This breezy crochet sweater blouse is the perfect combination of cozy comfort and chic flair, offering versatility for any casual or semi-formal occasion.

A crochet sweater blouse with lace panels is both elegant and comfortable. This design blends a stylish look with a soft, handmade touch. The lace pattern adds a delicate and airy feel, making it perfect for layering during cooler months or wearing on its own in warmer weather. It’s light, stretchy, and incredibly versatile.
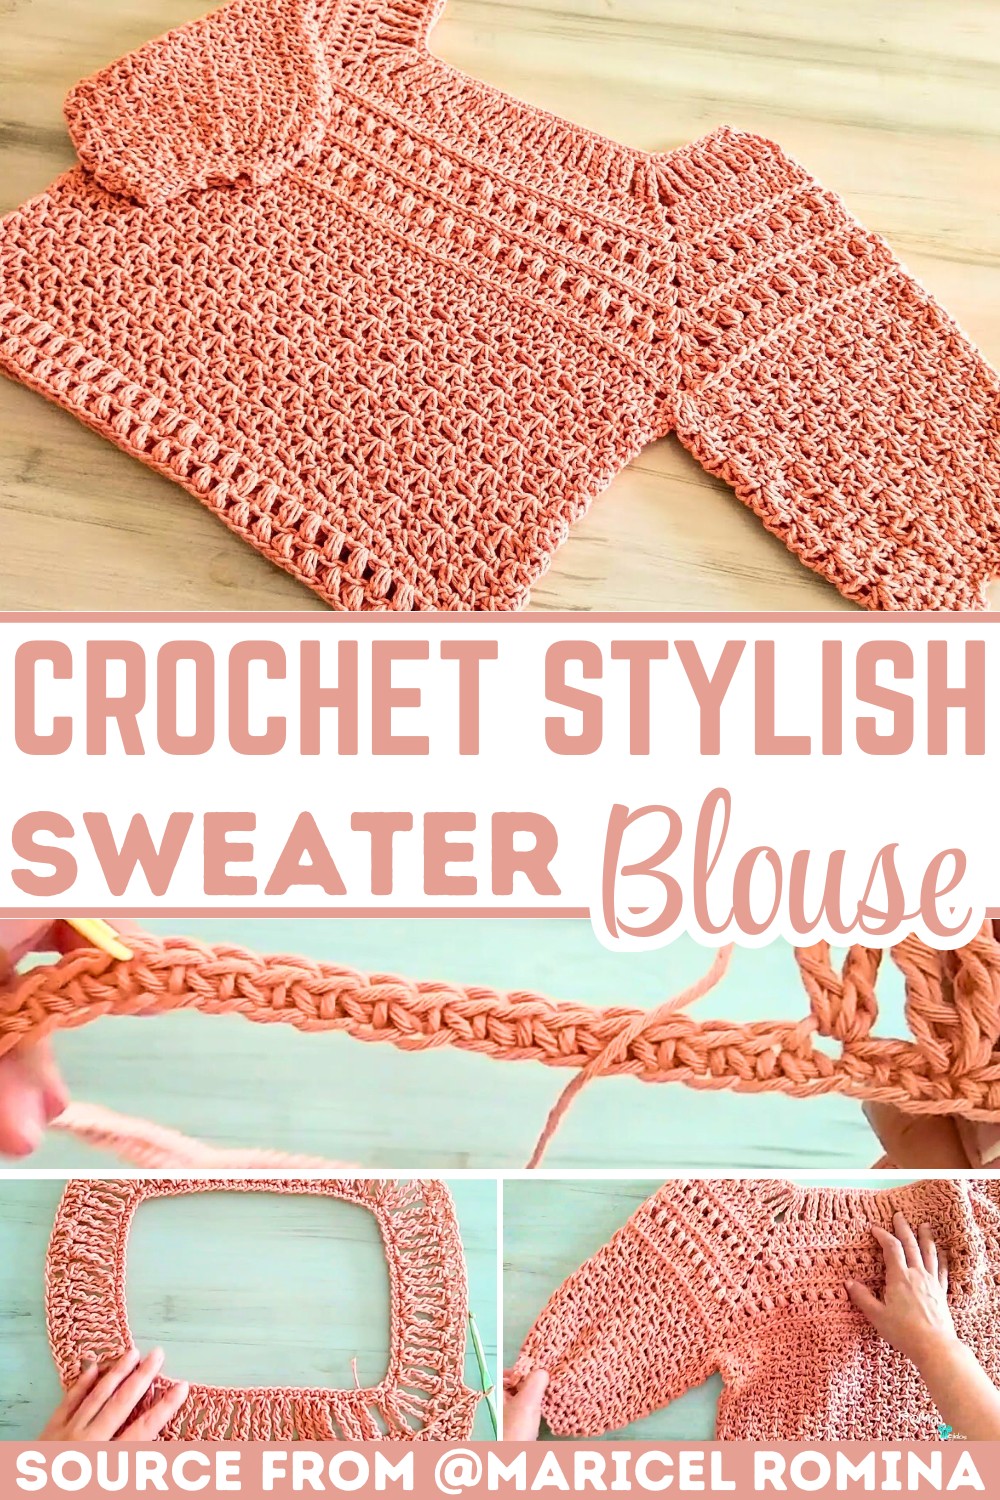
Crochet Stylish Sweater Blouse for Any Occasion
Crocheting this piece is simple yet fulfilling. The lace panels are the highlight; they give the sweater its graceful and decorative charm. If you’re aiming to try something new or want to make a gift for someone special, this blouse can be a delightful addition to a wardrobe. Plus, beginners can enjoy learning new techniques while experienced crocheters can appreciate the stylish design.
Credit Maricel Romina
Key Features and Construction Highlights:
- Begins with a customizable foundation chain worked in the round to match your bust size.
- Constructed in continuous rounds for a seamless, smooth body with optional texture variations.
- Features unique sleeve shaping with options for decorative stitches like shells or puffs for added character.
- Allows neckline customization with a V-shape or rounded edge for a personalized look.
- Finished with elegant borders and optional embellishments for a polished, tailored appearance.
How the Sweater Blouse is Made
The pattern begins with a foundation chain that matches your bust circumference, plus a little extra for ease and comfort. Once the chain is joined to create a round, a sturdy base is established with a row of single crochet. This ensures a solid, structured start that won’t lose shape over time. From there, the main body of the blouse is worked in continuous rounds of double crochet, which not only creates a beautiful fabric but also eliminates the need for joining and turning after every row. This process makes the blouse both beginner-friendly and quick to work up, with the option to add texture by incorporating stitch variations such as clusters or alternating rows of single crochet.

Once the body reaches the desired length, the shaping for the sleeves begins. This is achieved by dividing the round into four sections—front, back, and two sleeve openings. Using stitch markers to outline these areas ensures a clean division between panels. Additional chains are added as needed for width, and the sleeves are worked in rows to create a flattering drape. You can keep it simple with double crochet or experiment with decorative stitches, like shells or puffs, to give the sleeves a playful, boho vibe.

The neckline is another area where you can truly make the piece your own. For a flattering V-neck, gentle decreases are worked in the center of the front panel to bring the neckline to a point. Alternatively, a round neckline can be achieved with slip stitches to shape the curve.

Finally, the blouse comes together as the panels are joined at the seams using either slip stitches or a yarn needle. Once assembled, finishing touches like borders and embellishments add elegance and structure. A row or two of single crochet, or a more detailed border like shell stitches, around the neckline, cuffs, and hem, provides a cohesive, professional finish. You can even add buttons, ties, or crochet flowers to reflect your personal style.

Video Tutorial
Step-by-Step Pattern
Materials
To make your crochet sweater blouse, you’ll need the following materials:
- Yarn: Choose a medium-weight yarn (category 4). Cotton yarn or a wool-acrylic blend works well for a lightweight but warm sweater.
- Crochet Hook: Use a hook size recommended on the yarn label (typically 4.0 mm – 5.0 mm for medium yarn). Adjust based on your gauge and desired texture.
- Scissors: For cutting the yarn when finishing.
- Tape Measure: To check your measurements and ensure a good fit.
- Stitch Markers: Helpful for marking stitch placements, especially for shaping the neckline or sleeves.
- Yarn Needle: For weaving in ends and sewing seams.
Pattern Instructions
Foundation Steps
- Create the Base:
- Start by crocheting a foundation chain long enough to fit around your bust circumference. Add extra chains for ease (typically 5-10 chains).
- Join the chain ends with a slip stitch to form a round.
- First Row:
- Work a round of single crochet (sc) into each stitch of the chain. This creates a sturdy base.
- Main Body:
- For rows 2–10 (or desired length), switch to double crochet (dc) and work in continuous rounds.
- Optionally include pattern variations such as alternating rows of single crochet or clusters for texture.
Shaping the Sleeves
- Separate for Sleeves:
- To form the sleeves, divide the round into four sections: front, back, and two sleeves. Use stitch markers to outline these sections.
- Begin crocheting each section independently, starting with the front panel.
- Sleeve Construction:
- Chain additional stitches where required to create sleeve width.
- Work in rows to build length, using double crochet or other decorative stitches such as shell or puff stitches for texture.
Shaping the Neckline
- Adjust Neckline Depth:
- To create a V-neck, gradually decrease stitches in the middle section of the front panel.
- For a round neckline, use slip stitches to shape the curve.
Joining Panels
- Seam Assembly:
- Use slip stitches or a yarn needle to join the different panels together: front, back, and sleeves.
- Ensure seams are even and neat for a polished finish.
Decorative Touches
- Border Design:
- Add borders to the neckline, cuffs, and hem using simple single crochet or shell stitches. This adds structure and elegance.
- Final Embellishments:
- Consider adding buttons, ties, or a crochet flower as embellishments for personalization.
Finishing
- Weave Ends:
- Use a yarn needle to carefully weave in all loose ends.
- Ensure the seams and borders look clean and professional.
- Block Your Sweater:
- Lightly wet or steam your blouse and lay it flat on a drying rack. Shape it gently to ensure the correct fit and keep edges flat.
Troubleshooting and Suggestions
Common Issues and Tips:
- Foundation chain too tight: If you find the base is pulling or doesn’t stretch easily, consider using a larger hook size for the chain and switching back to the recommended size for the body.
- Uneven panel divisions: Double-check your stitch counts when marking the front, back, and sleeve sections to ensure symmetry.
- Sloppy seams: Take extra care to align your pieces properly before joining. Using stitch markers along the edges can help maintain even seams.
Creative Modifications:
- Experiment with color blocking or striping by alternating yarn colors for distinct panels or rows.
- Shorten the sleeves for a trendy, cap-sleeve look or extend them to a full length for added coziness.
- Add a touch of whimsy with fringe or tassels at the hem or sleeve edges.
- For extra texture, use corner-to-corner (C2C) crochet or a lacy stitch pattern in the sleeve or body panels.