Crochet Granny Square Cardigan with Flower Motifs
Looking for a cozy granny square cardigan with a floral finish? This medium-size design combines colorful flower squares with soft ribbed edges.
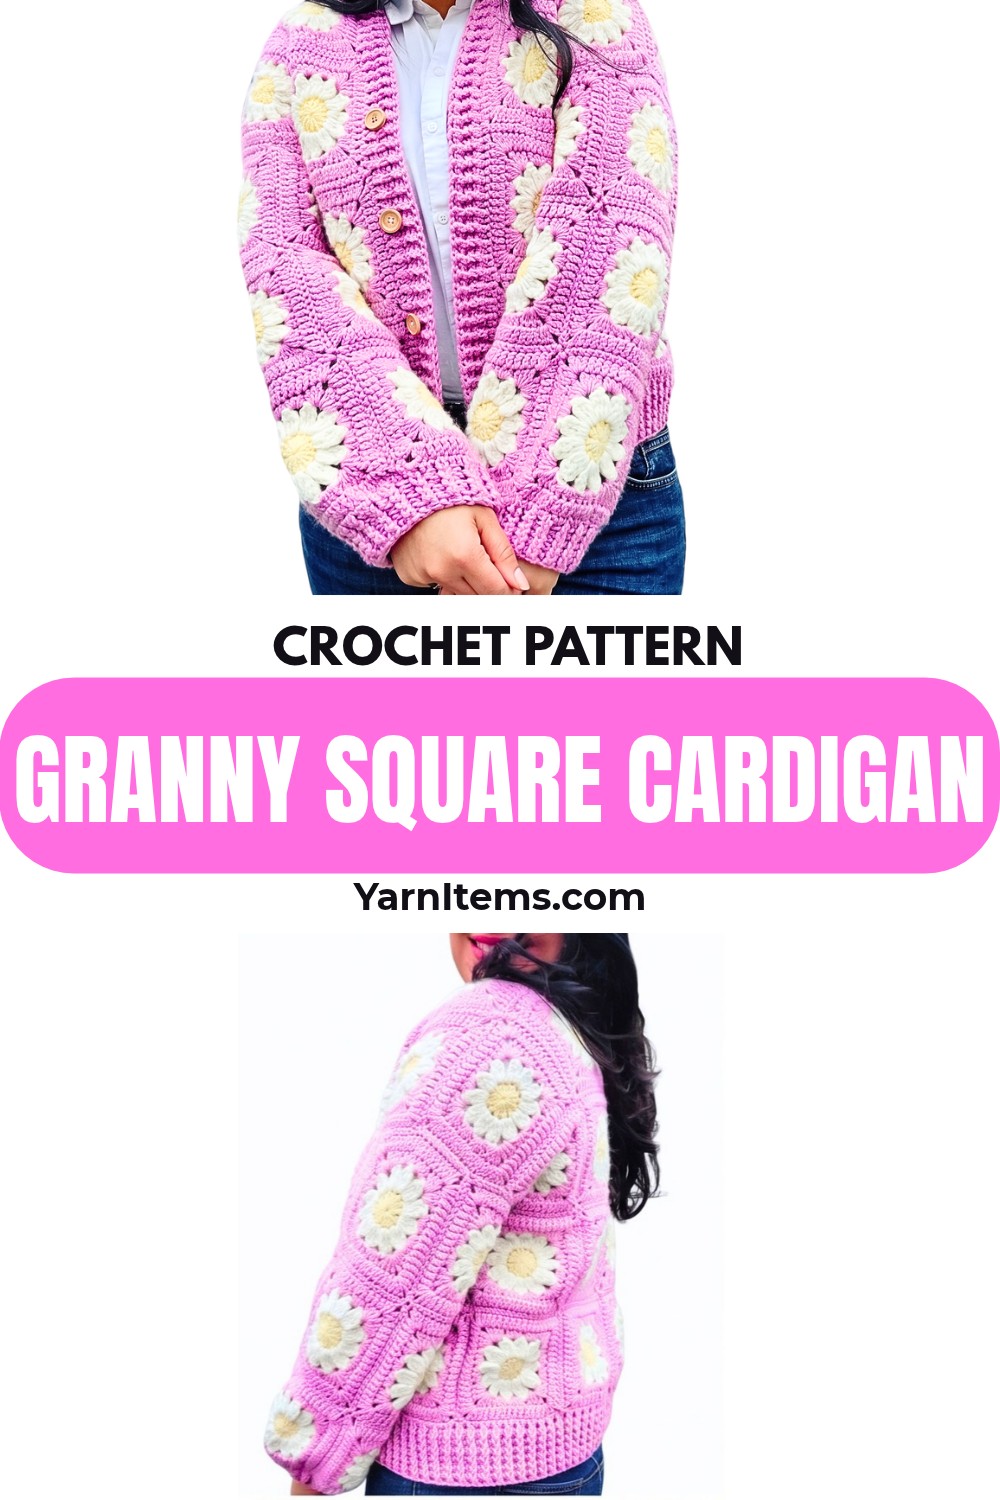
Bright flower centers, soft petals, and a contrasting border give this crochet granny square cardigan a cheerful handmade character. Designed in worsted-weight Drops Nepal yarn, the medium-size version uses 54 floral squares arranged into a back panel, two front panels, and two sleeves. Five buttons and matching ribbed edging complete the cozy crochet cardigan.
Working begins with the individual flower crochet squares, which are shaped into neat rectangles through the final border round. Once all 54 squares are ready, they are joined into panels before the sleeves are extended and attached. The neckline, button band, sleeve cuffs, and seven-row bottom hem are then added, so each stage can be checked before moving to the next.
Credit: Leonela Cevallos
Materials & Tools Needed
-
Yarn: Drops Nepal, worsted weight, 75 meters / 50 grams, a wool and alpaca blend
-
Yellow for the flower centers
-
White for the petals
-
Pink for the main color and borders
-
-
Crochet Hook: 5.0 mm
-
Stitch markers
-
Tapestry needle
-
Scissors
-
Buttons: 5 buttons
Finished Size & Customization
The tutorial provides the square count and measurements for a Size Medium.
The cardigan can be adjusted in several ways:
-
Make more or fewer granny squares for the main panels to change the overall width.
-
Add rows of double crochet along the vertical sides of the sleeve panels when a little additional sleeve width is needed.
-
Add or remove horizontal rows of squares on the back and front panels to change the cardigan length.
-
Keep the individual squares consistent in size so the panels remain easy to align during joining.
Crochet Abbreviations
US crochet terms are used throughout.
-
ch: Chain
-
sl st: Slip Stitch
-
sc: Single Crochet
-
hdc: Half Double Crochet
-
dc: Double Crochet
-
tr2tog: Treble Crochet Two Together
-
tr3tog: Treble Crochet Three Together
-
fpdc: Front Post Double Crochet
-
bpdc: Back Post Double Crochet
-
dc2tog: Double Crochet Two Together

Crochet the Granny Squares
Make 54 granny squares for the Size Medium cardigan.
Each square begins as a yellow flower center, receives white petals, and is then squared off with pink yarn. Keeping your tension consistent from the first square to the last will make the later panel joining much easier.
Flower Center
-
Round 1: Make a magic ring and ch 2, with the initial ch-2 not counting as a stitch; place 12 dc into the magic ring; pull the yarn tail to close the ring tightly; sl st into the first dc, ch 1, and cut the yarn, leaving exactly 12 dc.
Check the center before moving on. The magic ring should be closed firmly enough that there is no large hole in the middle, while the 12 dc should still sit comfortably around the center.

Flower Petals
-
Round 2: Attach the white yarn with a knot into any dc from the previous round; ch 3, then work 1 tr2tog into the same space and close them together, with this beginning cluster counting as the first tr3tog; ch 2; work 1 tr3tog into the next stitch, ch 2, and repeat around until you have 12 petal clusters in total; sl st into the top of the first tr3tog, ch 1, and cut the yarn.
The 12 petal clusters should form a complete flower around the yellow center. If the petals appear crowded or the flower is twisting, check your stitch placement before beginning the pink border.
Square the Flower
-
Round 3: Attach the pink yarn into any ch-2 space; ch 3, which counts as the first dc, and work 2 dc into the same space; work 3 hdc in the next ch-2 space; work 3 hdc in the next ch-2 space; in the following ch-2 space work the first corner as (3 dc, ch 2, 3 dc); repeat the side sequence of 3 hdc in the next space, 3 hdc in the next space, and (3 dc, ch 2, 3 dc) in the following space until 4 sides are completed; in the final starting space work 3 dc, ch 1, and 1 sc into the 3rd chain of the initial ch-3 to close the round and position the hook for the next round.
Tip: Crochet over the yarn tails as you work this round. Doing so can reduce the amount of weaving needed later.
At this stage, the flower should visibly be changing from a round motif into a square. Pay particular attention to the four corner spaces because they determine how neatly the squares will sit beside one another.
Final Square Border
-
Round 4: Ch 3 and work 1 dc into the same corner space; work 1 dc into each of the next 12 stitches; in the next corner space work (2 dc, ch 2, 2 dc); repeat the sequence of 1 dc in the next 12 stitches followed by (2 dc, ch 2, 2 dc) in the next corner around all four sides; in the final starting chain space work 2 dc, ch 2, and sl st into the 3rd chain of the initial ch-3; ch 1 to secure and cut the yarn.
Check that the finished square has four clear corners and reasonably straight sides. Consistent squares will make the larger panels much easier to arrange and join.
Arrange the Granny Squares
Once all 54 squares are complete, sort them into their individual panel layouts before joining.
-
Back Panel: Arrange 20 squares into a grid of: 4 columns × 5 rows
-
Front Panels: Arrange 16 squares total into two front panels, with each front panel using: 2 columns × 4 rows
-
Sleeves: Use the remaining 18 squares for the sleeves, arranging: 3 × 3 squares for each sleeve
Lay all the squares flat before joining. This gives you an opportunity to check the color distribution and make sure every square is facing the same direction.

Join the Panels with a Continuous SC Join
The panels are joined with pink yarn using a continuous single crochet method.
-
Horizontal Join: With the right sides of the squares facing each other, hold the first pair together with the wrong sides facing outward; attach pink yarn through the corner chain spaces of both squares and ch 1, which counts as a sc; work 1 sc into each of the next 16 stitches through the outer loops of both squares; work 1 sc into the next chain space; take the next pair of squares, keep them close, and work 1 sc into their starting chain spaces followed by 16 sc across their edges; repeat this process until the entire horizontal row is joined.
Working through the corresponding outer loops keeps the join neat and consistent. Match the square corners carefully as you go so the pink joining line does not gradually shift away from the corners.
-
Vertical Join: Turn your work 90 degrees and repeat the same single crochet joining method vertically; when reaching an intersection between previously joined seams, ch 1 to skip over the joined seam and then work sc into the next chain space.
Continue until the complete back, front, and sleeve panels have been joined.
Extend the Sleeves
Before attaching each sleeve to the body, add the extra vertical rows specified in the tutorial.
-
Sleeve Extension: Attach pink yarn to a corner space on the vertical edge of the sleeve panel; work a row of straight dc, placing 1 dc into each stitch and each join, down one vertical side; repeat the same process on the opposite edge of the sleeve.
These added rows provide the necessary width before the sleeve is attached. Keep both sides as even as possible so the sleeve remains balanced when folded.
-
Sleeve Attachment: Fold the sleeve in half lengthwise and line up the top center point with the shoulder seam of the main body, keeping the right sides touching; use a tapestry needle and pink yarn to whip stitch the sleeve securely to the body.
Repeat for the second sleeve.

Join the Body
Place the front panels over the back panel with the right sides touching.
-
Shoulder Seams: Whip stitch along the shoulder seams through both loops, keeping the front and back edges aligned.
-
Side Seams: Fold the cardigan and use the same SC joining method down the underarms and along the side seams.
Before completing the side seams, check that the sleeve openings and bottom edges line up naturally. This is the point where an uneven panel arrangement is easiest to correct.
Crochet the Neckline & Button Band
The neckline receives a shaped first row followed by textured ribbing.
Neckline Base
-
Row 1: With the right side facing, attach pink yarn to the bottom right front corner; ch 3 and work 1 dc in the same space; continue with 1 dc into each stitch and joining gap up the edge; place stitch markers on the 4th dc from the inner top corners of each front panel to mark the neckline; when reaching the first marker, work 1 hdc in each of the next 4 stitches and place the marker back on the first hdc; work sc around the back neck spaces and shoulder seams; on the opposite side, mirror the shaping by working sc, then 4 hdc and moving the marker, followed by dc down the left front edge; finish with 2 dc in the final corner.
The stitch markers help you keep the V-neck shaping balanced. Rather than estimating the corresponding point on the second side, use the first shaped section as your reference when working the opposite side.

Ribbed Neckline
-
Row 2: Ch 2 and turn; work 1 dc in the first space; alternate 1 fpdc and 1 bpdc up to the stitch marker; work 1 hdc in each of the 4 hdc stitches, sc in the sc stitches around the back neck, and 1 hdc in each of the next 4 hdc stitches; resume the fpdc/bpdc ribbing down the remaining edge.
-
Rows 3 to 5: Repeat Row 2 until you have 5 rows total for the neckline and button band.
The front ribbing should remain flexible enough for the cardigan to open comfortably while maintaining the V-neck shape.
Attach the Buttons
Sew 5 buttons onto the left front ribbed band, positioning them up toward the chest to follow the V-neck shape.
The ribbing naturally creates spaces that can accommodate the buttons, so separate buttonholes are not required.
Finish the Sleeve Cuffs
The sleeve cuffs begin with decreases to taper the wider sleeve opening toward the wrist.
Cuff Decreases
-
Round 1: Attach pink yarn to the bottom seam of the sleeve; ch 2 and dc into the next space to begin the dc2tog decrease; continue working dc2tog around the entire cuff circumference to taper the sleeve; sl st to join.
Ribbing
-
Round 2: Ch 2; alternate 1 fpdc and 1 bpdc around the cuff; sl st to join.
-
Rounds 3 to 6: Repeat Round 2 until the cuff has 6 rounds total.
Repeat the complete cuff process for the second sleeve.
Check both cuffs side by side before finishing. Matching their height and general width will give the cardigan a more balanced appearance.
Add the Bottom Ribbed Hem
The bottom edge is finished with the same textured fpdc/bpdc ribbing used on the cuffs and button band.
-
Bottom Hem: With the right side facing, attach pink yarn to the bottom edge; work the ribbed pattern across the entire bottom by alternating 1 fpdc and 1 bpdc.
Hem Rows
-
Rows 1–7: Continue the fpdc/bpdc ribbing until you have 7 rows total for the bottom hem.
Keep the ribbing consistent across the width of the cardigan. If the hem begins to pull inward noticeably, check your stitch tension before continuing.

Final Finishing
Weave in the Ends
Use a tapestry needle to weave in any remaining loose yarn ends securely on the wrong side of the cardigan.
Final Shape Check
Lay the cardigan flat and gently straighten the panels, sleeves, neckline, cuffs, and bottom hem.
Check that:
-
The four corners of each granny square remain clearly defined.
-
The back panel has 20 squares arranged in 4 columns by 5 rows.
-
Each front panel has 8 squares.
-
Each sleeve uses its 3 × 3 arrangement plus the added vertical dc rows.
-
The neckline shaping is balanced on both sides.
-
The five buttons sit evenly along the left front band.
-
Both sleeve cuffs have the same ribbing height.
-
The bottom hem has 7 rows of ribbing.
-
All loose ends are securely woven in.
Warm worsted-weight Drops Nepal yarn gives this floral granny square cardigan a soft, cozy feel, while the flower centers, contrasting petals, pink borders, and textured ribbing give the finished garment plenty of visual interest.