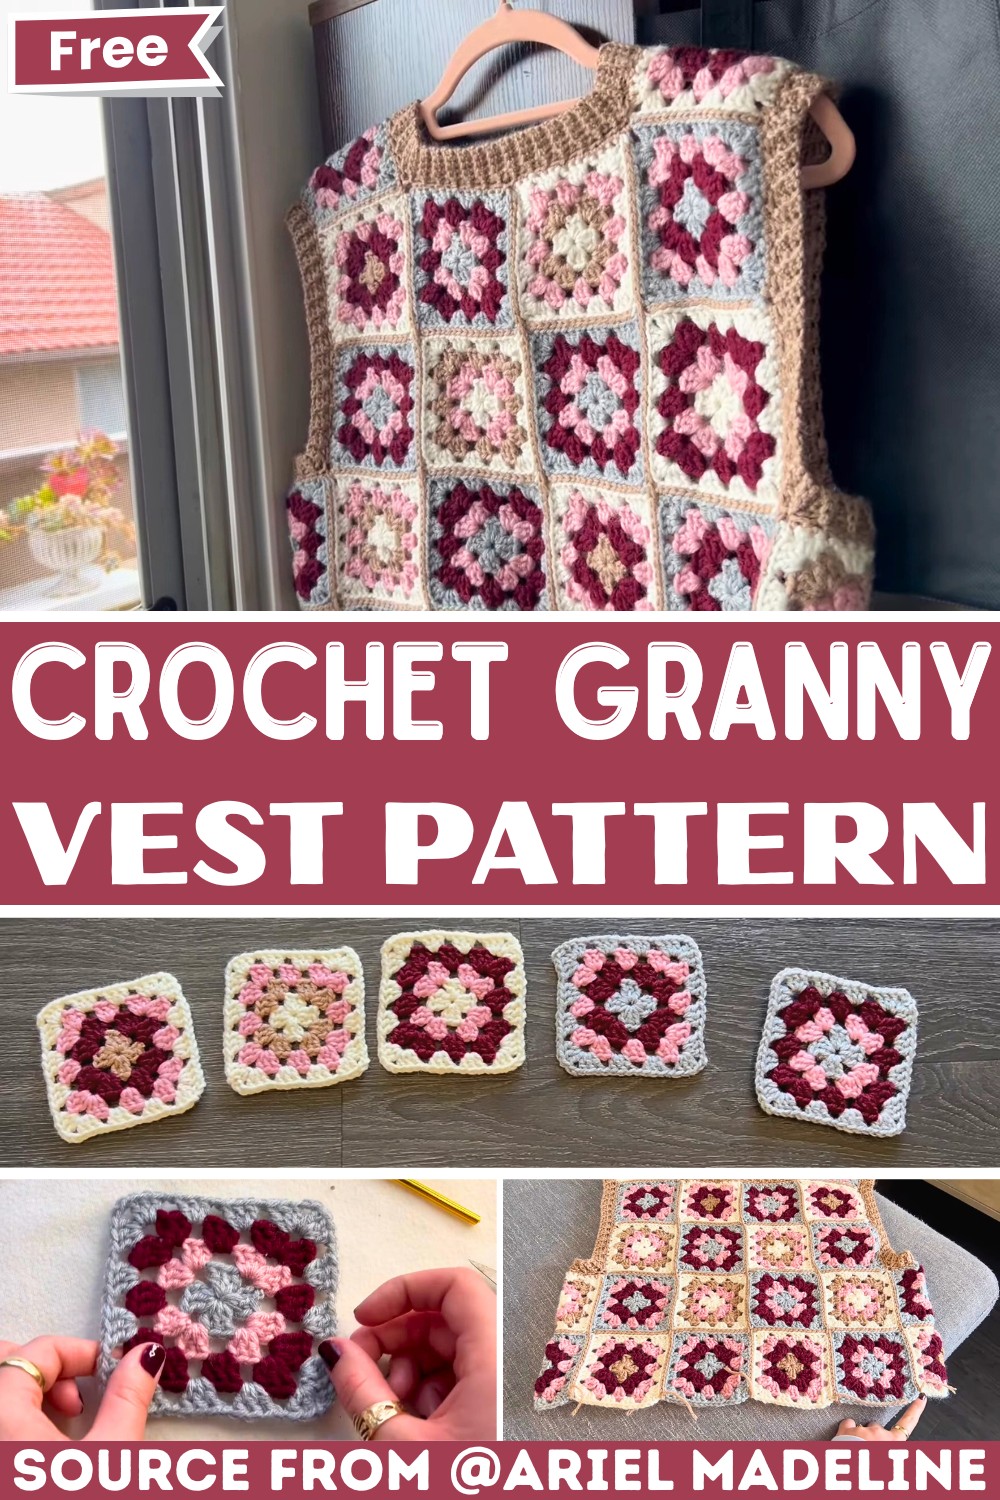
This vibrant granny square vest is the perfect blend of retro charm and modern style, making it an ideal wardrobe staple for layering all year long.

A granny square vest is a timeless and stylish wearable item. Its charm lies in its colorful and versatile design. This vest is made from small, square crochet pieces called granny squares, which are beautifully arranged and stitched together. Perfect for any season, it can add a cozy and creative touch to your daily wardrobe. Whether paired with jeans, a skirt, or layered over a dress, it’s a fun and playful addition to any outfit.
Granny Square Crochet Vest Pattern
Crocheting this vest is simple and suitable for beginners. You’ll create small granny squares using various yarn colors, then combine them to form the vest. Adding final touches like ribbing around the neckline, armholes, and bottom gives it a neat finish. The best part? You can customize it by using colors you love or yarn you already have at home, making every vest unique and truly yours.
Credit Ariel Madeline
Key Features and Pattern Overview:
- Created using iconic granny squares, stitched together into front and back panels.
- Features a customizable fit by adjusting the number and size of squares.
- Seamless construction with single crochet joins for clean and sturdy edges.
- Ribbing detail along the armholes, neckline, and bottom hem adds a professional, polished finish.
- Multiple color combinations are showcased, providing endless opportunities to get creative with your yarn stash!
Pattern Walkthrough:
This tutorial walks you through the creation of a classic crochet staple: a granny square vest. The pattern begins with crocheting simple yet timeless granny squares. Each square is worked using a combination of double crochets and chain stitches, building outward in rounds to achieve a 4″ x 4″ square. The beauty of this pattern lies in its flexibility—you can customize the colors and size of the squares to match your style or fit preference.

Once the squares are complete, they are arranged into panels: the front, back, sides, and shoulders. The tutorial uses a single crochet seam method to join the squares, ensuring strong and neat connections while keeping each seam uniform. The vests’ construction relies on aligning the squares carefully (wrong sides together) and crocheting along the edges for a seamless look.

After assembling the main panels, attention shifts to the vest’s finishing details: the ribbed edges around the armholes, neckline, and bottom hem. This ribbing is created using single crochet stitches worked in the back loop only, which creates a stretchy, ridged texture. Adjustments to the ribbing length (e.g., five stitches for the neckline, seven stitches for the hem) allow for varied widths that give a well-balanced, polished appearance to the finished piece.

A practical tip shared in the tutorial is to crochet over yarn tails whenever possible to save time during finishing. For the armholes, strategic single crochet decreases ensure a snug fit, and the ribbing is worked seamlessly around the edges to pull the entire garment together.

Video Tutorial
Step-by-Step Pattern
Materials
To create this beautiful granny square vest, you’ll need the following:
- Yarn: Any worsted weight yarn. This pattern uses stash yarn with 3–4 colors per square for variety.
- Crochet Hook: H/8 (5mm) or size matching your yarn weight for proper tension.
- Scissors: For cutting yarn.
- Tapestry Needle: For weaving in ends.
Pattern Instructions
Step 1: Creating the Granny Squares
- Round 1
- Create a slip knot and chain 3.
- Slip stitch into the first chain to form a loop.
- Chain 4 (this counts as 1 dc + chain 2 for a corner).
- Into the center of the loop, make 3 double crochets (dc). Chain 2.
- Repeat: 3 dc, chain 2, two more times. (You’ll now have four “clusters” with chain-2 corners in between.)
- To finish: Make 2 dc into the center, then slip stitch to the second chain in the starting chain 4.
- Changing Colors
- Cut the current yarn, leaving a small tail. Pull the yarn tightly to secure.
- Attach your new color to any corner space by slip stitching the yarn into place.
- Round 2
- Chain 4 (this counts as 1 dc + chain 2 for a corner).
- In the same corner space, make 3 dc.
- Chain 1, move to the next corner, and make 3 dc, chain 2, 3 dc. Repeat this for the remaining corners.
- To finish: Make 2 dc into the starting corner, and slip stitch to the second chain of the starting chain 4.
- Round 3 & 4
- Repeat the process from Round 2. Increase the number of 3-dc clusters per side as the square grows:
- Round 3: Each side will have 3 clusters.
- Round 4: Each side will have 4 clusters.
- Finish off your square by cutting the yarn, pulling tight, and weaving in loose ends.
- Repeat the process from Round 2. Increase the number of 3-dc clusters per side as the square grows:
Step 2: Assembling the Vest
- Layout
- Arrange the granny squares into two 4 x 4 panels (front and back).
- Use 1 square to join the tops of the panels at each shoulder.
- For the sides, seam up 2 additional granny squares for a medium size (adjust if needed for preferred fit).
- Seaming the Squares
- Use the single crochet seam method:
- Place two granny squares with wrong sides together.
- Work through the corner chains of both squares. Yarn over and pull through both squares. Yarn over again and pull through all loops on your hook. Continue along one edge until seam is complete.
- Use the single crochet seam method:
Step 3: Adding Ribbing
- Armhole Ribbing
- Cinch the Armhole: Single crochet evenly around the armhole edge, making 3 sc stitches into most spaces but skipping 1 stitch occasionally to slightly reduce the opening. Slip stitch to the first sc to finish.
- Create Ribbing:
- Chain 4. Turn, skip the last chain, and sc into the back loop of each remaining chain (3 sc total).
- Slip stitch into the next stitch on the armhole edge, skip 1 stitch, and turn the work.
- Continue working 3 BLO single crochets in a ribbed pattern, attaching to the armhole edge with a slip stitch after each row.
- Neckline Ribbing
- The neckline ribbing is worked the same way as the armholes but with a longer chain of 5 stitches for a more prominent look.
- Bottom Ribbing
- The bottom edge ribbing follows the same steps but begins with a chain of 7 stitches to form a wider band at the hem.
Final Touches
- Weaving Ends: Use a tapestry needle to weave in any remaining yarn tails for a neat finish.
- Fit Check: Try on your vest before moving on to other adjustments or final blocking.
- Blocking: Lightly block your vest to help shape and even out the granny squares if necessary.
Troubleshooting and Suggestions:
Common Issues:
- Color changes: If you’re switching colors often, make sure to knot securely and weave in the ends neatly as you go to avoid loose strands showing.
- Lopsided granny squares: Double-check your stitch count on each round, especially at the end—remember that the final side often requires fewer stitches than the others!
- Seaming alignment: Always start connections at clearly defined corner stitches to keep squares perfectly aligned and maintain a clean look.
Creative Modifications:
- Play with color blocking by alternating solid-colored squares with multi-colored ones.
- Add embellishments like embroidered flowers, appliques, or fringe along the bottom hemline to give your vest a personalized twist.
- Experiment with yarn weights—bulky yarns can create a cozier winter look, while lighter cotton yarns are perfect for summer layering.
- Extend the pattern by adding more rows or panels, transforming the vest into a granny square cardigan or a longer sweater dress.