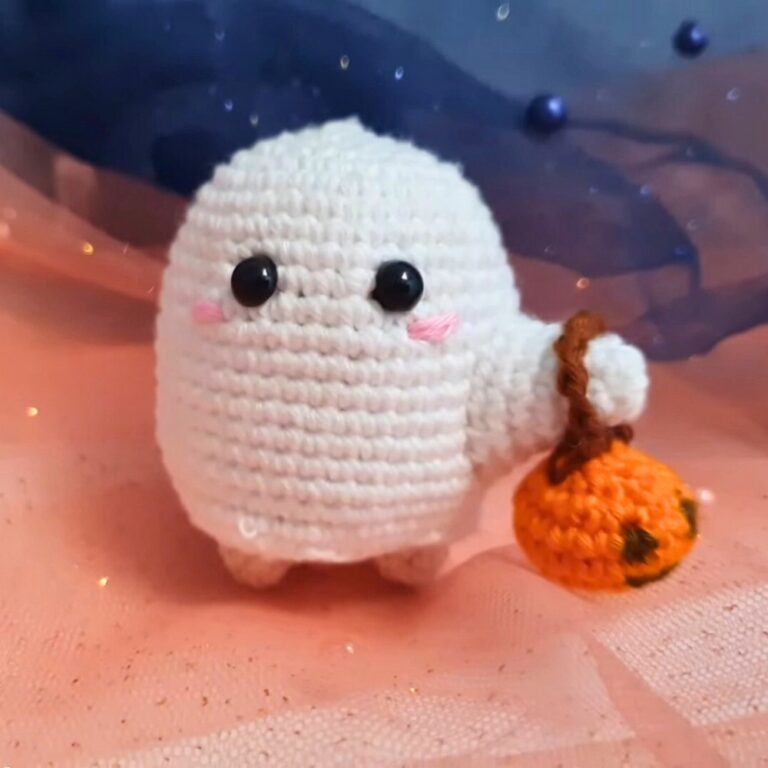
These adorable Halloween ghosts are perfect for decorating your mantle or creating a spooky keychain.
Creating a crochet ghost is a wonderful way to enjoy making things by hand. This easy tutorial is designed for beginners and experienced crocheters who love fun design. You can make these small ghosts for Halloween decorations, gifts, or just to add a playful touch to your space. With their adorable design, they’re sure to bring smiles and a cozy handmade feel.

Crochet Amigurumi Ghost
These little ghosts are quick to make and don’t need much material. All you need is white yarn, a crochet hook, a bit of stuffing, and some safety eyes. You can even add a tiny smile and rosy cheeks for extra personality. This design is easy to follow, perfect for relaxing, and allows you to use your imagination.
Pattern Highlights:
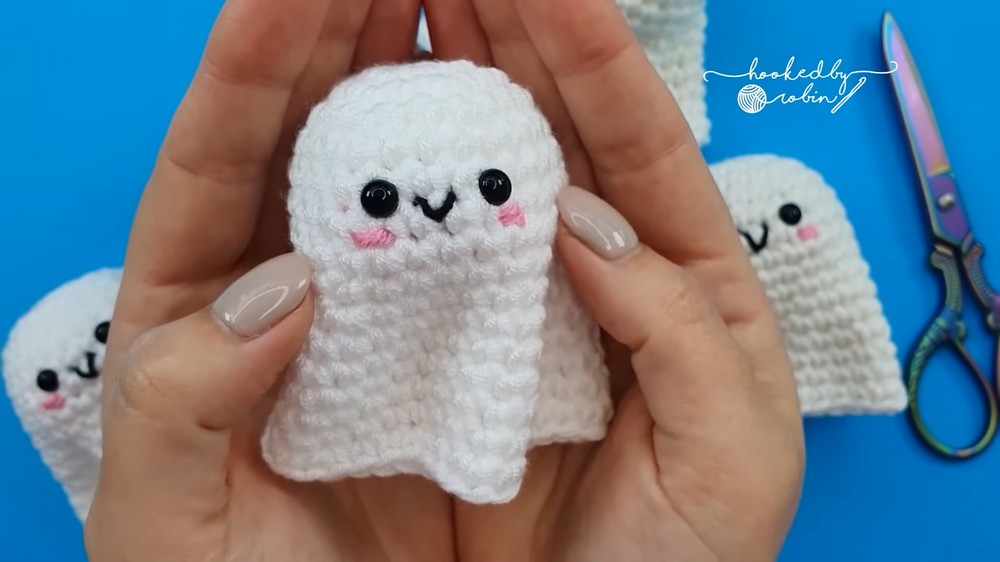
- Two-part construction: The ghost consists of a structured head wrapped in a flowing sheet-like body.
- Beginner-friendly techniques: Start with a magic ring, work in continuous rounds, and add simple single crochet increases and decreases.
- Playful details: Add safety eyes and optional embroidery for a smile and rosy cheeks.
- Shaping magic: Pinch and fold the sheet for dramatic draping that brings the ghost to life.
- Versatile uses: Leave them freestanding for decorations or easily adapt them into playful keychains.
Fun and Simple Construction
Making this charming little ghost begins with the magic ring technique to form the ghost’s flowing sheet. Once the base is established, you’ll work in continuous rounds to gradually expand the shape through single crochet increases. This creates a cone-like structure that mirrors a ghostly sheet. Don’t worry about ultra-tight stitches; this pattern intentionally embraces a slightly looser stitch texture, adding to the playful and airy look.

After completing the sheet, it’s time to crochet the inner structure: the head. Using basic amigurumi techniques, the head is formed by crocheting a small, firm sphere filled with stuffing to help the ghost maintain its shape. This durable little feature is tucked inside the sheet during assembly, ensuring your ghost stands proudly without collapsing.
Bringing Your Ghost to Life
The real charm lies in the details! The tutorial guides you on positioning 6mm safety eyes between the proper stitch rounds for a delightfully spooky yet cute expression. An optional embroidered smile and blush cheeks using scraps of black and pink yarn elevate the ghost’s personality—you can make them happy, shy, or even mischievous! If your yarn feels too thick for embroidery, simply separate the strands for finer detailing.

Once the face is complete, you’ll secure the head and ghost sheet together for assembly. The folds and shaping of the sheet are left to your imagination, allowing you to pinch and mold it for the perfect “floating ghost” look. Adjust the eyes or fluff up the blush cheeks for that last bit of charm—it’s these little touches that truly breathe life into your creation.

Materials
You will need the following materials to create your amigurumi ghost:
- White Yarn: DIY Glow Lion Brand Yarn works excellently if you want glow-in-the-dark effects, but you can also use regular white acrylic yarn.
- Black Yarn: For stitching the ghost’s mouth.
- Pink Yarn: For optional blush cheeks.
- Crochet Hook: 4 mm hook (adjust if needed for your yarn).
- Stuffing: A small amount of fiberfill for the ghost’s head.
- Safety Eyes: 6 mm size.
- Stitch Marker: For marking rounds (especially useful with white yarn).
- Scissors: To trim yarn ends.
- Large-Eye Needle: For weaving in ends and assembling the ghost.
Stitch Guide
Here are the basic stitches and techniques used in this pattern:
Magic Ring
A foundation technique that creates a tight, adjustable loop for starting circular design. Wrap yarn around your fingers and crochet into the centre to begin.
Single Crochet (SC)
Insert your hook into the stitch, yarn over, pull through, then yarn over again and pull through both loops on your hook.
Increase
Work two single crochets into the same stitch.
Invisible Decrease
Pick up the front loops of the next two stitches, yarn over, pull through both loops, then complete a single crochet as usual.
Slip Stitch
Insert your hook into the stitch, yarn over, pull through the stitch and the loop on your hook.
Notes
- Gauge: Gauge isn’t crucial for this ghost, as the shape can be adjusted. Tight stitches are generally preferred for amigurumi, but the ghost’s “sheet” can be looser for a floaty effect.
- Customization Ideas:
- Use glow-in-the-dark yarn for added whimsy.
- Add facial expressions (e.g., sleepy eyes or a mischievous grin).
- Experiment with blush colours to give your ghost a unique personality.
Pattern Instructions
Part 1: Crochet the Ghost’s Sheet
- Start with a Magic Ring
- Chain 1 (does not count as a stitch).
- Make 6 single crochets into the ring.
- Tighten the centre and mark your first stitch with a stitch marker.
- Round 2 (Increase Round)
- Work 2 SC into each stitch (12 stitches total).
- Mark the first stitch of the round.
- Round 3
- Alternate: Work 1 SC into the next stitch, then 2 SC into the following stitch (18 stitches total).
- Round 4
- Alternate: Work 2 consecutive SC stitches, then 2 SC into the next stitch (24 stitches total).
- Rounds 5–6
- Work 1 SC into each stitch (24 stitches total per round).
- Round 7
- Work 1 SC into the next 5 stitches, then 2 SC into the following stitch. Repeat this sequence (28 stitches total).
- Rounds 8–9
- Work 1 SC into each stitch (28 stitches total per round).
- Round 10
- Work 1 SC into the next 6 stitches, then 2 SC into the following stitch. Repeat this sequence (32 stitches total).
- Rounds 11–12
- Work 1 SC into each stitch (32 stitches total per round).
- Round 13
- Work 1 SC into the next 7 stitches, then 2 SC into the following stitch. Repeat this sequence (36 stitches total).
- Rounds 14–15
- Work 1 SC into each stitch (36 stitches total per round).
- Round 16
- Alternate: Work 1 SC into the next 5 stitches, then 2 SC into the following stitch (42 stitches total).
- Round 17 (Final Round)
- Work 1 SC into the first stitch, then slip stitch into the next.
- Cut your yarn, leaving a tail for weaving in.
- Weave in the ends, flip the sheet inside out, and trim excess yarn.
Part 2: Crochet the Head
- Start with a Magic Ring
- Chain 1 and make 6 SC into the ring. Tighten and mark the first stitch.
- Round 2 (Increase Round)
- Work 2 SC into each stitch (12 stitches total).
- Round 3
- Alternate: Work 1 SC into the next stitch, then 2 SC into the following stitch (18 stitches total).
- Rounds 4–7
- Work 1 SC into each stitch (18 stitches total per round).
- Round 8 (Decrease Round)
- Alternate: Work 1 SC into the next stitch, then an invisible decrease over the next two stitches (12 stitches total).
- Stuff the head lightly with filling.
- Round 9 (Final Round)
- Work invisible decreases over all stitches (6 stitches total).
- Close the hole by weaving the tail through the front loops of the remaining stitches and pulling tight.
- Secure your yarn tail inside the head.
Part 3: Assemble the Ghost
- Turn the ghost’s sheet inside out again and attach the head to the sheet by sewing them together from the inside.
- Tie a secure knot to attach, hide the yarn tails, and flip the ghost’s sheet over the head.
Part 4: Add the Face
- Attach Safety Eyes
- Place the eyes between rows 6 and 7 of the sheet, with 2 gaps between the eyes.
- Add the backs to the safety eyes, and adjust their alignment by pressing them gently into the ghost’s head underneath the sheet.
- Embroidery the Mouth
- Using black yarn, stitch a small smile between the eyes. Knot the ends on the inside of the sheet and trim.
- Add Blush Cheeks
- Using pink yarn, stitch small blush spots under the eyes. Knot securely and trim the ends.
Shaping the Ghost
- Pose the Sheet: Pinch and fold areas of the ghost’s sheet to give it a floaty, whimsical appearance.
- Adjust the Eyes: Ensure the eyes are aligned adequately by gently pressing them into the underlying head.

Troubleshooting and Suggestions
Common Issues & Fixes:
- Stitch Consistency: Working with white yarn can make it tricky to see stitches. Try using a brightly colored stitch marker to ensure your counts stay accurate.
- Safety Eyes Placement: If the safety eyes look uneven, check they’re aligned in the correct stitch row before securing the backs. If they remain crooked, gentle pressure can adjust their placement.
- Loose or Tight Stitches: If your ghost appears too tight or too floppy, adjust your hook size or tension until it matches the shape you’re aiming for.
Creative Modifications:
- Customize the Colors: While white yarn offers that classic ghostly glow, try experimenting with pastel yarns for a whimsical ghost family!
- Glowing Ghosts: Take advantage of glow-in-the-dark yarn for an eerie nighttime effect—perfect for Halloween parties.
- Additional Embellishments: Add little bows, hats, or even tiny pumpkins to your ghost for extra personality. You can also include a keychain loop to turn this amigurumi into a portable friend.
- Multi-Purpose Design: Swap out the sheet-like design for a more defined “skirt” to adapt the ghost for holiday-themed decorations like angels or elves.
Your little ghost will quickly become a favorite seasonal decoration or gift. With simple stitches and endless possibilities for creativity, this pattern is sure to delight crocheters of all levels!