This stylish two-tone beanie is cozy, versatile, and perfect to brighten up cooler days.
This two-tone crochet beanie is a cozy and stylish accessory that’s perfect for keeping you warm during chilly days. With its beautiful blend of two colors, it stands out as a fun and versatile addition to any winter wardrobe. You can pick your favorite color combinations to match your personal style, making it a hat that feels truly your own.
Beautiful Crochet Two-Tone Beanie Pattern

Using basic stitches and easy color changes, you’ll get to see your crochet hat come to life row by row. You can even fold the brim for extra coziness and a sleek look. The stretchy design ensures it fits comfortably, and you can adjust it to match your head size. It’s not just a beanie, it’s a fun way to combine colors and make something unique.
Credit Crochet with MeMiMade
Key Features of the Pattern:
- Created by working in the round to achieve a seamless finish.
- Two contrasting yarn colors are used to create bold visual interest.
- Flexible sizing allows you to customize the fit to any head size.
- Features a combination of simple stitches like single crochet and slip stitch for clean, polished edges.
- The beanie is topped off with optional embellishments like pom-poms or buttons for a personal touch.
Overview of the Design and Construction:
This two-tone beanie begins at the base, working in the round from the brim upward for a smooth, seamless construction. The brim is typically made with a tighter stitch pattern, providing a snug yet stretchy foundation that fits securely around the head. You’ll use simple techniques, such as single crochet stitches, to create a neat band that holds the beanie comfortably in place.

Once the brim is completed, the body of the hat is made with two contrasting yarn colors. Color changes are introduced seamlessly, blending the tones while maintaining a crisp break between them. This adds depth and character to the design. You’ll use a mix of beginner-friendly stitches, perhaps double crochet or half-double crochet, to build consistent rows that stack elegantly, creating the solid shape of the beanie.
As you approach the crown, shaping techniques come into play to taper the edges and form the rounded top. This is achieved through gradual decreases, which narrow down the rows with precision. The pattern may include tips on counting stitches to ensure smooth transitions and avoid uneven tension during the decreases.

Finally, you’ll finish off the beanie by bringing the top stitches together—typically with slip stitches or a simple cinching technique—and weaving in the ends. Optional embellishments such as a fluffy pom-pom, decorative buttons, or handmade appliqué add a playful or personalized flair to the completed design. Whether left simple and sleek or dressed up, the final result is a modern accessory fit for any wardrobe.

Materials
You will need the following:
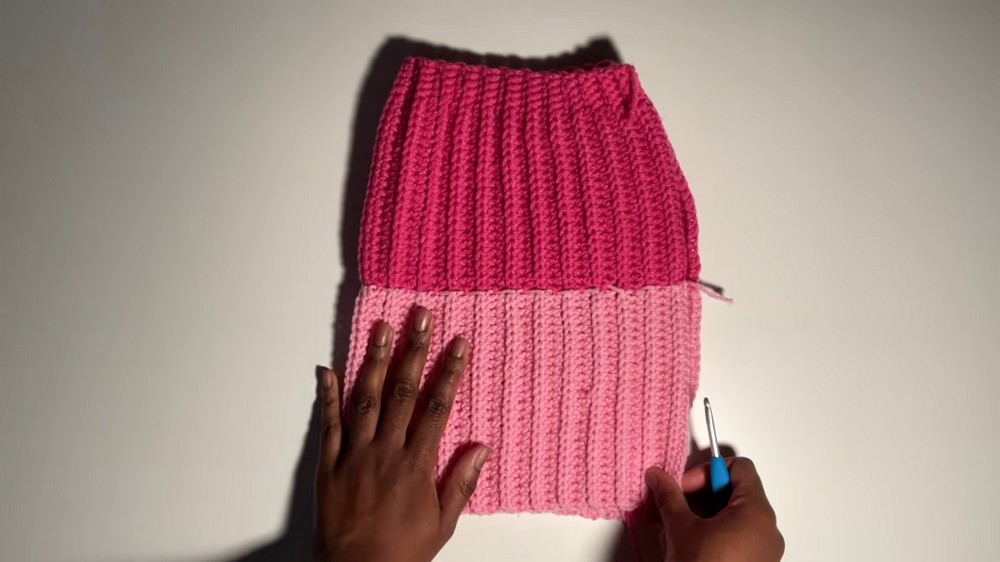
- Yarn: Two contrasting colors of medium weight yarn. This tutorial uses Hobby Lobby “I Love This Yarn” in dark pink (for the top) and light pink (for the bottom). Feel free to experiment with your favorite color combinations, such as red and cream or purple and gray, for a customized look.
- Crochet Hook: 5.0mm hook. Adjust the hook size based on your yarn thickness for the perfect gauge.
- Tapestry Needle: To seam the hat and weave in the ends.
- Scissors: For cutting your yarn.
- Measuring Tape (optional): To ensure the beanie fits your head or your desired size. You’ll also use this to check the size during the design.
- Stitch Markers: These will help you keep stitches aligned when seam stitching at the end.

Stitch Guide
Here’s a brief explanation of the stitches and techniques you’ll be using for the Two Tone Beanie pattern:
- Slip Knot: Create a loop, insert the hook, and pull the yarn tight to start your design.
- Chain (ch): Yarn over, pull the hook through the loop to create a chain. Continue chaining to your desired length.
- Half Double Crochet (hdc): Yarn over, insert your hook into the next stitch, yarn over again, pull up a loop (you’ll have 3 loops on the hook). Yarn over and pull through all 3 loops on the hook.
- Single Crochet (sc): Insert your hook into a stitch, yarn over, pull up a loop (you’ll have 2 loops on the hook), then yarn over and pull through both loops.
- Back Loop Only (BLO): Instead of working into both loops of the stitch, insert your hook into the loop farthest away from you, which creates the ribbed look.
- Slip Stitch: Insert your hook into the stitch, yarn over, and pull through all loops to create a smooth join. This will be used to seam the hat together.
Notes
- Foundation Chain Count: A total of 26 chains is used for each side of the hat. You start with one of your colors for the first 26 chains, then switch to the second color for another 26 chains.
- Gauge Tips: Stop crocheting rows when the edges stretch to the desired circumference of your head. For this design, 46 total rows were used, which fit a head size of approximately 23 inches.
- Color Placement: The tutorial utilizes dark pink for the top of the beanie and light pink for the bottom. Make sure to start the foundation chain with the color you want at the top of your hat.
- Customizations:
- You can try different colors for your two-tone beanie, such as red and cream for a Valentine’s Day theme or other fun color combinations like black and white, blue and green, etc.
- Add small embellishments, such as pom-poms or appliqués, for a unique finishing touch.
Pattern Instructions
Step 1: Create Two Separate Foundation Chains
- Start with Color 1 (dark pink) by making a slip knot.
- Using your 5.0mm crochet hook, create 26 chains. This will become the top section of your beanie.
- Switch to Color 2 (light pink) for the lower section:
- Prepare your light pink yarn by making a slip knot.
- Insert your hook into the loop of the dark pink yarn, tighten the dark pink, and pull the light pink loop through. Tug gently to ensure the knot is secure.
- Work another 26 chains in this color. You now have 52 chains in total.
Step 2: Begin Row 1
- Add Starter Chains: Once you’ve completed your 52 chains, add 2 extra chains to begin your row.
- Half Double Crochet (hdc): In the third chain from the hook, work your first half double crochet.
- Continue working hdc stitches into every chain stitch across this row—make sure you’re not skipping your last chain! You should end up with 26 hdc stitches in the first color section.
- Prepare for your color change:
- Drop Color 1 (dark pink) and pick up your light pink yarn by tugging gently on both colors to tighten.
- Pull up the light pink yarn loop through the last dark pink loop to complete the transition.
- Work the second color section: Continue working hdc stitches (26 stitches total) in the light pink. After finishing, chain 1 and turn your work.
Step 3: Start the Ribbed Pattern
- Work Back Loops Only: Starting from Row 2, you’ll work into the back loops only for every stitch. Back loops create a textured, ribbed design that is perfect for the two-tone effect.
- Follow the stitch placement:
- Take the light pink yarn and work 26 hdc stitches into the back loops only of the row.
- Drop the light pink yarn and pick up the dark pink yarn, tucking the end of the light pink to tighten the color change.
- Work 21 half double crochets into the back loops only of the dark pink section, leaving 5 stitches for single crochets.
- Single Crochet Finish: Work 5 sc stitches into the last 5 back loops to complete the row.
- Chain 1 and turn your work.

Step 4: Repeat Rows
- Continue the same pattern:
- Row 3: Work 5 single crochets in Color 1 (dark pink), followed by 21 hdc stitches in the back loops only.
- Switch to Color 2 (light pink) and pull it through snugly—work 26 hdc stitches in the back loops only.
- Repeat this row pattern until your rectangle reaches the desired head circumference. For an average adult, complete 46 rows to achieve a stretch that fits up to 23 inches.
Step 5: Seam the Edges
Once your rectangle is complete:
- Fold the edges together: Turn the rectangle inside out and decide which side will be the inside of your beanie. Align the edges properly.
- Use slip stitches:
- Insert your hook into the first stitch on one edge.
- Pick up the corresponding stitch on the opposite edge.
- Yarn over, pull through both stitches, and create a slip stitch.
- Continue this process down the seam line, ensuring alignment by either counting stitches or using stitch markers to hold the edges together.
- Switch colors at the halfway point, using the same technique as in previous color changes.
Step 6: Close the Top of the Beanie
- Thread your tapestry needle: Leave a long tail of yarn, thread it through the tapestry needle, and secure the top of the hat by weaving the tail through the edges of the last row.
- Gather the stitches: Work the needle back and forth across the top edge, pulling the yarn tightly to close up the hole at the top of the beanie.
- If there’s still a small hole, continue weaving in a circular motion to close it completely.
- Secure the knot: Create a double knot at the top to ensure the yarn stays in place. Trim any excess yarn as necessary, and weave in the yarn tails using your needle.
Step 7: Turn and Style
Turn the beanie right-side out. You can style it by folding the brim once for a casual look or twice for a unique layered look. This creates a gorgeous two-tone effect that showcases your color choices beautifully!
Final Notes
The Crochet Two Tone Beanie is stretchy and versatile. Feel free to use your imagination while customizing this fun design! Some ideas for customization include:
- Trying different color combinations for various occasions—red and cream for Christmas, orange and black for Halloween, or pastel tones for spring.
- Adding a pom-pom or other embellishments for extra flair.
- Experimenting with different stitches for the brim or the body for texture variation.
Troubleshooting and Suggestions
- Common Issues:
- Handling Color Changes: Ensure you’re twisting the yarn strands neatly when switching between colors to avoid gaps or messy joins. A quick tug on loose strands can tighten uneven sections.
- Keeping Consistent Tension: Pay close attention to tension, particularly when transitioning between stitch types and colors, as this helps the beanie maintain a smooth surface without bulges.
- Crown Shaping: Decreasing evenly is critical to achieving a neat, rounded top—double-check stitch counts at the end of each row to avoid errors.
- Creative Modifications:
- Color Variations: Experiment with ombré effects, gradient yarns, or even more than two colors for a unique multi-tone appearance.
- Embellishments: Add flair with a large pom-pom, a cluster of buttons, or embroidered details.
- Adapt the Design: Adjust the height or add extra rows for a slouchy beanie, or make a tighter brim for a snug fit. This pattern is flexible enough to accommodate every style.
Friendly and fun to make, the two-tone beanie is a wonderful design that combines practicality with creativity. Dive in with your favorite yarn colors and enjoy crocheting a piece that’s personalized and perfect for chilly weather.