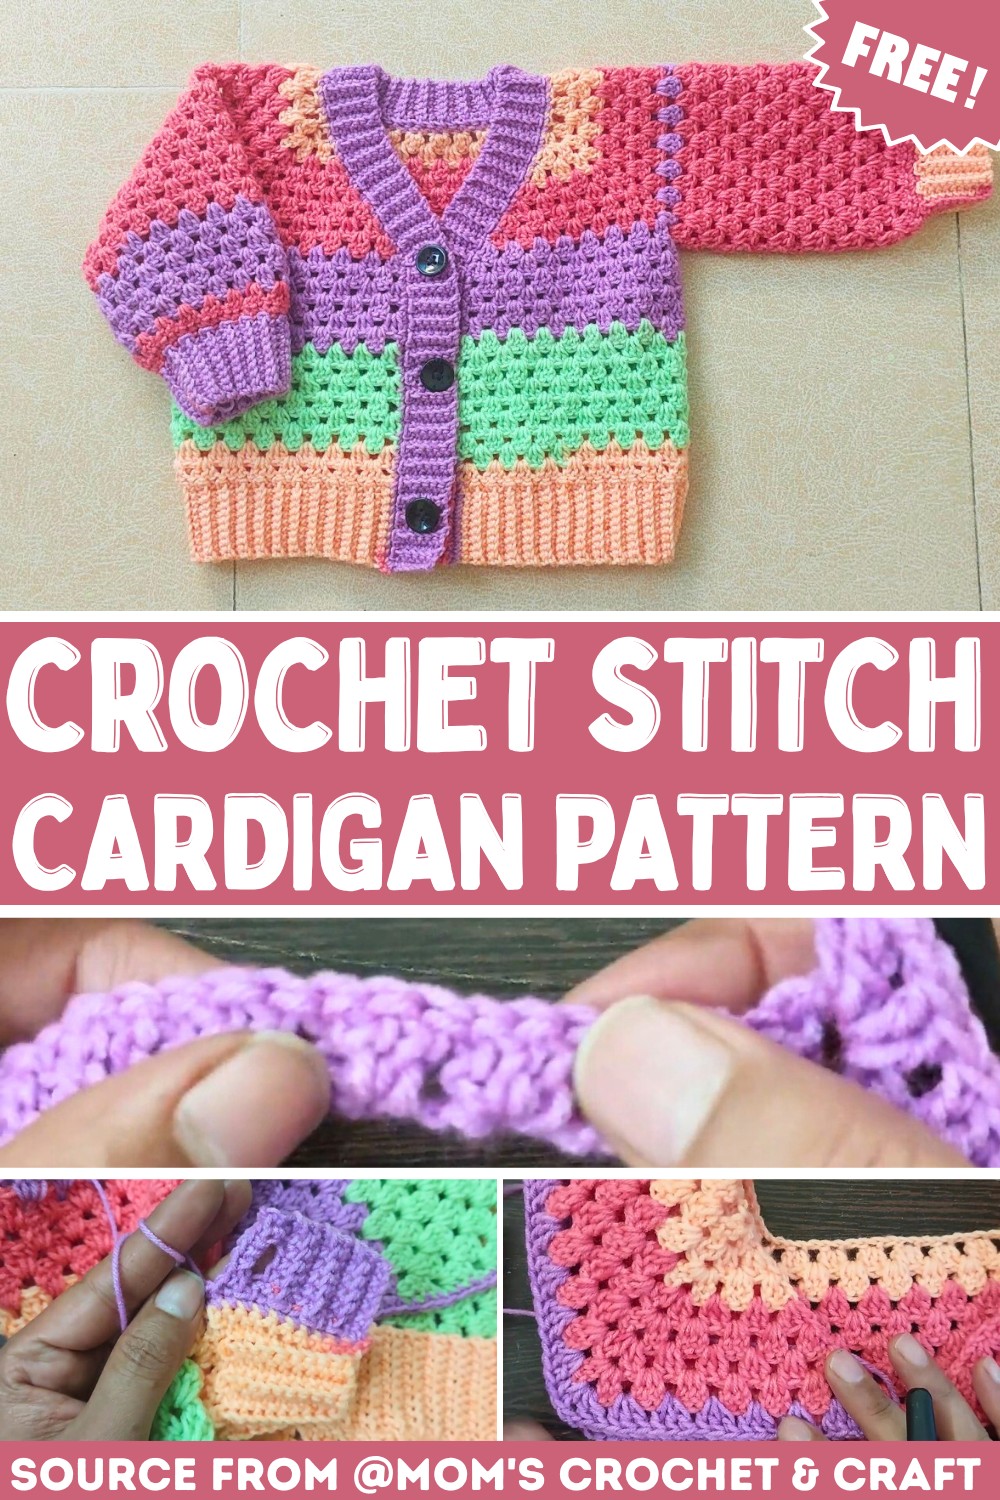
This cozy granny stitch cardigan is the perfect mix of comfort and classic style—lightweight, wearable, and built from airy granny panels for an effortlessly chic look.

This Crochet Granny Stitch Cardigan is a wonderful handmade clothing item that’s cozy, light, and stylish. It’s special because it combines timeless crochet techniques with modern charm, creating a cardigan suitable for any season. You can wear it over a dress for a casual outing or layer it over your favorite outfit to stay comfortable indoors. Crochet Cardigan is perfect for anyone who loves colorful and soft handmade clothing.
Crochet Granny Stitch Cardigan Pattern
This crochet cardigan is simple and fun, especially for beginners. The Granny Stitch pattern is easy to follow, and the repetitive stitches make it calming to crochet. It’s a chance to play with colors and customize the cardigan to match your personality. If you gift it or keep it for yourself, this crochet Pattern will bring you joy and warmth.
Credit Mom’s Crochet & Craft
Key Pattern Features:
- Worked mostly in granny stitch (clusters of double crochets) for a soft, drapey fabric
- Constructed in flat panels: back, two fronts, and sleeves, then seamed together
- Uses simple shaping by changing stitch counts rather than complex increases/decreases
- Built-in front bands and neckline created by continuing granny rows around the opening
- Finished with neat edging and optional length/sleeve adjustments for a custom fit
How It’s Made
This cardigan starts with straightforward rectangular panels, making it very approachable if you’re comfortable with the basic granny stitch. The back panel is usually worked first, beginning with a foundation chain and then building up rows of granny clusters (groups of double crochets with chain spaces). This gives the body of the cardigan that familiar granny texture—light, airy, and slightly stretchy—without being too bulky. Because you’re working flat, it’s easy to hold the panel up against yourself and adjust length as you go.

Next, the front panels are created in much the same way, but worked as two narrower rectangles that will form the left and right fronts of the cardigan. The designer keeps the shaping simple by relying on the natural structure of granny stitch and small changes in cluster placement, rather than complicated shaping. This approach means you spend more time in a calm, repetitive rhythm and less time counting complex increases or decreases. It also makes the pattern easier to adapt if you want a deeper V-neck or a more closed front.

Once the back and fronts are finished, the panels are seamed at the shoulders and sides. Depending on the tutorial, this might be done with a whipstitch using a yarn needle or by crocheting the seams together with slip stitches or single crochet. The granny stitch fabric joins cleanly, and the seams add a bit of structure without making the cardigan stiff. After the main body is assembled, the sleeves are added—often worked from the armhole downward in rows or rounds of granny stitch. This lets you customize sleeve length on the fly, from short and breezy to long and cozy.

A key feature of this cardigan is the simple but effective edging around the front opening and neckline. After the panels are joined, the pattern has you work rows of granny stitch (or sometimes single crochet or half-double crochet) evenly along the front edges and around the neck. This creates a built-in front band that frames the cardigan and helps it sit nicely on the shoulders. The edging not only looks polished, but it also helps stabilize the fabric so it doesn’t stretch out of shape at the front.

Finally, the hem and sleeve cuffs are cleaned up with a matching border. This might be a few rows of single crochet, a subtle ribbed effect with front- and back-post stitches, or simply continuing the granny stitch pattern for a cohesive look. At the end, you’ll weave in ends, lightly block if needed, and you’re left with a soft, drapey cardigan that feels like wrapping up in a granny square blanket—but looks much more put-together.

Video Tutorial
Step-by-Step Pattern
Required Supplies:
- Yarn: Hobby Shop DK Anti-Pill Yarn Cake (Color: VLG 58 recommended).
- Crochet Hook: 3.50 mm.
- Optional Tools:
- Stitch markers (for keeping track of corners or increases).
- Tape measure (to check gauge).
- Yarn needle (to weave in ends).
- Scissors.
Pattern Instructions
Follow these detailed steps to crochet the beautiful granny stitch cardigan:
1. Foundation
- Begin by making a foundation chain:
- Chain an appropriate length for the cardigan’s shoulders (as demonstrated in the video). Skip 3 chains as these count as the first stitch.
- Work into the fourth chain:
- Add clusters of 3 double crochets separated by chain spaces (granny clusters). Skip 2 chains between each cluster as you work across the row.
2. Building Rows
- For rows 2-8:
- Turn your work and chain 3 to begin a new row. Work granny clusters (3 dc) into the spaces created in the previous row.
- At each corner, add additional chains or clusters (depending on the shaping needed) to form the cardigan’s structure.
3. Adding Special Touches
- Row 9 (Treble Section):
- Begin with a chain 3. Work treble crochet stitches into each cluster space from the previous row to add height and delicate design.
- Skip middle stitches as directed in the video to keep the edges clean.
- Rows 10-22:
- Alternate between rows of double and single crochet stitches, following the same format, to build the body of the cardigan.
4. Front Edging
- For the buttonhole edge:
- Work single crochet along one side using the back loops only, ensuring the edge is neat.
- To create buttonholes:
- Skip 3 stitches along the row and continue working single crochet. Repeat this format at equal distances to create evenly spaced buttonholes.
- Continue until you reach the bottom edge.
5. Sleeves
- To create sleeves:
- Join the yarn into one armhole space and chain to start the first row.
- Work granny clusters in the round for the sleeves, building rows until desired length.
- For the finishing row, decrease slightly to taper the sleeves using single crochet and slip stitches.
6. Final Touches
- Join the cardigan edges:
- Use slip stitches or single crochet to join specific rows and create a polished look.
- Weave in all loose threads with a yarn needle.
Pattern Question
Q: Can I adjust the size for a different age group?
A: Yes, you can adjust the size by altering the starting chain count and adding or subtracting rows in the body and sleeves to customize the fit.
Troubleshooting and Suggestions
- Uneven edges or wavy fronts: If your front edges are rippling, you may be adding too many stitches when you work along the raw edges. Try skipping every few rows or tightening your tension when you pick up stitches for the front band.
- Loose or tight granny clusters: Granny stitch can look messy if your tension changes. Keep your chains consistent between clusters, and count clusters every few rows to make sure your panel isn’t unintentionally widening or narrowing.
- Armhole fit issues: If the sleeves feel tight, add an extra row or two on the body panels before seaming to deepen the armhole. If they’re too loose, seam a little farther down the side to reduce the opening.
- Color changes and joins: For striped or multi-colored versions, change colors at the end of a row and carry the yarn up the side or neatly fasten off each color. Try working your ends in as you go by crocheting over them in the next row.