This charming Crochet Daisy Granny Square Cardigan is a wearable masterpiece that combines timeless granny squares with a floral twist for a cozy yet stylish look.

The Crochet Daisy Granny Square Cardigan is a stunning and cozy wearable item made with love and care. It’s a cardigan designed by combining colorful daisy granny squares, creating a cheerful and unique piece you can wear anywhere. This cardigan isn’t just stylish, but it also keeps you warm, adding comfort to your day. Its fun floral design makes it perfect for expressing your creativity and bringing a bit of joy to your wardrobe.
Crochet Daisy Granny Square Cardigan With Full Pattern
Making a Crochet Cardigan is easier than it looks. You create small, square pieces (granny squares) with pretty daisies in the middle and then join them together to shape the cardigan. The beauty of this pattern is how customizable it is; use any colors you love and make it your own. If you’re new to crochet or have some experience, this crochet cardigan is a great choice to create something both fashionable and practical.
Credit Mom’s Crochet & Craft
Key Features and Construction Summary:
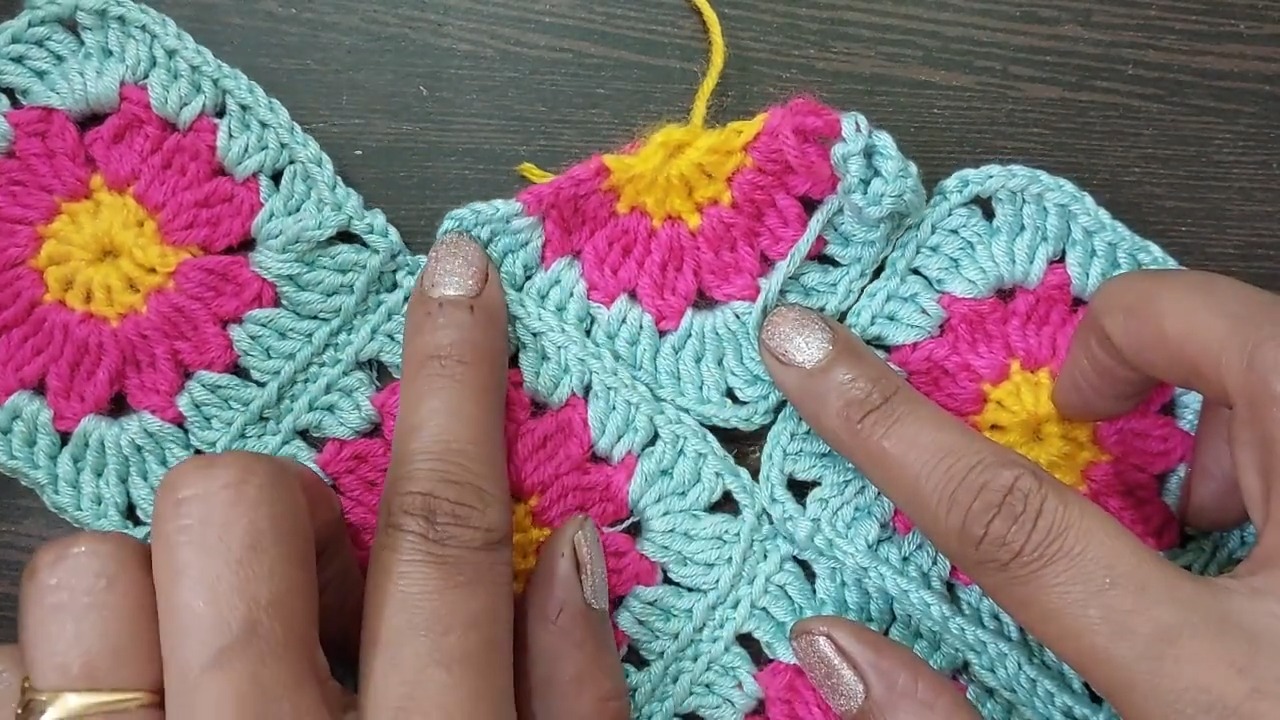
- Daisy granny squares form the foundation of the cardigan, made with three rounds of crochet stitches to create a colorful flower motif.
- Panels and sleeves are shaped by joining squares with slip stitches to form the back, front, and arms.
- Decorative edging adds polish to the sleeves, neckline, and bottom hem with rows of single, double, and triple crochets.
- Offers seamless assembly that allows easy adaptation to different sizes or styles by adding or subtracting granny squares.
A Closer Look at Making Your Daisy Granny Square Cardigan:
Step 1: Crafting the Daisy Granny Squares
The pattern kicks off by making individual granny squares, each featuring a delightful daisy floral motif. The first round involves forming the center, worked in single crochets within a magic ring or chain ring. In the second round, you’ll switch to a second yarn color and create striking clusters—each resembling daisy petals—with triple crochets in every stitch around. The third round adds the granny square’s signature shape using a third yarn color, with triple crochets that define neat corners and edges. This step alone provides endless creativity for pairing colors and creating a unique piece!

Step 2: Making Multiple Squares
To build the cardigan, you’ll need approximately 40 squares, depending on size. The back panel consists of rows of four squares, the front panels use smaller configurations like 2.5 squares for neckline shaping, and each sleeve requires six squares. You can modify the number or orientation of the squares for a custom fit. Beginners and experienced crocheters alike can enjoy the repetitive, meditative process of creating these squares.

Step 3: Joining the Granny Squares
Assembling the squares is done with slip stitches, which create clean, seamless joins. Squares are attached in rows for panels (e.g., four squares per row for the back) and other configurations for the front and sleeves. The simple slip stitch connecting technique ensures durability while maintaining the flexibility of the cardigan. Assembly is intuitive, with the square edges naturally aligning into wearable panels.

Step 4: Connecting Panels and Sleeves
Attach the back panel to the front panels at the shoulders with neat slip stitches. Sleeves are added to the cardigan by joining six granny squares each, seamlessly attaching panels at the armholes and shoulder seams. At this stage, the cardigan takes on its structure and starts resembling a finished garment.
Step 5: Adding Decorative Edging
The final steps focus on elevating the cardigan with neat finishes and optional embellishments. Edging prolongs the sleeves to your desired length, with rows of single, double, and triple crochets creating a polished look. The cardigan bottom features trim for structure and definition, while the neckline increases shaping with half double and triple crochet clusters. These finishing touches give the cardigan extra depth and style, while ensuring comfort and fit.

Adapting the Design:
This pattern is incredibly versatile! You could turn the daisy squares into a vest by skipping sleeves or extend the design into a boho-style duster by adding extra rows of granny squares. Want a matching accessory? Make extra squares for a tote bag or scarf to complement the cardigan.

Video Tutorial
Step-by-Step Pattern
Materials
To craft your cardigan, you’ll need the following materials:
- Yarn: 3-ply yarn in three colors (example: white, yellow, and green or any combination of your choice).
- Hook Size: 3 mm crochet hook.
- Optional Tools:
- Scissors.
- Yarn needle for weaving in ends.
- Measuring tape to ensure the correct size of your squares.
Pattern Instructions
Step 1: Make the Daisy Granny Squares
- Round 1:
- Begin by making a magic ring or chaining 4 and joining with a slip stitch to form a ring.
- Work 4 slip stitches (sl st) into the ring.
- Chain 3 (counts as the first triple crochet).
- Make 11 single crochets (sc) in the ring.
- Join with a slip stitch in the third chain.
- Round 2:
- Attach the second color yarn to any stitch, pulling it through to the front.
- Chain 4, then work 2 triple crochets together in the same space. Repeat this cluster stitch in each stitch around.
- At the end, you should have 12 clusters and 2 slip stitch spaces.
- Join using a slip stitch to the 4th chain and fasten off.
- Round 3:
- Join the third color yarn to any space.
- Chain 4, make 2 triple crochets in the first space.
- In the next space, work 1 chain, 3 single crochets. Repeat this pattern around the square.
- Work 3 triple crochets in each corner to form neat edges.
- Join with a slip stitch to the fourth triple crochet.
Step 2: Make Multiple Squares
- For the cardigan, create a total of 40 squares (6 squares for each sleeve, 4 rows of 4 squares for the back panel, and smaller configurations for the front panels and neckline). Make additional half squares for areas like the neckline.
Step 3: Joining the Granny Squares
- Join Squares for Panels:
- Use a slip stitch method to connect the squares. Start at the middle triple crochet of both squares and work along their edges.
- Assemble the Back Panel:
- Dividing 4 squares per row, join them into 4 total rows using slip stitches.
- Assemble the Front Panels:
- Create one row of 4 squares and another row of 2.5 squares for each front panel. Attach them using slip stitches.
- Sleeves:
- Join 6 squares for each sleeve. Add an extra row on either side if more armhole depth is required.
Step 4: Connect Panels and Sleeves
- Sew the front and back panels together at the shoulders.
- Attach the sleeves to the shoulder seams, starting at the middle stitch of both sections.
Step 5: Add Decorative Edging
- Extend Sleeves:
- Add yarn to the sleeve edges, chain 3, and make 3 single crochets in each space to the end of the row.
- Join with a slip stitch and continue creating rows to reach the desired sleeve length.
- Cardigan Bottom Trim:
- Add yarn to the bottom edge and work single crochet rows, skipping stitches periodically for a neat finish.
- Neckline Finish:
- Create 3 half double crochets at the neckline corners.
- Fill the gap with 3 double crochets, 3 triple crochets, and 3 double crochets.
- Work single crochet rows across the back neckline, skipping every 4th stitch for shaping.
- Final Touches:
- Make one final row of double crochets followed by two rows of single crochet for clean edges.
- Ensure all panels and sleeves are securely attached, with neat seams.
Troubleshooting and Suggestions:
Common Issues & Tips:
- Petal uniformity: Keeping consistent tension in your triple crochet clusters ensures smooth and even-shaped daisy petals. If petals twist or buckle, relax your grip on the yarn and focus on steady pulling.
- Neat joins: Slip stitching squares together can be tedious. Use stitch markers to align corners for a clean seam while joining panels.
- Adjusting fit: If the cardigan feels snug, add extra rows or half squares around the neckline or shoulders during assembly for more flexibility.
Creative Modifications:
- Experiment with color pairings for the daisies—try ombre shades for flower petals or rainbow themes for a whimsical cardigan.
- Use sparkly yarn or metallic threads for accents for an elevated look.
- Add embellishments such as small buttons at the sleeve cuffs or front panels for functional flair.
Adapting the Design:
This pattern is incredibly versatile! You could turn the daisy squares into a vest by skipping sleeves or extend the design into a boho-style duster by adding extra rows of granny squares. Want a matching accessory? Make extra squares for a tote bag or scarf to complement the cardigan.
This pattern is perfect for crocheters who love floral designs and want to make a playful, wearable item. The Crochet Daisy Granny Square Cardigan combines structure, texture, and color to create a standout addition to any handmade wardrobe. Customize your piece, tackle those granny squares, and enjoy crafting a cardigan that’s as unique as you are. Happy crocheting!