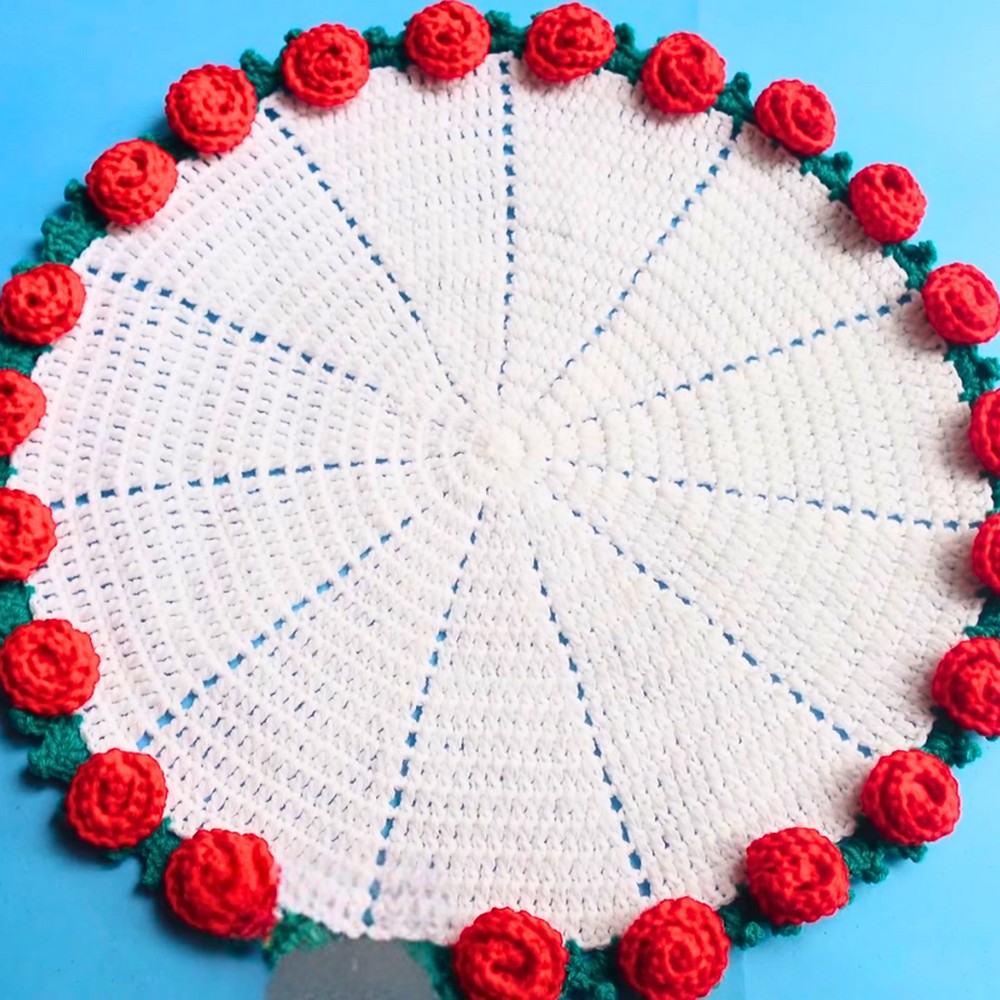
This mini crochet coaster pattern combines delicate roses and leafy textures to create a functional yet elegant piece of decor for your table.

The Crochet Red Rose Bouquet Coaster is a beautiful, handmade item that combines charming design with practical use. This mini coaster features delicate rose flowers surrounded by leaves, making it perfect for decorating your table, gifting, or brightening up a relaxing evening with your favorite drink.
Crochet Red Rose Bouquet Coaster for Floral Table Decor
This Crochet coaster is perfect for adding a pop of elegance to any surface. Whether used under mugs, vases, or bowls, it protects your furniture and looks lovely while doing so.
Credit Diy crochet-crosia
Key Features and Construction Summary:
- Base Construction: Worked in the round using double crochet with gradual increases for a circular shape.
- Leafy Border: A green scalloped border with a 3D “leaf” effect using picot and double crochet techniques.
- Rose Embellishments: Small, spiral-folded roses crocheted separately and sewn onto the coaster.
- Customizable Sizes: Can be adjusted for larger or smaller coasters or placemats by varying the number of rounds.
- Materials: Medium weight (4-ply) yarn in red, green, and white, and a 3.5 mm crochet hook.
The coaster begins with a foundation magic circle or a chain 4 loop, creating a solid base with 12 double crochet stitches in the first round. From there, a series of increasing rounds are worked, with chain spaces and clusters of 2 double crochet stitches to build a textured spiral effect. This circular base can be scaled to your preferred size by repeating the increase sequence in additional rounds.

Once the base is completed, the vibrant green border brings a natural, leafy touch. Using a combination of single crochet, chain spaces, and picot stitches, the border mimics delicate leaves encircling the coaster. Care is taken to skip stitches strategically, ensuring that the border sits evenly and doesn’t ripple.

The standout feature is, of course, the beautiful red rose embellishments. These tiny roses start with a simple foundation chain that is folded into a spiral. Double crochets and cluster stitches create the petal-like effect, which is then wound carefully to form the flower shape. After securing the roses with slip stitches, they are stitched firmly onto the base. The placement of the roses can be customized to suit your preferences for a balanced or clustered look.

Finally, the details pull everything together! Securing loose ends, arranging the flowers evenly, and giving the coaster its final shape through a bit of steam blocking ensures a polished finish.
Video Tutorial
Materials & Tools Needed
- Yarn:
- Medium weight 4-ply wool in three colors:
- Half white (for the coaster base)
- Green (for the leaves)
- Red or pink (for the rose flower)
Tip: You can experiment with cotton yarn for a more absorbent coaster.
- Medium weight 4-ply wool in three colors:
- Crochet Hook:
- Size 3.5 mm crochet hook (recommended for the medium weight 4-ply yarn).
- Scissors:
- For trimming excess yarn after securing.
- Yarn Needle:
- To weave in ends and secure the rose to the coaster.
Pattern Abbreviations & Terminology
- ch: Chain
- st(s): Stitch(es)
- dc: Double Crochet
- sc: Single Crochet
- sl st: Slip Stitch
- sp: Space
- rep: Repeat
(Pattern utilizes US crochet terminology.)
Step-by-Step Crochet Instructions
1. Coaster Base (White Color)
- Foundation:
- Use half-white yarn. Create a magic circle. Alternatively, chain 4, slip stitch into the first chain to form a ring.
- Round 1:
- Ch 2 (Does not count as a stitch).
- Make 12 dc into the magic circle.
- Join with a sl st into the first dc of the round.
(12 stitches total)
- Round 2 (Increase Round):
- Ch 2 (Does not count as a stitch).
- In the same st: Work 2 dc.
- Ch 1. Work 2 dc in the next st.
- Repeat: (2 dc, ch 1) in each stitch around.
- Sl st into the first dc of the round to join. (Total: 24 stitches with 12 ch 1 spaces)
- Round 3 (Continue Increasing):
- Ch 2.
- Work 1 dc in the first st and 2 dc in the next st. Ch 1.
- Repeat: (1 dc in the first st, 2 dc in the next st, ch 1) around.
- Sl st to join. (Stitch count increases by 12 in every round.)
- Repeat for Additional Rounds:
- Continue following a similar increase pattern (dc across with one increase per group at the last stitch of every group) until your desired size is achieved.
- Example: Row 4 will have 3 dc before the increase, and Row 5 will have 4 dc before the increase.
2. Leaf Border (Green Color)
- Attach Green Yarn:
- Sl st into any stitch to join green yarn.
- Round 1:
- Ch 1.
- In the same stitch: Sc.
- Ch 3, skip 2 stitches. In the next stitch: Sc.
- Repeat: (Ch 3, skip 2 sts, sc in the next st) around.
- Sl st to the starting sc. (24 chain spaces form the base for leaves.)
- Round 2 (Leaf Details):
- In the first ch-3 space: Sc, dc, ch 3, sl st (to form a picot), dc, sc.
- Move to the next ch-3 space and repeat: (Sc, dc, ch 3, sl st, dc, sc).
- Continue working the leaf details around.
- Sl st to the first sc to join.
3. Rose Decoration (Red or Pink Yarn)
- Foundation Petals:
- Using the red or pink yarn, start with 9 chains.
- In the 3rd chain from the hook, work 3 dc.
- In the next 6 chains, work 3 dc in each stitch.
- You now have a long strip of double crochets forming a petal base.
- Form Rose Spiral:
- Starting at one end, roll the long strip into a spiral (like a rose).
- Secure the back with stitches using a needle and yarn.
- Attach to the Coaster:
- Skip 2 leaf sections on the green base, and sew the rose onto the single crochet stitch of the coaster. Secure tightly with the yarn needle.
Finishing Touches
- Weave in Ends: Use the yarn needle to hide and secure any loose yarn ends.
- Shape the Coaster: Gently block the coaster to ensure it lays flat. Steam blocking works well for acrylic and wool yarns.
- Optional Additions: You can add multiple flowers or embroider additional details to personalize your coaster.

Troubleshooting and Suggestions:
Common Challenges:
- Handling Increases: Ensure your stitch count is consistent to prevent uneven edges or puckering. Place a stitch marker at the beginning of each round if needed.
- Shaping the Rose Spiral: If the rose isn’t folding properly, check that your double crochets are evenly spaced. Practice winding the spiral loosely and adjust the tension before securing with stitches.
- Leaf Border: Avoid skipping too many or too few stitches to maintain the smooth scallop effect of the leaves.
Creative Modifications:
- Color Variations: Create a bouquet of different flowers by using various colors for the roses, or opt for pastel shades for a softer look.
- Multi-Purpose Use: Enlarge the pattern to make placemats or shrink it for festive ornaments or keychains.
- Additional Embellishments: Add pearl beads in the rose centers or use sparkly yarn for an extra decorative touch.
- Seasonal Themes: Swap red roses for poinsettia-inspired flowers during the holidays or bright yellows and pinks for spring decor.