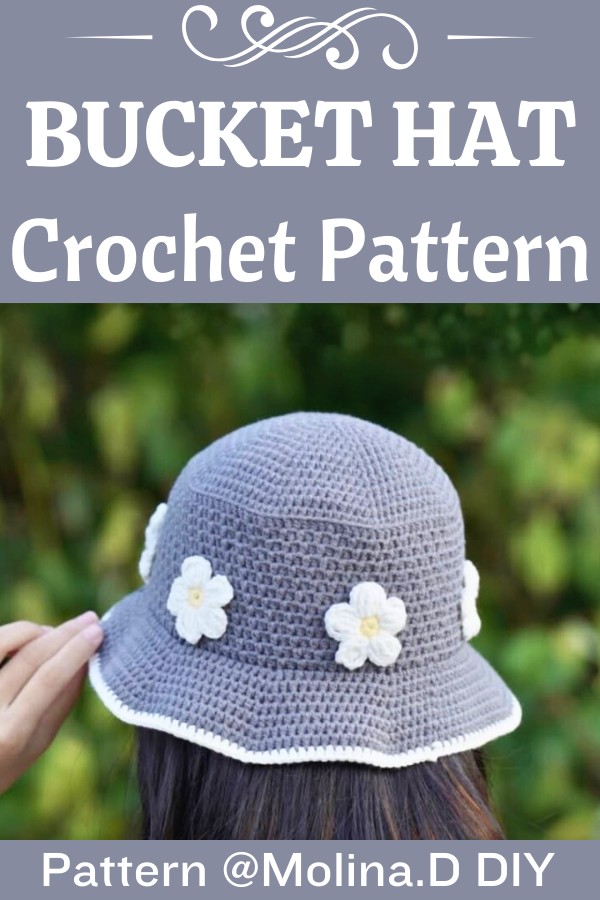
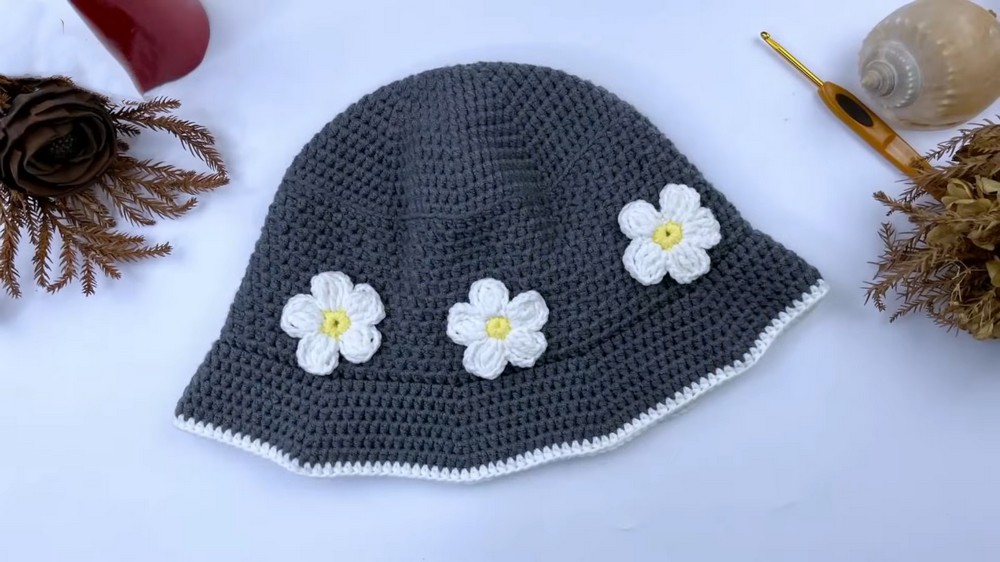
This breezy Daisy Summer Bucket Hat is the perfect companion for sunny days—lightweight, stylish, and adorned with cheerful crochet daisies.

Add a playful touch to your summer wardrobe with this elegant yet fun Crochet Daisy Bucket Hat. Perfect for sunny days, this easy-to-follow guide teaches you how to crochet a daisy-themed bucket hat that’s both stylish and functional. Ideal for beginners, this crochet pattern uses simple techniques, ensuring an enjoyable and rewarding crafting experience that you can personalize to your taste.
Crochet Daisy Summer Bucket Hat
In just a few easy steps, you can create this summer bucket hat. You will crochet the top, middle, and brim and finish it off by adding the daisy flowers. The tutorial uses basic yarn, a crochet hook, and simple stitches, so it is perfect for those new to crochet. The process is relaxing and fun, and the finished result is a stylish hat you will love to wear.
Credit Molina.D DIY
Key Features of the Daisy Summer Bucket Hat Pattern:
- Beginner-friendly: Uses simple stitches like the magic ring, single crochet, half double crochet, and triple crochet.
- Constructed in three parts: The top (crown), middle section (body), and brim for a structured bucket shape.
- Textured design: Includes back loop and front loop work to create subtle details.
- Adorned with daisy embellishments: Crocheted flowers are added for a fun, summery finish.
- Milk cotton yarn and a 3.5mm hook: Lightweight and comfortable for warm weather.
Overview of the Construction Process
This delightful summer bucket hat starts with the crown, shaped by working rounds of half double crochet beginning from a magic ring. Increasing stitches evenly in each row gives the hat its flat, circular start—perfectly sized for small and medium heads. If you’re new to crochet, this section is a great introduction to working in the round and understanding increases.

Once the top is complete, the pattern transitions into the middle section, which becomes the structured body of the hat. Here, you’ll work half double crochet exclusively in the back loops, creating a subtle textured ridge that separates the crown and body. This detail adds character to the hat while maintaining a smooth, wear-friendly shape. The repeated rounds of half double crochet make this portion simple and relaxing to crochet—but consistency in stitch tightness is key for the best look.

The brim is created next, and this section adds the classic bucket hat flair. The increases here are spaced evenly to make a gently flared edge. Working in the front loops gives a subtle design feature, and switching to white yarn for the last few rounds adds a touch of contrast to pair perfectly with the daisies.

Finally, the daisy embellishments elevate this hat from functional to absolutely adorable. Each flower is made separately, starting with a magic ring and single crochet base, followed by elegant petals shaped with triple crochet stitches. These daisies are sewn onto the middle section of the hat, creating a charm-filled, summery vibe.

Video Tutorial
Step-by-Step Pattern
Looking for a fun and stylish summer design? The Daisy Summer Bucket Hat is the perfect accessory that’s both cute and practical. This beginner-friendly pattern combines simple stitches with decorative touches to create an adorable bucket hat featuring daisy embellishments. Follow this step-by-step guide to get started.
Materials
To crochet your Daisy Summer Bucket Hat, you’ll need:
- Yarn: Milk cotton yarn (5-ply). Cotton is recommended for its soft, durable properties.
- Crochet Hook: Size 6/0 (3.5 mm).
- Tools:
- Scissors
- Yarn needle (for weaving in ends and sewing flowers)
- Stitch markers (optional for tracking rounds or placement of flowers)
Stitch Guide
Here are the basic stitches and techniques used in this pattern:
- Magic Ring: Create a tight adjustable loop by wrapping the yarn around your fingers. This forms the center of your hat or flower.
- Chain (ch): Yarn over (yo) and pull through the loop on your hook.
- Single Crochet (sc): Insert hook into stitch, yo, pull through, yo, and pull through both loops.
- Half Double Crochet (hdc): Yo, insert hook into stitch, yo, pull through, yo, and pull through all three loops.
- Triple Crochet (tr): Yo twice, insert hook into stitch, yo, pull through, yo, pull through the first two loops, yo, pull through the next two loops, and yo to finish through the last two loops.
- Slip Stitch (sl st): Insert hook into stitch, yo, pull through both the stitch and the loop on your hook.
- Back Loop (BL): Work into the back loop only of the stitch for a subtle, textured design.
- Front Loop (FL): Work into the front loop only of the stitch to create dimensional effects.
Notes
- Sizing: This pattern works well for small to medium-sized hats. To make larger sizes, increase the number of rounds in the top portion or middle section until the desired width/depth is achieved.
- Gauge: Crochet a small swatch to measure your tension. Adjust the hook size slightly if stitches are too tight or loose.
- Customization Tips:
- Experiment with colors for the daisies and hat base.
- Vary the brim width for a floppy, oversized look or a tighter fit.
- Add ties or embellishments for personal flair.
Pattern Instructions
Top (Crown) of the Bucket Hat
- Round 1: Start with a magic ring, chain 1, and make 8 half double crochets (hdc) inside the ring. Slip stitch to close the round. (8 stitches)
- Round 2: Chain 1. Increase by working 2 hdc in every stitch around. Slip stitch to close. (16 stitches)
- Round 3: Chain 1. Work 1 hdc into the first stitch, then increase (2 hdc) in the next stitch. Repeat all the way around. Slip stitch to close. (24 stitches)
- Round 4: Chain 1. Work 2 hdc into two stitches, then increase (2 hdc) in the next stitch. Repeat all the way around. Slip stitch. (32 stitches)
At the end of this step, the crown of the hat is complete. Adjust sizing here before moving on if necessary.
Middle (Body) of the Bucket Hat
- Round 1: Chain 1. Begin shaping the sides by working hdc in every stitch in the back loop only (BL) around. Slip stitch to close. (104 stitches)
- Round 2: Chain 1. Work hdc in the first stitch, hdc in the next stitch in BL, alternating regular stitches with BL stitches across. Slip stitch. (104 stitches)
- Round 3: Repeat the variation between regular hdc and hdc in BL, continuing to form the sides. Slip stitch to close. (104 stitches)
Repeat this process for Round 4 through Round 13, or until the hat’s depth matches the desired size. The middle part of the hat is now complete!
Brim
- Round 1: Chain 1. Work 10 hdc in the next 10 stitches, then increase an hdc (2 hdc in one stitch). Repeat 9 times all the way around. Then, work 5 hdc in the next 5 stitches in front loop (FL). Slip stitch to close. (113 stitches)
- Round 2: Chain 1. Work 11 hdc in the next 11 stitches, followed by an increase hdc, repeating as above, ending with 5 hdc in 5 stitches in FL. Slip stitch. (122 stitches)
- Round 7: Chain 1. Work hdc in every stitch around. Slip stitch to close. (149 stitches)
Feel free to adjust the number of rounds to customize the width of your brim. Finish off and weave in ends.
Daisy Flowers
- Using colored yarn, make a magic ring. Chain 1 and work 10 single crochet (sc) into the ring. Slip stitch to close.
- Attach white yarn to start the petals.
- First petal: Chain 4, work 2 triple crochets (tr) in the first stitch, followed by 1 tr and chain 4, slip stitch in the next stitch.
- Repeat this process for the next petals around the daisy.
- Make enough daisies to embellish the hat (usually around 6-8), depending on the size and your preference. Sew the daisies securely around the middle section.
Finishing Touches
Once you’ve sewn the daisies, check for any loose threads or uneven stitches. Block your hat if desired, shaping it to perfect form.
Troubleshooting and Suggestions
Troubleshooting:
- Keeping rounds flat in the crown: If your initial top section starts curving upward unexpectedly, check your stitch counts to ensure all increases are placed correctly.
- Maintaining consistent tension: Uneven tension can result in a wavy or overly stiff middle section of the hat. Slow down and check your stitches periodically to keep them uniform.
- Attaching the daisies neatly: To prevent visible knots or bulky seams, carefully weave in ends and consider pinning flowers in place before sewing.
Suggestions (Customization Ideas):
- Color variations: Use pastel shades for an airy look or bold colors for a statement piece. Alternate daisy petal colors for an extra pop!
- Add versatility: Skip the daisies and keep the brim plain for a minimalist look, or lengthen the brim for more sun protection.
- Experiment with texture: Try adding a few rounds of decorative stitches, like popcorn or puff stitches, to the brim or middle section for extra flair.
- Alternative uses: Create matching daisies separately and attach them to headbands, clothing, or bags for a coordinated summer look.