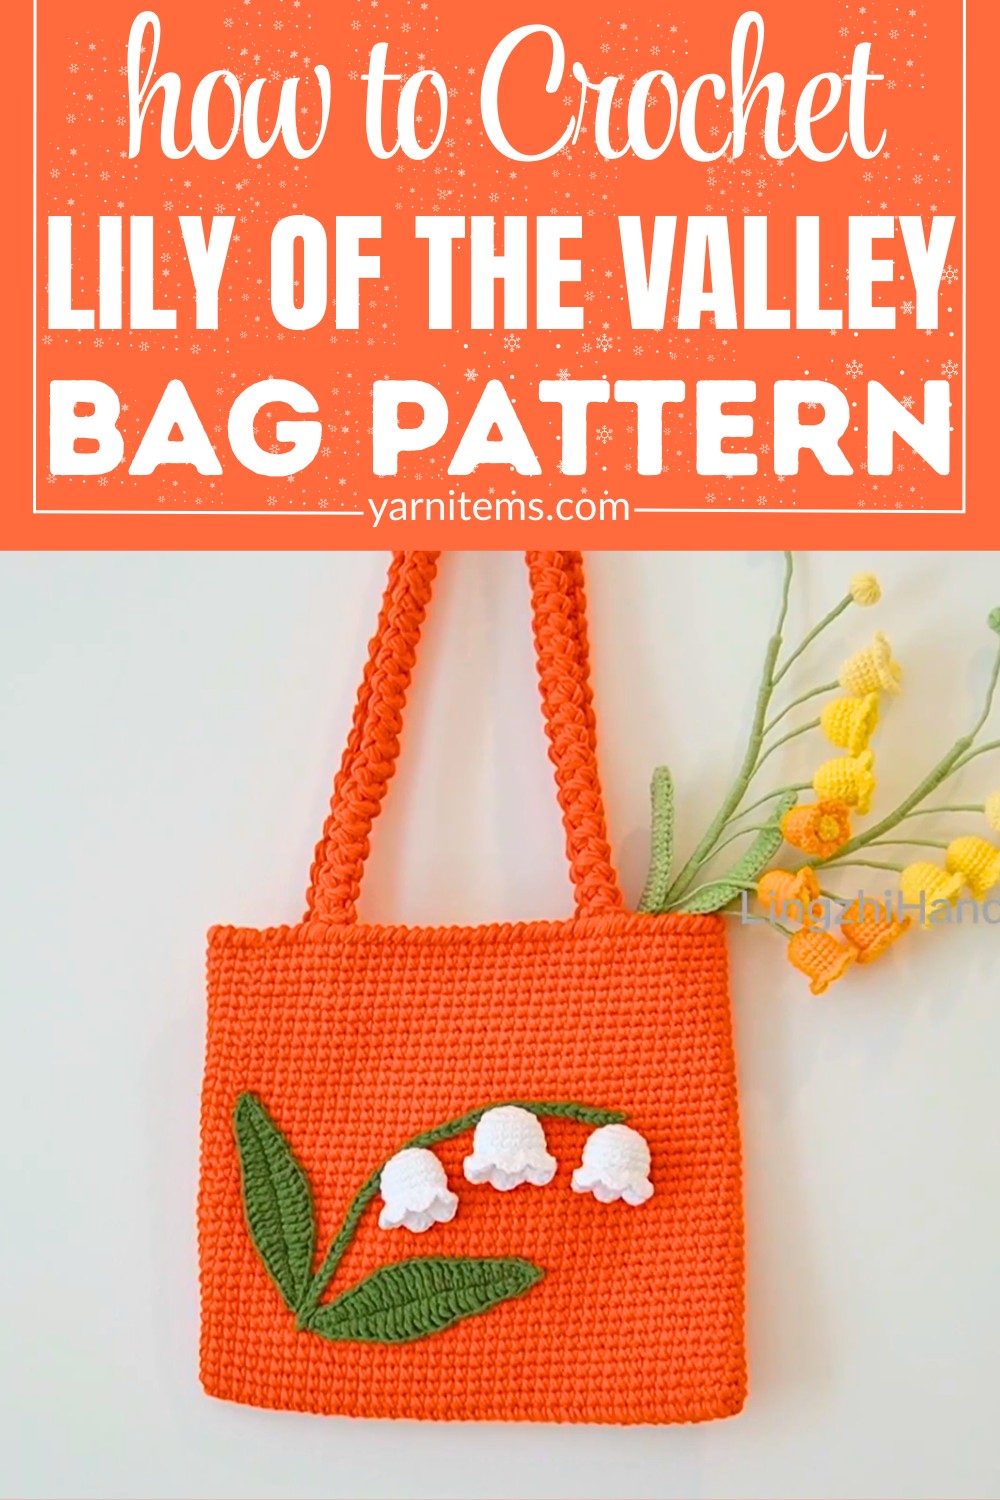
A stunning crochet bag inspired by the delicate Lily of the Valley, blending practicality with floral elegance through clever construction and charming embellishments.

The Crochet Lily of the Valley Flower Shoulder Bag is a charming handmade accessory inspired by the delicate beauty of lily of the valley flowers. Its intricate floral design, paired with functional elements like straps and spaciousness, makes it not only a statement piece but also ideal for daily use.
Crochet Lily of the Valley Bag
This crochet bag is perfect as a spring or summer accessory, celebrating the freshness and simplicity of the season. It also makes a thoughtful handmade gift for special occasions like birthdays or Mother’s Day, adding a personal touch to any moment.
Key Features & Construction Highlights:
- Bag Body: Worked in the round with single crochet stitches, forming a sturdy oval base and cylindrical body.
- Textured Edging: Finished with reverse single crochet for a unique, polished look.
- Straps: Crocheted with four strands of yarn for durability using an innovative technique to achieve thick, flexible straps.
- Lily of the Valley Flowers: Small, intricate blooms featuring petals worked with single, half-double, and double crochet stitches.
- Leaf Details: Made with varying stitch heights (single crochet to treble crochet) for a natural, tapered shape.
- Assembly: Decorative flowers, stems, and leaves are securely attached to the bag for a cohesive, elegant design.
This Crochet Lily of the Valley Bag is a blend of functionality and elegance. Starting with the bag body, you’ll work in the round using two strands of yarn and single crochet stitches. After forming a flat oval base, the pattern transitions into simple rounds of single crochet to create the cylindrical sides of the bag. For added texture and stability, the final round is worked in reverse single crochet (also known as crab stitch), which gives the edges a subtle sculptural finish.

The straps are crocheted uniquely by crocheting with four strands of yarn for extra strength, creating a sturdy yet flexible design. Using a clever folding technique, the pattern demonstrates how to pull multiple strands from a single ball of yarn without cutting or reconnecting, ensuring no yarn is wasted. The straps are made with loose stitches to maintain a comfortable level of stretch for daily use.

To elevate the bag’s design, the tutorial adds Lily of the Valley flowers, which contrast beautifully against the body of the bag. These flowers begin with a magic circle and are worked in increasing rounds of single crochet to form a small, dense base. Petals are then shaped with a combination of single, half-double, and double crochet stitches, arranged symmetrically for lifelike detail. You can choose to make three flowers like in the tutorial—or go all out with a full bouquet!

The leaves and flower stems complete the floral embellishments. The leaves are tapered delicately with stitches that increase in height, giving them a realistic silhouette. The stems, worked in chains with two strands of yarn, add a modular element you can either glue or sew onto the bag. The finished product is a celebration of nature-inspired design with sophisticated assembly.

Video Tutorial
Required Materials
- Yarn:
- Two strands of yarn for the bag body and flower stems
- Four strands of yarn for the bag straps
- One strand of yarn for the leaves
- Crochet Hooks:
- 4 mm hook for the bag body and flower stems
- 2.5 mm hook for the leaves
- Additional Tools:
- Stitch markers (helpful for beginners)
- Scissors
- Glue or needle for assembly
- Optional: Flower steam wire (if desired)

Detailed Step-by-Step Instructions
Bag Body Instructions
- Start with the base:
- Use two strands of yarn and a 4 mm hook.
- Begin with a slip knot (do not count this as a stitch).
- Chain 41 stitches.
- Work Single Crochet (Sc):
- Find the second stitch from the hook and work one single crochet.
- Continue making one single crochet in each space—38 single crochets in total.
- In the last stitch, work three single crochets for rounding a corner.
- Second side:
- Repeat single crochets across—38 stitches in total.
- Add two single crochets in the last stitch (increase).
- Closing the round:
- Slip stitch into the first space to close.
- Chain one to start the next round (chain does not count as a stitch).
- Continue rounds:
- From Round 2 to Round 36, do one single crochet in each space (82 single crochets per round).
- Each round ends with a slip stitch to close.
- End with Reverse Single Crochet:
- In Round 37, crochet from right to left for a pattern change.
- Make one reverse single crochet in each space (82 stitches total).
- Finish with a slip stitch, cut off the yarn, and hide the tail.
Bag Straps Instructions
- Prepare four strands of yarn from one ball:
- Use strands from inside and outside, then fold to create four strands.
- Start working straps:
- With a loose slip knot, begin with chain two.
- Work two single crochet stitches through two horizontal stitches.
- Repeat the pattern until the desired strap length is achieved.
- End the strap:
- Chain one, cut off three strands, leaving one for sewing. Create two straps.
Flower Instructions
- Base Circle:
- Use a double knot or magic ring.
- Chain one (does not count as a stitch).
- Work six single crochets into the circle to form the base.
- Close with a pull on the moving yarn and slip stitch into the first space.
- Round 2:
- Work six increases (two single crochet in each stitch).
- Total stitches: 12.
- Round 3:
- Work one single crochet in a stitch, then an increase in the next—repeat six times.
- Total stitches: 18.
- Rounds 4–6:
- Work one single crochet in each space without increases.
- Round 7:
- Alternate: One single crochet, then one invisible decrease over two stitches.
- Total stitches: reduced to prepare for flower petals.
- Round 8 (Petals):
- First Stitch: Single crochet, half double crochet, double crochet.
- Next Stitch: Double crochet, half double crochet, single crochet.
- Repeat for all six petals.
- Complete by slip stitching into the first single crochet.
- Cut off yarn and hide the tail.
Flower Steam Instructions
- Start with two strands of yarn and 4 mm hook:
- Slip knot, then chain four.
- Steam can be attached directly to straps or glued to the bag—no wire necessary.
Leaf Instructions
- Use one strand of yarn and a 2.5 mm hook:
- Begin with a slip knot, then chain 25.
- Pattern:
- Single crochet in the second stitch from hook.
- Two half double crochets, followed by three double crochets.
- Work eight triple crochets for height increases.
- Bring height down: three half double crochets, one single crochet.
- Last stitch:
- Single crochet, chain two, then work a picot stitch (slip stitch into chain legs).
- Repeat the same pattern on the opposite side of the chain.
- End with a slip stitch and cut off yarn.
Assembly
- Sew or glue flowers, stems, and leaves onto the bag body.
- Attach two straps securely to create the shoulder bag.
- Customize by adding extra decorative flowers if desired.
Features & Benefits
- Skill Level: Beginner-friendly, great for those starting with crochet.
- Time Commitment: A manageable pattern that lets you create something unique within a few days.
- Unique Appeal: Combines beauty and practicality with its floral appliqué, customizable length straps, and handmade charm.
- Versatility: Use it as a casual shoulder bag for outings or to carry light essentials stylishly.
Extra Tips & Variations
- Try experimenting with different yarn colors to match your outfits.
- Make additional flowers or adjust the strap length to suit your style.
- Add a fabric lining inside the bag for extra durability.
- The lily of the valley flowers can also be used as standalone embellishments for other makes.
Troubleshooting & Suggestions:
Common Challenges:
- Reverse Single Crochet (Crab Stitch): If the reverse single crochet stitch feels awkward, practice the motion slowly before starting on the bag’s edging. It may feel unnatural to work from left to right, but with patience, you’ll achieve the beautiful texture this step provides.
- Stitch Counts: Staying consistent with stitch counts, especially during the base and flower rounds, is key to maintaining the bag’s proportions. Use a stitch marker in the first stitch of each round for clarity.
- Loose Strap Stitches: Making the strap stitches too tight could result in stiffness. Keep tension relaxed when working with four strands.
Creative Modifications:
- Color Choices: Experiment with different shades for the flowers and leaves to match your aesthetic—pastels for a spring look or bold, contrasting colors for extra pop.
- Additional Embellishments: Add buttons, beads, or embroidery to the flowers or straps for personalized flair.
- Functional Adaptations: Adjust the bag’s height or strap length depending on your needs—more rounds for a larger bag or shorter straps for a handbag style. You could even repurpose the design as a decorative basket!