
This delicate butterfly granny square is the perfect decorative element for blankets, garments, or even wall hangings, bringing a whimsical, handmade touch to your crochet creations.
The Butterfly Granny Square is a beautiful crochet design that combines colorful yarn and clever shapes to create a delicate butterfly in a square. This crochet pattern is special because the butterfly looks like it’s floating inside the square, making it beautiful and unique. You can use this crochet design for all kinds of creative purposes, like eye-catching blankets, stylish pillow covers, or even unique wall hangings.
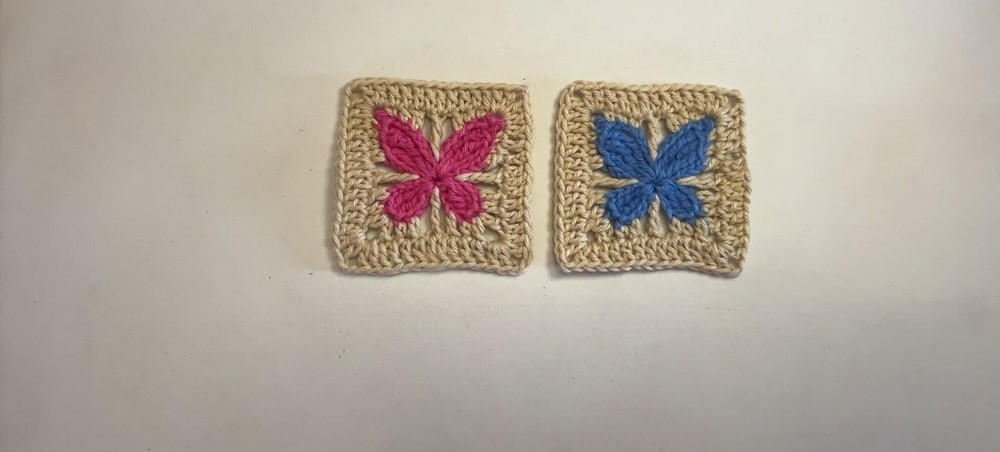
Crochet a Versatile Butterfly Granny Square

This crochet granny square is simple yet versatile, and it’s created using basic crochet techniques with a small crochet hook, soft yarn, and an easy shaping process. You can make the butterfly stand out in bright colors or keep it soft and subtle for neutral tones. It’s a lovely way to decorate your space or create a heartfelt gift.
Credit Hook & Loop Crochet Tutorials
Key Features:
- Materials: Uses organic cotton yarn in two contrasting colors and a 2 mm crochet hook.
- Butterfly Design: Constructed with a magic ring and features small and large wings using stitches such as dtr, qtr, picots, and slip stitches.
- Square Formation: Built around the butterfly with simple stitches (hdc, sc, dc, tr) and includes structured corners for easy paneling.
- Blocking: Optional stretching and blocking are recommended for the final shaping.
- Versatility: Can be joined with other squares for larger projects and customized with endless color combinations.
Construction Overview:
The Butterfly
The centerpiece of this design is the butterfly motif, crafted in the first color of yarn. The butterfly is made by working all four wings—two small and two large—into a magic ring. The small wings use stitches like double treble crochet (dtr) and chains, while the large wings incorporate trebles, quadruple trebles (qtr), and picots for added texture and detail. This stitching pattern creates the illusion of graceful wings in flight. Once the butterfly is complete, the yarn tails are neatly woven in for a polished look.

Creating the Square Base
To transform the butterfly into a granny square, a second color of yarn is introduced. This involves working around the butterfly using standing hdc stitches, sc stitches, and chains to form structured rounds. Stitches are added in strategic placements to outline the butterfly’s silhouette while maintaining the symmetry of the square. The corners are created using dc stitches and chain spaces, which ensure the square takes shape perfectly.

Adding Depth and Refining Edges
As the pattern progresses, additional rows are worked to expand the square. Double crochets (dc), single crochets (sc), and trebles are used to cleanly frame the butterfly. The corners are emphasized with a classic corner stitch (2 dc + ch 2 + 2 dc) in chain spaces, which makes joining multiple squares seamless if you’re creating larger items like blankets or shawls.

Blocking and Finishing Touches
Once the square is complete, blocking is recommended to keep the shape crisp. A foam board and a light mist of water can be used to stretch and refine your square’s edges. Although blocking is optional, it can elevate the overall look, particularly if the square will be incorporated into a larger pattern.

Step-by-Step Pattern
Materials
To create your butterfly granny square, you’ll need:
- Yarn: Two colors of yarn (100% organic cotton recommended). You can choose contrasting or complementary colors for your butterfly and square base.
- Crochet Hook: Size 2 mm crochet hook.
- Optional Tools:
- A tapestry needle for weaving in ends.
- Scissors for cutting yarn.
- Blocking board or foam board for shaping your square.

Pattern Instructions
The Butterfly
First Small Wing:
- Create a magic ring.
- Inside the ring:
- Work 1 single crochet (sc) and chain 3 (ch 3).
- Create 2 double treble crochets (dtr).
- Work chain 4 (ch 4) and finish with a slip stitch (sl st).
First Big Wing:
- Chain 4 (ch 4), followed by 1 treble crochet (tr).
- Work 2 quadruple crochet (qtr).
- Create a picot (ch 3, sl st in both loops).
- Chain 6 (ch 6) and finish with a slip stitch in the ring.
Second Big Wing:
- Chain 9 (ch 9) and create a picot (sl st in the 4th chain stitch).
- Work 2 quadruple crochet (qtr), followed by 1 double treble crochet (dtr).
- Chain 4 (ch 4) and finish with a slip stitch (sl st).
Second Small Wing:
- Chain 4 (ch 4) and work 2 double treble crochets (dtr).
- Chain 4 (ch 4) and finish with a slip stitch.
- Chain 1, pull the yarn, cut it, and weave in the tails with a tapestry needle.
The Square
Round 1:
- Switch to the second yarn color and begin with a slip knot.
- Work into the back loops only:
- Standing half double crochet (hdc) into the top chain next to the treble.
- Single crochet (sc) into the next two stitches.
- Chain 3 (ch 3), skip the picot, then work 1 sc.
- Work 1 hdc, then 1 double crochet (dc).
- Chain 1 (ch 1), skip 3 stitches, then crochet 1 treble (tr) between the two wings.
- Chain 1 (ch 1), skip 3 stitches, work 1 double crochet (dc) into the 4th stitch.
- Repeat this pattern around all four sides of the butterfly:
- Corners: For each corner, work 1 double crochet (dc), chain 3 (ch 3), and 1 double crochet (dc) in the same stitch.
- Pull the yarn through, cut it, and weave in the ends for a clean look.
Round 2:
- Start with ch 3 (ch 3), which counts as 1 double crochet (dc).
- Work 1 double crochet (dc) in the next two stitches.
- For each corner, work 2 double crochet (dc), chain 2 (ch 2), 2 double crochet (dc) into the chain space.
- Continue working around the square. Pull the yarn through, cut it, and finish with a seamless stitch for neatness.
Optional Finishing Touches
- Blocking: Lightly spray your square with water and stretch it out on a foam or blocking board to refine its shape.
- Joining Squares: Create multiple butterfly granny squares in different colors and stitch them together for a larger project. Adjust the layout to suit your design idea.

Troubleshooting and Suggestions
Common Issues:
- Picots not forming neatly: Ensure you’re pulling the yarn tightly when locking the picots with slip stitches.
- Shifting symmetry: Count your stitches carefully in the square’s foundation rows to maintain balance around the butterfly.
- Uneven edges: Double-check corner stitches to ensure proper spacing for every round.
Creative Modifications:
- Color Play: Experiment with various color combinations for the butterfly and square base to suit your project’s aesthetic.
- Alternate Uses: Transform a single butterfly square into a coaster or applique for bags, or join multiple squares for blankets, scarves, or table runners.
- Embellishments: Add beads to the butterfly wings or edges for an extra touch of flair.


