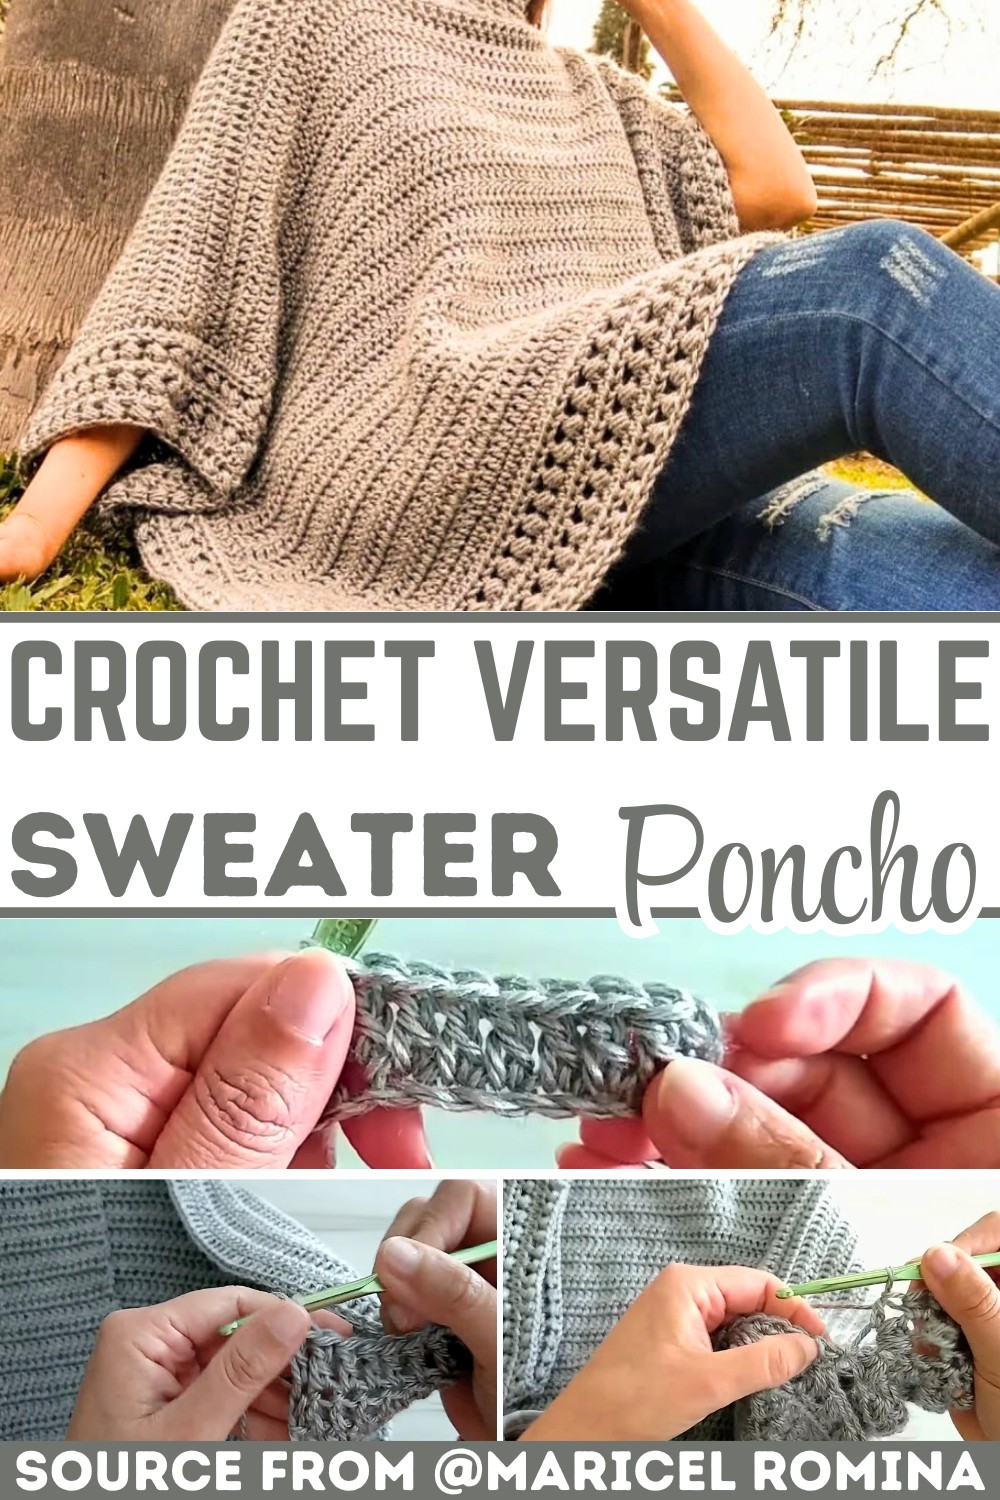
This sweater poncho is the perfect layering piece, combining effortless comfort and chic texture for a wardrobe staple you’ll love to make and wear.

A crochet sweater poncho is a cozy and stylish item that feels like a hug you can wear. Perfect for chilly days or adding flair to your outfit, it combines the warmth of a sweater with the flowy elegance of a poncho. This poncho pattern creates something versatile you can throw over casual clothes or dress up for an outing.
Versatile Crochet Sweater Poncho
Making this crochet poncho is simple enough for beginners to try. It’s all about combining basic stitches to form a lightweight, comfy layer. The step-by-step design makes it a relaxing and rewarding activity, and you’ll love seeing it come together. If you enjoy crocheting for fun or want to create something practical, this sweater poncho is sure to charm you.
Credit Maricel Romina
Pattern Overview: Key Features and Construction
- Two easy rectangles make up the body of the poncho, crocheted entirely with double crochet stitches.
- Seamless shoulder joins create the neck opening, adjustable for different sizes.
- An optional ribbed neck adds a polished, high-neck or T-shirt-style finish.
- Elegant edging with bead stitches and half double crochet rows decorates the hem and sleeve openings.
- Finishing involves simple side seaming, leaving space for optional sleeves or a flowing drape.
Expanded Description of Construction Steps
1. Crocheting the Rectangles
The main body of the poncho starts with two identical rectangles made with simple double crochet stitches. Begin with a foundation chain, ensuring a loose tension for an even, flexible edge. Working double crochet rows back and forth creates a smooth, consistent texture that forms the poncho’s base. The number of rows determines the length, allowing you to customize the fit based on your preferences or size guide. After completing both rectangles, you’ll have two versatile panels ready for assembly.

2. Joining the Rectangles: Neckline & Shoulders
Align the two rectangles to prepare for seaming at the shoulders. Slip stitches join the panels, ensuring a seamless and comfortable connection. Crocheters can adjust the neck opening width by marking the center stitches. Whether you desire a wide, scoop-style neck or prefer a snug high-neck look, this part of the pattern lets you personalize the design to your liking.

3. Optional Neck Ribbing
Take the neckline up a notch by crocheting a textured ribbed border. Using alternating front post and back post double crochet stitches, this ribbed section creates visual appeal and adds structure. You can opt for just a quick round or multiple rows for a cozier high neck. This step is optional but brings a polished finish to the garment.

4. Edging and Sleeves
The bottom edges and sleeves feature decorative touches with bead stitches and half double crochets worked in alternation. The bead stitch adds texture and charm, using unique yarn wraps for a puff-like effect. Rows of half double crochet balance this section by providing stability. You can extend the same pattern around the sleeve openings for a unified design or leave the sleeves open for a natural poncho vibe.

5. Seaming and Finishing
The final step involves joining the sides just enough to create arm openings while maintaining the poncho’s signature drape. Simple slip stitches or sewing with a darning needle work perfectly for this part. Lastly, weave in any leftover yarn tails for clean, professional finishing touches. Try the poncho on to assess fit and make small customizations if needed.

Video Tutorial
Step-by-Step Pattern
Required Materials:
- Yarn: Soft wool, acrylic, or cotton yarn (semi-thick for winter ponchos, lighter weight for mid-season or summer versions). Approx. 2mm thick.
- Hook: 6mm crochet hook.
- Markers: To keep track of stitches (especially for the neck opening).
- Scissors: For cutting yarn.
- Darning/Tapestry Needle: To weave in ends.
- Optional: Tape measure to check gauge and length.
Pattern Instructions
Step 1: Making the Rectangles
- Begin by crocheting two identical rectangles.
- Foundation Chain: Create the required number of chains (see size guide above). Use a loose tension.
- Row 1: Chain 4 more to begin the first row. Skip 4 chains, then make 1 double crochet in the next chain. Continue placing 1 double crochet (dc) in each chain to complete the row.
- Row 2 Onwards: Chain 2 or 3 (depending on your preference). Begin making double crochets in each stitch across. Repeat this for 28–30 rows, depending on your desired length.
At this point, both rectangles should have the same length and width. For example, for L/XL, the sample worked in the video had 28 rows.
Step 2: Joining for the Body
- Prepare for the Neck Opening:
For each rectangle, count 38 stitches from each edge (or adjust based on your chosen size). Use markers to indicate the space for the neck opening in the center. - Seaming the Shoulders:
Join the two rectangles together at each shoulder with slip stitches. Ensure the double crochet stitches of the front piece align perfectly with the back. Use a loose slip stitch to avoid pulling or tightening the seam. - Finalizing the Neck Opening:
Once the two shoulders are joined, you’ll have an opening for the head in the center.
Step 3: Adding the Neck (Optional)
- Attach your yarn to the neck edge. Start working on the right side.
- Create a round of double crochets around the neck opening.
- For each subsequent round, alternate front post and back post double crochet stitches to create a ribbed texture (relief stitch).
- Continue for as many rows as you prefer to achieve your desired neck height.
- For a T-shirt style neck, you can stop after 1–2 rows.
- For a high-neck style, crochet 5–6 rows.
Step 4: Creating Edges and Sleeve Borders
- With the poncho laid flat, begin working on the edges of the garment. Start with one rectangle.
- Crochet a foundation row of half double crochets (hdc) along the bottom edge.
- Follow this with alternating rows of:
- Bead Stitch: Make 1 double crochet, then yarn over and wrap the yarn 3 times for a puff effect. Skip one stitch before repeating.
- Half Double Crochets: Crochet a row of hdc to separate the bead stitch rows.
- Repeat the pattern of bead stitches and hdc rows as desired for the bottom edging.
- For the sleeve openings (optional), count 10 stitches from the center on both the front and back. Mark your placement and join yarn to create sleeves.
- Crochet in the round, following the same pattern (bead stitch/hdc). Complete as many rows as your desired length requires.
Step 5: Finishing Touches
- Seam the Sides: Use slip stitches or a darning needle to join the rectangle sides just enough to create arm openings (leave part of the edges unsewn for sleeves or a natural drape).
- Weave in Ends: Hide all loose yarn tails using a darning needle.
- Try It On: Check the fit and length. Make adjustments if necessary to fine-tune the overall look.
Troubleshooting and Suggestions
Troubleshooting Tips
- Uneven Edges: Ensure consistent tension when working double crochets in the rectangle rows. Looser tension creates flexibility, while overly tight stitches could lead to stiff panels.
- Slip Stitch Seaming: Avoid pulling the yarn too tight during shoulder and side joins to prevent puckering. A loose slip stitch seam allows for a smooth, fluid drape.
- Stitch Consistency in Edging: When working bead stitches, maintain even yarn wraps and spacing for a clean, professional look.
Creative Modifications
- Color Combinations: Use stripes, gradient yarns, or create contrasting colors for the rectangles and edging to personalize your poncho.
- Embellishments: Add tassels or pompoms to the edges for a playful touch.
- Adaptable Design: Skip the side seaming entirely to convert the poncho into a flowing wrap or oversized shawl.