A lightweight and cozy oversized crochet shirt designed for comfort, style, and versatility that can easily be made in any size.

This oversized crochet shirt is the perfect blend of comfort and style. It’s loose-fitting, soft, and great for everyday wear. If you want to pair this crochet shirt with jeans for a casual look, or layer it over a tank top during cooler days. Its relaxed design makes it perfect for lounging, running errands, or hanging out with friends. The crochet shirt’s oversized look adds a trendy touch, and best of all, you can customize it to any size or color.
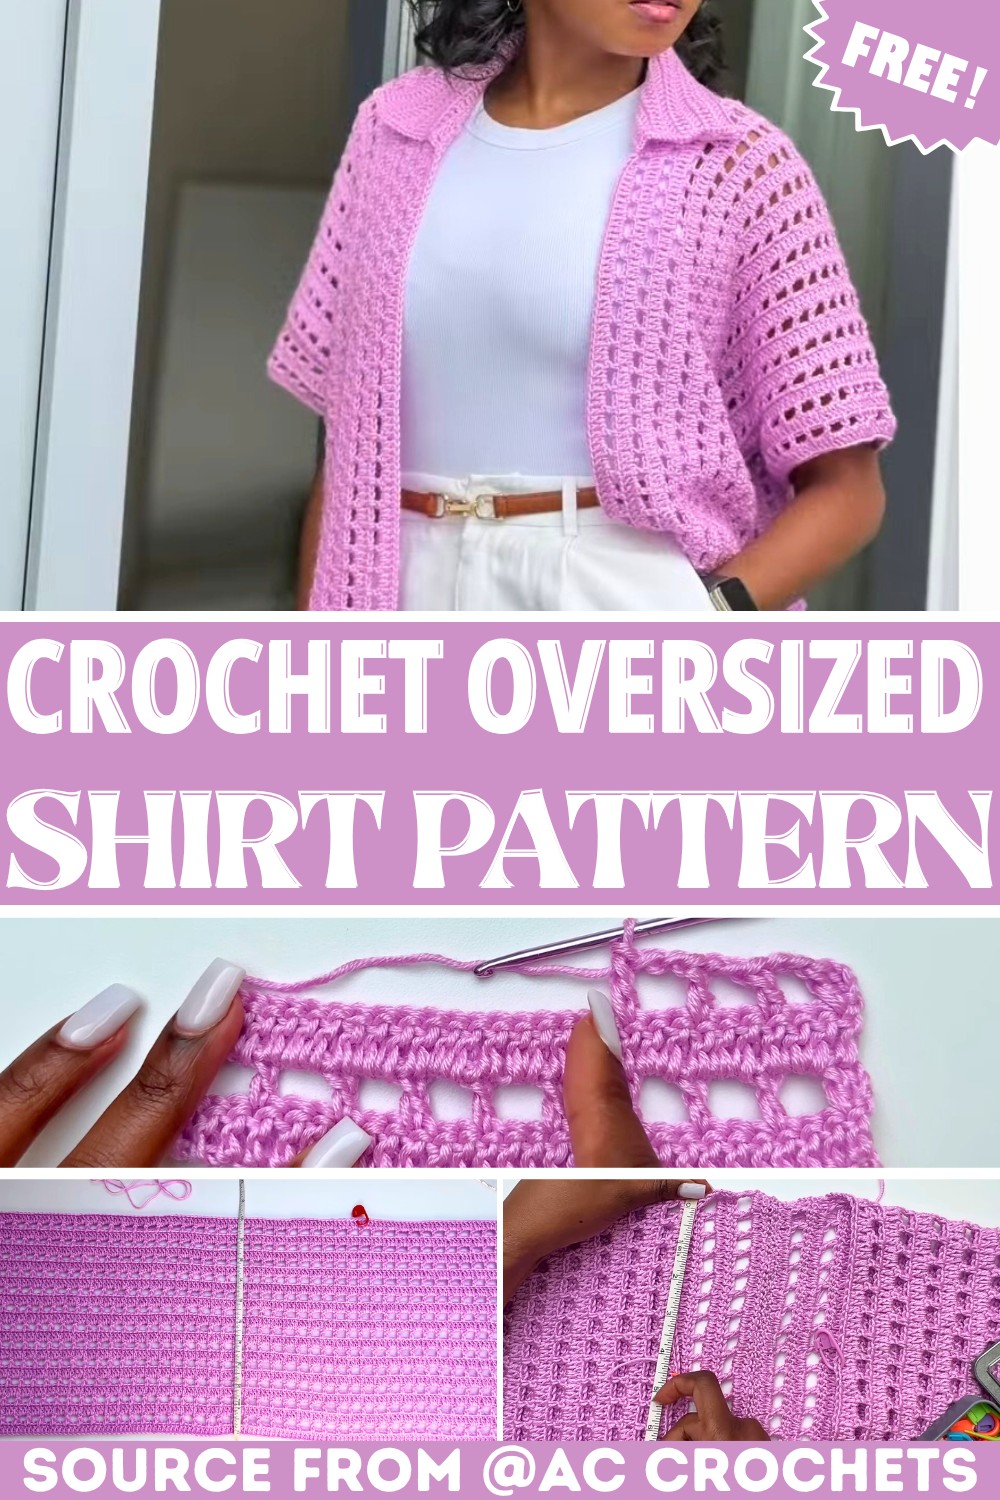
Crochet an Easy Oversized Shirt
Crocheting this shirt is like building a simple puzzle; it involves two identical panels that are joined together. The beauty of this design is its simplicity, using basic stitches and a neat pattern. You’ll work step by step to shape the body, the sleeves, and even a cozy neckline. You can adjust the length and width to suit your style, if you want a longer or shorter fit. This shirt design is easy to follow and perfect for beginners who are ready to make their first wearable piece.
Credit AC Crochets
Key Features & Construction
- Customizable sizing: Easily adjust the shirt’s size by altering the foundation chain length and measurements.
- Two-panel construction: The shirt is worked in two identical panels, joined at the sides and shoulders.
- Simple stitch pattern: Features alternating rows of mesh (chain spaces) and solid double crochet for a neat yet breezy texture.
- Optional neckline shaping: A structured neckline is created by leaving space in the middle of the panels and reinforcing it with additional rows.
- Finishing touches: Sleeves and a clean border are added for a polished, oversized fit.
How the Oversized Shirt Comes Together
This oversized shirt begins with two identical panels, worked flat from the top of the shoulder to the bottom hem. What’s unique about this design is how the foundation chain determines the height of your shirt—so make yours twice the desired height of the final piece. Mesh rows (chain spaces) alternate with double crochet rows to create a beautifully textured, breathable fabric that is lightweight and perfect for layering.

Once the panels are complete, they’re joined together. The neckline is shaped by leaving a section unworked at the top center of each panel. This section is reinforced with additional rows to create a clean, structured opening. To ensure a great fit, you can customize the neckline width based on your preference by adjusting how much space is left open.

After the panels are sewn together on the shoulders and sides (leaving space for armholes), the design is polished with a couple of finishing techniques. The bottom hem gets a straightened border using a row of double crochet stitches, providing a neat and professional look.

The sleeves are added last, worked directly in the round from the armhole. They follow the shirt’s main pattern—alternating mesh and double crochet rows—for a cohesive design. With just a few quick rounds, you’ll have the perfect oversized shirt: comfortable, breathable, and stylish.

Video Tutorial
Step-by-Step Pattern
Materials
To create your crochet shirt, gather the following items:
- Yarn: Durable Comfy Yarn (100g/266m per skein, 100% microfiber acrylic, sport-weight yarn or size 2 yarn). You’ll need approximately 400g for the indicated size.
- Recommended yarn: Durable Comfy Yarn.
- Color used: Oid.
- Crochet Hook: 3mm size hook (recommended for this yarn).
- Other Tools:
- Darning needle (for sewing panels and weaving in ends).
- Stitch markers (to mark key sections like the neckline and armholes).
- Tape measure (to determine shirt size and customization).
- Scissors (for cutting yarn).
Pattern Instructions
Step 1: Foundation Chain
- Begin with a foundation chain that measures twice your desired shirt height. For example, if your shirt height is 23 inches, create a chain that measures approximately 46 inches in length.
- Work this chain in multiples of 3 + 1 additional chain at the end.
Example: Chain 46 inches using the formula 3 + 3 + 3… + 1 for an even base.
Step 2: Row 1 – Double Crochet Row
- Yarn over, and skip the first 3 chains of your foundation chain.
- Insert your hook into the 4th chain and make a double crochet (DC).
- Continue making 1 DC in every chain until the end of the row.
Step 3: Row 2 – Mesh Stitch
- Chain 3 (does not count as a stitch), turn your work, and yarn over.
- In the first stitch, make a DC.
- Chain 2, skip 2 stitches, and make a DC into the 3rd stitch.
- Repeat chain 2, skip 2, DC across the row.
Step 4: Row 3 – Double Crochet Row
- Chain 3 (does not count as a stitch), turn your work, and yarn over.
- Make 1 DC in the first stitch.
- In the mesh spaces from the previous row, crochet 2 DCs in each space.
- On top of DCs from the previous row, crochet 1 DC.
- Repeat until the end of the row.
Step 5: Repeat Rows
Repeat Row 2 (Mesh Stitch) and Row 3 (Double Crochet) until the desired width of each panel is achieved. For an oversized look, aim for approximately 10 inches wide.
Step 6: Neckline and Dividing Panels
- Determine the middle of your panel by folding it in half or counting the total mesh spaces (referred to as “windows” in the tutorial).
- Mark the middle section with a stitch marker. Create space for the neckline by working additional rows on either side of the marker, ensuring each side matches in size and stitches.
Leave approximately 4 inches for the neckline opening.
Step 7: Joining the Panels
- Lay the two panels together, wrong sides out.
- Use a darning needle to sew along the shoulder seams and sides or use a slip stitch for joining.
- Leave armholes of approximately 7 inches from the top of the shoulder seam on both sides.
Step 8: Adding Sleeves
- Attach yarn to the bottom corner of an armhole.
- Begin with a Mesh Stitch round, working in a continuous circle around the armhole.
- Switch to a Double Crochet Row for the next round.
- Alternate between Mesh Stitch and Double Crochet Rows until the sleeves measure approximately 4 rows.
Step 9: Collar Edging
- Attach yarn at one corner of the neckline. Work evenly spaced double crochets along the neckline edges.
- Begin with 1 DC in each stitch across the bottom, working 2 DCs in mesh spaces and 1 DC on top of each previous DC.
- Add additional rows to the collar to achieve a clean and polished look. Optional: Incorporate increases at the start and end of rows to widen the collar.
Step 10: Finishing Touches
- Straighten the bottom hem with a row of evenly spaced double crochets.
- Secure all loose ends by weaving them in using a darning needle.
- Block your shirt (optional) for a cleaner, professional finish.
Troubleshooting and Suggestions
Crocheting this oversized shirt is relatively simple, but here are a few tips to avoid potential headaches:
- Keep your foundation chain even and loose: A tight chain might cause the panels to pucker or curl. Consider using a hook size larger for the foundation chain or double-checking tension.
- Check your stitch counts: Consistent stitch counts are key for rows to align properly. If the mesh rows aren’t sitting evenly, verify that you’re working multiples of three and maintaining proper skipping.
- Seam carefully: Sew the sides and shoulders evenly using a whipstitch, slip stitch, or your preferred method for neat, clean joins. Ensure both sides of the body and sleeves match perfectly.
Creative Tweaks to Try:
- Use bold color striping or a gradient yarn for a trendy twist.
- Add ribbing at the sleeves or hem for a snugger finish.
- Adjust sleeve length—go sleeveless for summer or full-length for colder months.
- Incorporate embellishments such as faux buttons down the front or tassels at the bottom for a bohemian vibe.