Create perfectly tailored crochet shorts using textured fan stitches, a stretchy waistband, and versatile leg shaping, customizable for any size or occasion.

Crochet shorts are a delightful and stylish piece of clothing that’s perfect for warm weather. If they’re for a playful two-year-old or made in larger sizes for adults, these crochet shorts are both comfortable and charming. With their simple yet elegant design, they pair beautifully with tank tops, making them ideal for casual outings or staying cozy at home.
How to Crochet Stylish Shorts
Making these shorts is simple and fun, especially for beginners. You’ll start by working on a stretchy waistband with neat little buttonholes for the cord. Then, you’ll add cute fan-shaped stitches for the lower half, creating a breezy, stylish design.
Credit: Majovel crochet english
Key Features and Construction Overview
- Flexible Fit: Start by measuring the waistband and working with a chain base in multiples of 4.
- Structured Waistband: Includes buttonholes for threading a decorative crochet cord.
- Fan Stitch Design: Delicate fans create structure and beautiful texture for the main shorts.
- Separate Leg Construction: Each leg is worked individually from the fans downward.
- Simple Cord Tie: A functional and decorative cord completes the look.
Construction and Techniques Breakdown
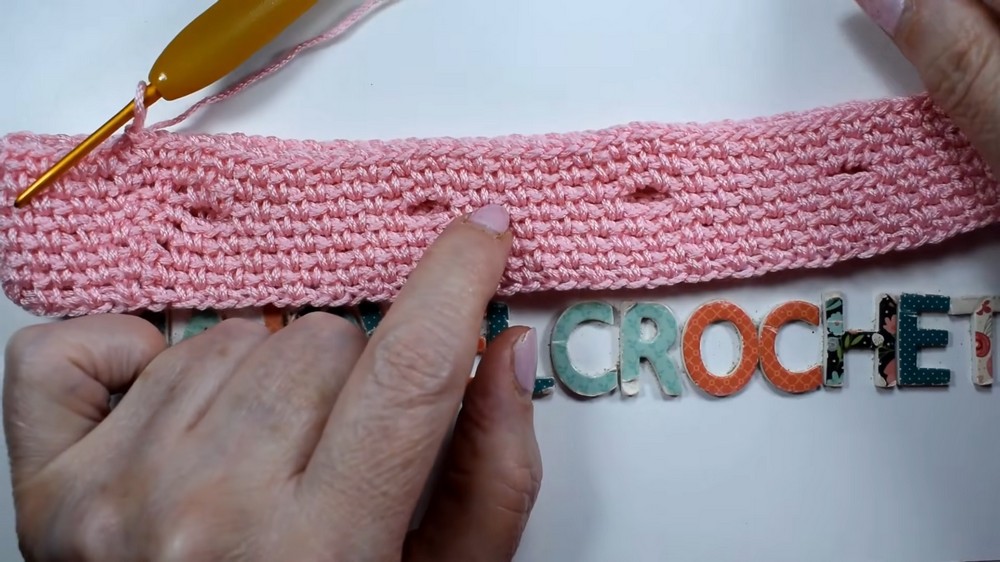
These charming shorts begin with a chain foundation tailored to your waist measurement—perfect for ensuring a custom fit no matter the recipient’s size. You’ll join your chains into a crisp loop using a slip stitch, so it’s key to keep the chain untwisted as you work. The waistband alternates single crochet stitches with chains in a repeating pattern, providing stretch and durability while maintaining a delicate, lightweight feel. After completing the waistband rows, small buttonholes are incorporated, spaced evenly to thread a decorative cord later.
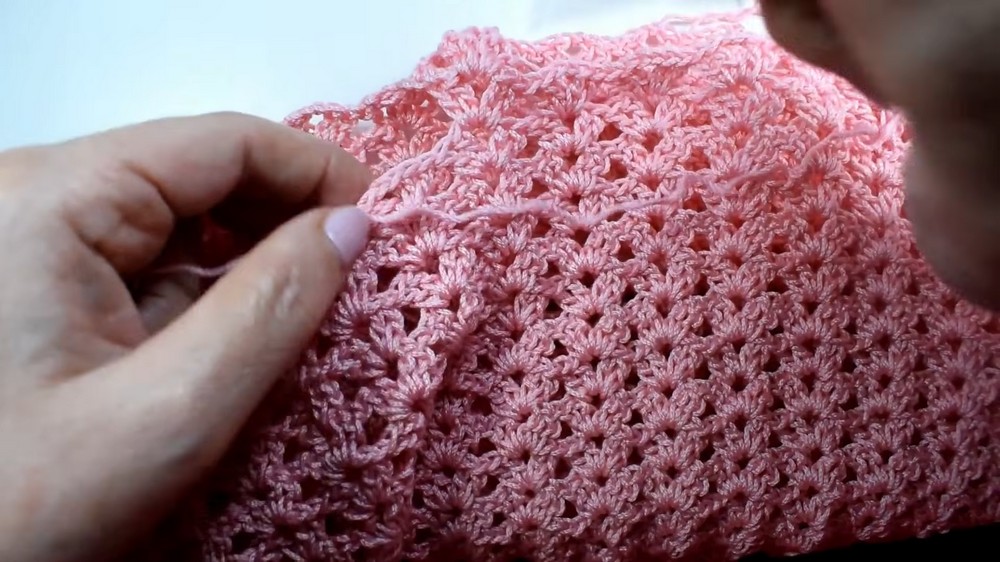
Once the waistband is complete, the design’s beauty truly shines through with the use of fan stitches. These textured stitches create a visually appealing, breezy feel for the main body of the shorts. Fans are carefully spaced and worked evenly around, ensuring symmetry and balance—important for achieving a polished look. As you progress, you’ll flip the direction with every row, creating a reversible texture that adds uniformity across the shorts.
The shorts are then divided into two sections to form the individual legs. The structured fans continue seamlessly down each leg, preserving the beautiful stitch flow. By working even rows around each leg cuff, you can easily adjust the length to customize the shorts for different sizes or personal preference.

To finish, a simple crochet cord made with a chain stitch provides both a practical and decorative touch, allowing the shorts to be cinched at the waist comfortably. This final element not only adds functionality but also adds a cute, handmade detail that ties the pattern together beautifully.

Video Tutorial
Step-by-Step Pattern
Materials
- Yarn: 100 grams of thread (cotton yarn is recommended for comfort and breathability).
- Hook: 3mm crochet hook.
- Optional Tools: Scissors, measuring tape (to measure waist and desired length), and tapestry needle for weaving in ends.
Pattern Instructions
Step 1: Waistband
- Measure the waist of the intended wearer and create a chain of the necessary length. (For example: The tutorial used a chain measuring 56 cm or 22 inches—128 chains for a child’s size.)
- Join Chain: Connect the chain ends with a slip stitch to form a loop. Be sure not to twist the chain.
Step 2: Create Ribbing for Waistband
- Row 1:
- Chain 1.
- Insert a single crochet into the first stitch.
- Chain 1, skip 1 stitch, single crochet into the next stitch. Continue this sequence across the row.
- End the row with a slip stitch.
- Row 2 to 5: Repeat row 1. Alternate between chains and single crochets while following the same sequence for a total of 4 rows.
Step 3: Add Buttonholes for Cord
- Row 6:
- Chain 1, single crochet into the first stitch.
- Chain 1, skip 1 stitch, single crochet into the next stitch (repeat this base sequence for 9 stitches).
- Create a buttonhole by chaining 3 and skipping 3 stitches, then continue the sequence (single crochet, chain 1, skip stitches).
- Adjust stitch counts as needed (skip 4 or 2 stitches) to ensure the buttonholes are evenly spaced.
- End the row with a slip stitch.
Step 4: Basic Shorts Body
- Fan Pattern:
- Begin the row by working 3 chains. In the same stitch, work 1 double crochet, 2 chains, and 2 double crochets (this creates one fan).
- Skip 3 stitches and repeat the fan sequence into the next stitch (2 double crochets, 2 chains, 2 double crochets).
- Continue this sequence for the entire row.
- End with a slip stitch.
- Work Even Fans: Ensure the fan count is even. Spin your work and repeat the fan sequence from the reverse side for the second row. This creates a symmetrical structure.
- Rows 7 to Necessary Measurement: Keep repeating the fan stitch rows until you reach your desired shorts length. For reference, the example pairs were worked to 16 cm (6.2 inches) in length, with 34 fans total (17 for each leg).

Step 5: Separate Legs
- For the first leg, divide the fans evenly (e.g., 17 for each leg). Join with a slip stitch to form the first leg opening.
- Work in the round for additional rows to complete the first leg (continue working 3 chains, 1 double crochet, and fan patterns).
- When you reach the desired leg length, fasten off the yarn and move on to the second leg, repeating the steps.
Step 6: Add Decorative Features
- Create the cord: Crochet a long chain (about 150 chains) and work slip stitches across the entire chain to make it sturdy.
- Pass the cord through the buttonholes created earlier in the waistband to create a drawstring effect.
- Customize further by adding tassels, beads, or pom-poms to the ends of the cord.
Finishing Touches
- Weave in any ends using a tapestry needle to ensure a clean finish.
- Test the fit and adjust the cord as needed.
Troubleshooting and Suggestions
Common Issues:
- Twisting Chains: Be extra mindful when joining the foundation chain into a loop—it’s easy to accidentally mess up! Smooth out your chain before connecting.
- Fan Stitch Consistency: Ensure you’re skipping the correct number of stitches between each fan to maintain an even spacing. Miscounts can lead to lopsided shorts!
- Sizing the Legs: Measure carefully when dividing the fans for the legs. Uneven division can impact balance and fit.
Creative Suggestions:
- Color Play: Experiment with variegated yarns or alternate colors between the waistband, fans, and cord for playful, eye-catching shorts!
- Add Embellishments: Consider adding pom-poms to the cord ends or a delicate scalloped edging at the leg cuffs for extra flair.
- Extend or Adapt: Turn this pattern into bloomers for babies or breezy lounge shorts for adults by adjusting the starting chain length and adding rows.