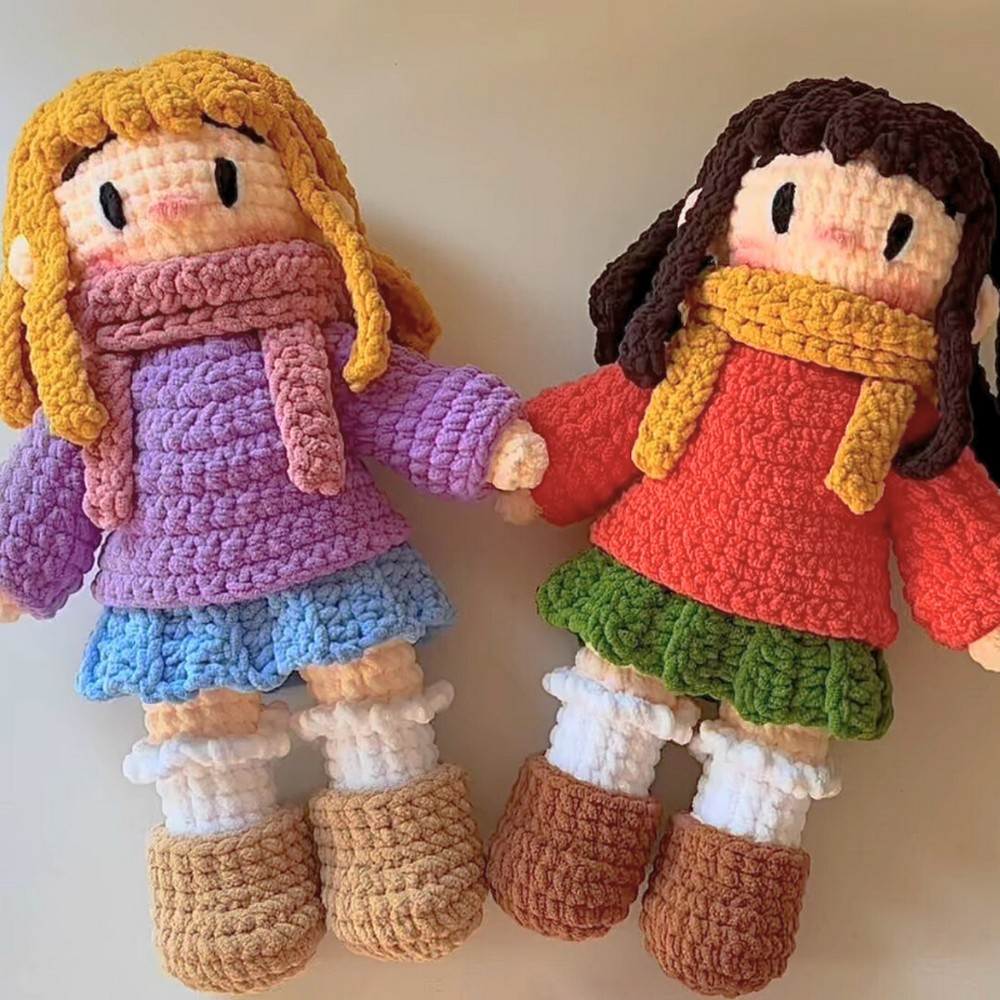
This crochet Baby Girl Doll is large, cuddly, and perfect for winter! Complete with handmade details including frilly socks, boots, a cute sweater, scarf, and a styled hairstyle, she’s ready to be your little one’s best companion.
Crochet Baby Girl Doll Pattern Free

This adorable crochet doll is the perfect winter companion. She’s soft, warm, and as big as a real baby, making her incredibly huggable. Whether used as a toy, a cute display on a shelf, or a thoughtful gift, she adds joy wherever she goes.
Creating the Baby Girl Crochet Doll is simple yet satisfying. From her cuddly arms to her tiny details like blushy cheeks, eyes, and hair strands, every part of this crochet doll is lovingly made. Beginners and experienced crocheters alike can enjoy the process. Add creative touches like a scarf, sweater, or even boots. Once complete, she becomes a cherished friend for cold days.
Credit Chubby Cheek
Key Features and Pattern Construction:
- Handmade doll parts: Magic ring-based arms, legs, and body worked in the round.
- Details and textures: Color changes for socks, frilly embellishments, and back loop stitches for depth.
- Shaping and assembly: Decreases to form curves for the head, body, and features such as ears and nose.
- Facial features and hair: Embroidered eyes, brows, and nose, along with frilly layered hairlines attached with glue for extra flair.
- Accessories: Tiny scarf, boots, and a winter sweater with well-placed armholes.
Forming the Doll Base
The doll begins with its arms and legs, which are crocheted using the magic ring technique and simple single crochet stitches. The arms are created in skin-toned yarn and securely stuffed before being closed and set aside. The legs include playful details like sock color changes and frill additions worked in white yarn with back loop crochet for texture. These foundational pieces are stuffed and later joined seamlessly to form the body using chain stitches.

Creating the body involves rows of single crochets combined with strategic increases and decreases to shape and taper the design, giving the doll its baby-like proportions. The head is similarly shaped with gradual decreases at its crown, and snug stuffing helps the doll maintain durability and softness. The hands, legs, and body are strategically sewn together to ensure stability.

Adding Personality to the Doll
Facial embroidery using black, white, and brown yarn creates expressive eyes, eyebrows, and a delicate nose. The tutorial demonstrates a simple yet effective method to achieve this with clean stitching and spacing. The addition of light shading with blush (optional) provides the doll with a natural and warm appearance.

The styled hair is constructed in layers, with two types of strands—long and short—crocheted into front and back loops of specific rounds on the head. Following careful strand placement, glue secures the hair in place to create a fun, voluminous hairstyle. Short strands add fringe detail while the long ones form the textured body of the hair—a truly special touch!

Winter-Ready Ensemble
The adorable outfit includes a tiny sweater, boots, scarf, and skirt. The sweater features neat armholes achieved through skipped stitches and chain spaces, with classic single crochet rows building up its structure. The boots and scarf are tiny accessories crocheted from scratch and shaped to fit snugly on the doll’s legs and neck. The frilly skirt alternates back loop and front loop stitches, creating playful waves that pair beautifully with the doll’s minimal yet cozy design.

The completed look is soft, warm, and cheerful—a little crocheted bundle of joy!
How To Crochet Baby Girl Doll
Materials & Tools Needed
- Yarn:
- Skin color
- White (for socks)
- Additional color(s) of your choice for clothing, hair, and accessories
- Black (for eyes)
- Dark brown (for eyebrows)
- Pink (optional, for blush)
- White for detailing (eye highlight)
- Hook Size: 5 mm crochet hook
- Stuffing Material: Poly-fil or similar
- Stitch Markers
- Tapestry Needle: For sewing and hiding yarn tails
- Fabric Glue (optional): For securing the doll’s hair
- Scissors
- Makeup (optional): Light blush to apply to the cheeks
Finished Size
- The finished doll will be sizeable (approximately baby-sized) and cuddly, making it a great gift or comforting companion.
Customization Ideas
- Hair Color: Choose yarn colors that match your preferred hairstyle for the doll.
- Clothing Colors: Use your favorite colors for the sweater, skirt, and scarf.
- Accessories: Add embellishments like buttons, ribbons, or embroidery for personalized touches.
Pattern Abbreviations & Terminology
(Note: This pattern uses US crochet terminology.)
- ch: Chain
- sc: Single Crochet
- hdc: Half Double Crochet
- dc: Double Crochet
- sl st: Slip Stitch
- MR: Magic Ring
- inc: Increase (2 sc in the same stitch)
- dec: Decrease (crochet two stitches together)
- BLO: Back Loop Only
- FLO: Front Loop Only
- st(s): Stitch(es)
- YO: Yarn Over
Step-by-Step Crochet Instructions
1. Arms (Make 2)
With skin color yarn:
- Create a magic ring (MR).
- Round 1: 8 sc in MR. Pull the tail to close. [8 sts]
- Rounds 2-11: 1 sc in each st around. [8 sts]
- Lightly stuff the arm before closing.
- Closing: Fold the top edge flat and crochet through both sides to close the opening (approx. 3 sc across). Fasten off, leaving a long tail for sewing.
Set aside both arms.
2. Legs (Make 2)
Sock Color (White):
- Create a magic ring.
- Round 1: 7 sc in MR. Pull to close. [7 sts]
- Round 2: 7 increases (2 sc in each st). [14 sts]
- Rounds 3-11: 1 sc in each st around. [14 sts]
Switch to Skin Color:
5. Round 12: Work in BLO for this round only. 1 sc in each st around. [14 sts]
- Rounds 13-14: 1 sc in each st around. [14 sts]
- Fasten off the first leg after Round 14. For the second leg, do not fasten off.
3. Body
- Joining Legs:
- On the second leg, ch 2, and join to the first leg with a sc.
- Round 1: 14 sc on the first leg, 2 sc on the ch 2, 14 sc on the second leg, 2 sc on the other side of the ch 2. [32 sts]
- Rounds 2-5: 1 sc in each st around. [32 sts]
- Shaping the Body:
- Round 6: 6 sc, dec, repeat 4 times. [28 sts]
- Round 7: 5 sc, dec, repeat 4 times. [24 sts]
- Rounds 8-14: 1 sc in each st around. [24 sts]
- Stuff the body.
4. Head
- Round 15: 4 sc, dec, repeat 4 times. [20 sts]
- Round 16: 3 sc, dec, repeat 4 times. [16 sts]
- Round 17: Dec 8 times. [8 sts]
- Rounds 18-21: Gradually increase stitches to form the head:
- Round 18: (1 sc, 1 inc) x 8 [16 sts]
- Round 19: (1 sc, 1 inc) x 8 [24 sts]
- Round 20: (3 sc, 1 inc) x 6 [30 sts]
- Round 21-28: 1 sc in each st. [30 sts]
- Begin decreasing again:
- Round 29: (3 sc, dec) x 6 [24 sts]
- Round 30: (2 sc, dec) x 6 [18 sts]
- Round 31: (1 sc, dec) x 6 [12 sts]
- Round 32: Dec 6 times. [6 sts]
- Stuff and close the head by weaving the tail through the remaining stitches. Secure and hide the yarn.
5. Hair
- Work a hair base by creating a small circle (MR, increasing outwards to fit the doll’s head).
- Add strands by chaining and working back with hdc or sc (as described in your transcription).
- Glue or sew the completed hairpiece securely onto the head.
6. Face Details
- Eyes: Use black yarn to create small embroidery-style eyes.
- Eyebrows: Embroider with dark brown yarn.
- Nose: Embroider with skin-colored yarn between the eyes.
- Blush (optional): Apply a light pink blush to the cheeks.
7. Clothing
- Sweater: Crochet rows back and forth. Add sleeves by attaching yarn to the armholes and working outward in rounds.
- Skirt: Create a ruffled effect (increase stitches regularly while working in the round).
- Scarf: Start with a long chain. Work back with hdc.
8. Assembly
- Sew arms to the body, positioning them between Rounds 14 and 15 on the body.
- Attach any final details (e.g., shoes, scarf).
Notes
- Feel free to experiment with color changes for extra customization!
- Be sure to stuff the doll firmly but not excessively to maintain shape.

Troubleshooting and Suggestions
Common Challenges:
- Color Changes: Be consistent when switching colors to avoid gaps. Carry the yarn ends along the project or weave them in later to create a polished finish.
- Decreases and Increases: Ensure stitches are tight and evenly spaced during shaping rounds to maintain smooth curves for the head and body. Use stitch markers to track the beginning of each round.
- Facial Embroidery: Use short, intentional stitches when crafting eyes and brows. Avoid pulling too tightly to prevent puckering the crochet fabric.
Creative Modifications:
- Color Themes: Try different color palettes for the doll’s outfit—bright pastels or monochrome winter hues can give the doll a whole new personality.
- Embellishments: Add tiny buttons, bows, or even crochet applique flowers to the sweater and scarf for extra charm.
- Alternative Uses: Adapt the sweater or scarf design into doll-sized clothing for other crochet toys, making reusable patterns from this tutorial.