Free Crochet Baby Ghost Keychain Pattern For Halloween
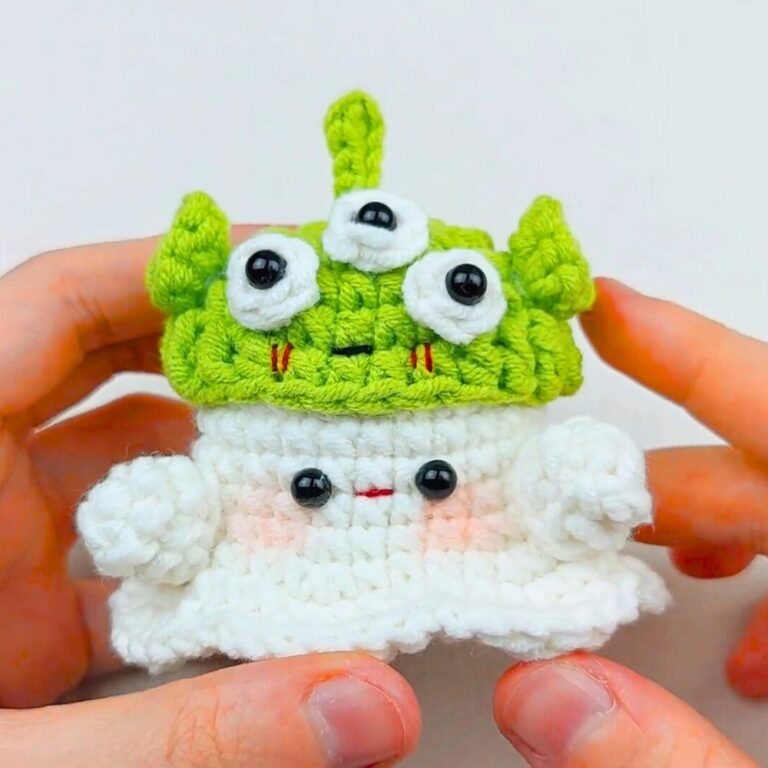
Some crochet pieces are impossible to ignore, and Yurongi is one of those tiny creations that wins you over at first glance. This adorable baby ghost keychain blends playful Halloween charm with an exceptionally cute personality.
Making it a delightful addition to keys, backpacks, purses, or festive displays. Every little detail adds to its character, making it easy to picture this cheerful ghost becoming your next favorite crochet piece.
Free Crochet Baby Ghost Keychain Pattern

Creating Yurongi is much simpler than its detailed appearance suggests. The step-by-step pattern guides you through each stage with basic supplies and a few yarn colors. Making the crochet process enjoyable from beginning to end. As each small feature comes together, the ghost’s playful personality begins to shine, leaving you with a handmade keychain that’s just as fun to crochet as it is to carry or display.
Credit Syona
Materials & Tools Needed
- Yarn: 3 colors
- White for the ghost’s body
- Two contrasting colors for the ghost’s hat (e.g., light colors for visibility)
- Cotton Queen yarn or equivalent works well.
- Crochet Hook: Size 3/0 or 2.3 mm (or a hook size that matches your yarn).
- Eyes: Plastic safety eyes; alternatively, embroider with black yarn.
- Glue Gun: For securing eyes and hat (optional).
- Scissors
- Stitch Markers: Useful for marking the first stitch to avoid confusion.

Finished Size & Customization Ideas
- Finished ghost size: Approximately small keychain size, customizable based on yarn and hook sizes.
- Customizations:
- Use vibrant yarns to add personality.
- Make multiple ghosts in different colors for a decorative garland or Halloween-themed collection.
- Create whimsical expressions by varying eye placements.
Pattern Abbreviations & Terminology
- MR: Magic Ring
- Ch: Chain
- SC: Single Crochet
- Inc: Increase (2 SC into the same stitch)
- Sl st: Slip Stitch
- BLO: Back Loop Only
- […] Stitch repeat instructions
- FO: Fasten Off
All instructions use US crochet terminology.

Step-by-Step Detailed Crochet Instructions
Follow these instructions carefully for each part of the Baby Ghost.
1. Ghost Body
Round 1:
- Create a Magic Ring (MR).
- Work 8 SC into the ring.
- Pull the tail tightly to close the ring.
- Use a stitch marker to mark the first stitch. (8 sts)
Round 2:
- Inc in each stitch around. (16 sts)

Rounds 3-4:
- SC in each stitch around. (16 sts per round)
Round 5:
- [SC in next 3 sts, Inc] repeat 4 times. (20 sts)
Rounds 6-10:
- SC in each stitch around. (20 sts per round)
Round 11 (Fluttering End):
- [SC in first stitch, DC (Double Crochet) in next stitch, 3 DC in same stitch, DC in next stitch] repeat. (Creates the fluttering effect.)
- Sl st in the last stitch, FO, and weave in ends.

2. Ghost Arms
Step 1:
- Attach yarn to the designated spot (slightly below the center of the ghost body).
Step 2:
- Ch 4.
- Skip the first chain, work 3 SC back across the chain.
- Sl st to the starting point.
Step 3:
- Fasten off and weave in ends. Repeat for the other arm on the opposite side.

3. Adding the Eyes
- If using safety eyes, attach them near the top of the ghost’s body.
- If embroidering, use black yarn to create cute expressions.
- Optional: Use a glue gun to secure the eyes in place.

4. Ghost Hat
Round 1:
- Create a Magic Ring (MR).
- Work 6 SC into the ring.
- Pull the tail tightly to close the ring. (6 sts)
Round 2:
- SC in each stitch around. (6 sts)
Round 3:
- Inc in each stitch around. (12 sts)
Round 4:
- [SC in next 3 sts, Inc] repeat 4 times. (15 sts)
Round 5:
- SC in each stitch around. (15 sts)
Round 6 (Contrasting Color Change):
- At the last stitch of Round 5, drop the current yarn and switch to the contrasting color.
- Sl st, Ch 1, then [SC in next stitch, Inc] repeat around. (30 sts)
Round 7:
- SC in each stitch around. (30 sts)
Finish: Reverse the hat (inside out) and weave in all yarn tails securely. Place on the ghost’s head and optionally secure with a glue gun or thread.

Final Assembly
- Attach the hat to the ghost’s head, ensuring it sits snugly and straight.
- Use your glue gun or a needle and thread to fix it in place.
- Add a keychain ring at the top loop or stitch the ring directly into the ghost’s hat.
Tips for Beginners
- Use stitch markers liberally to avoid losing your place.
- Practice the Magic Ring technique if unfamiliar; it’s key for creating the ghost and hat.
- Work slowly with color changes to keep transitions clean.