
This cozy, modern crochet checkerboard blanket blends simplicity and elegance, making it the perfect customizable baby gift or stylish accent for any room.

The checkerboard crochet blanket is a beautiful, modern piece that’s perfect for wrapping up tiny babies or warming up cozy spaces. Made with soft, soothing Bernat Softy Baby Cotton yarn, this crochet blanket makes for a heartfelt gift or a stunning accent in any room. Its eye-catching checkerboard design stands out, offering both simplicity and elegance that suits every taste.
Crochet Checkerboard Blanket
This crochet Blanket design is an exciting mix of simplicity and charm. You’ll use basic half-double crochet stitches while switching colors to form the pattern. Carrying the yarn neatly in this design makes it clean and neat on both sides. This easy shape and adjustable blanket size make it great for beginners learning color changes, and you can use colors that suit your personal style or theme.
Credit Daisy Farm Crafts
Key Features & Pattern Construction:
- Main Design: Rows of alternating blocks of color using the half double crochet (HDC) stitch for a simple yet bold checkerboard pattern.
- Color Changes: Yarn is carried seamlessly across the rows for crisp color transitions without visible floats on the back.
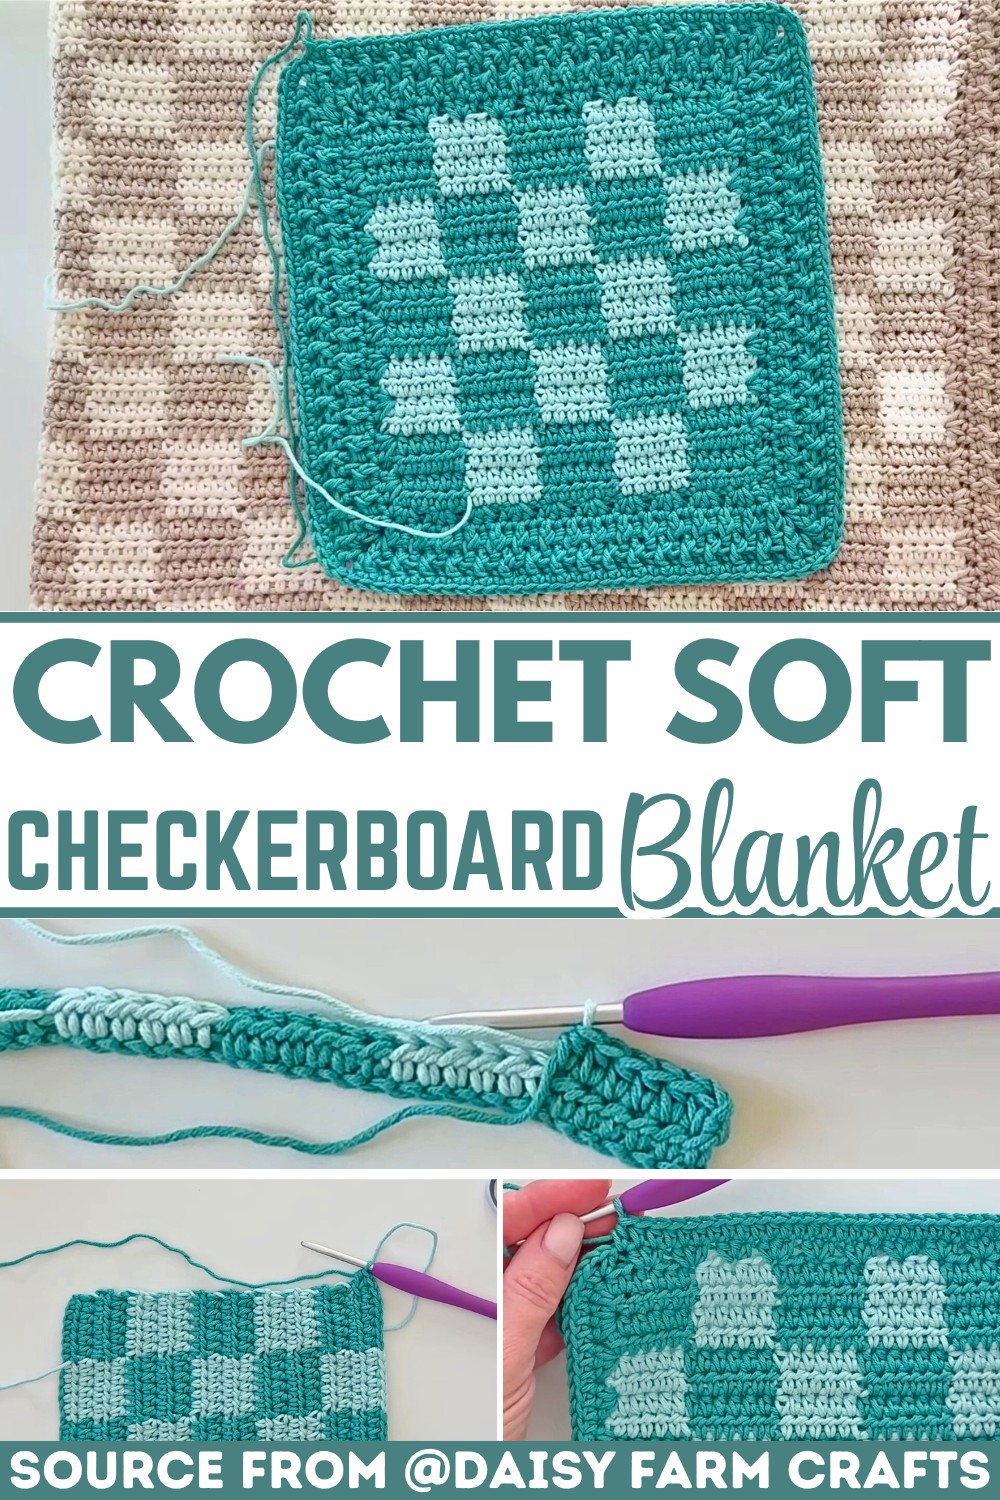
- Materials: Made using Bernat Softee Baby Cotton in two colors, with three skeins required: two for the main blanket and one for the border.
- Border Design: Includes clean, even edges using front post double crochet (FPDC) and back post double crochet (BPDC) stitches, finished with a single crochet round for polished corners.
- Customizable Size: The repeat is based on a formula: chains in multiples of 6 times an odd number plus 1.
The blanket begins with a foundation chain that determines the overall width. Using a simple formula (multiples of 6 times an odd number plus 1), the pattern ensures both ends of the row begin and end with the same color. Starting with the darker of the two yarn colors, you’ll work half double crochet (HDC) stitches in blocks of six stitches before seamlessly transitioning colors.

Color changes are a standout feature of this design. Switching shades every six stitches, the working yarn is “carried” along the rows under the stitches, allowing for a neat back and eliminating the need for excessive tail weaving. The repetitive nature makes it relaxing while the colorwork keeps things engaging. Once the desired height is reached, the blanket forms a perfect square grid of checkerboard blocks.

The border is where this blanket shines even more. Tiffany from Daisy Farm crochet demonstrates a methodical approach to creating an even, professional-looking edge by adding half double crochet stitches along the sides. The FPDC and BPDC stitches in subsequent rounds add a soft, ribbed texture to the edges, giving the blanket a finished, elegant touch.

Finally, the outermost round is completed with single crochet stitches for a refined, uniform look. Tiffany alternates the placement of front and back post stitches in the second-to-last border round to create a visually interesting texture that sets this blanket apart.
Special Details & Modern Finishing Touches:
The interplay between darker and lighter shades creates a clean, contemporary look. Though the tutorial uses feathered gray and cream, Tiffany’s demonstration with aqua mist and pool green highlights the versatility of this design. The use of Bernat Softee Baby Cotton lends the blanket a soft, lightweight, and luxurious feel, making it an excellent baby gift or home accent.

Video Tutorial
Step-by-Step Pattern
Materials
To create this blanket, you will need:
- Yarn: Bernat Softy Baby Cotton – Choose two contrasting colors (e.g., Pool Green and Aqua Mist for the main blanket; Feathered Gray or your preferred shade for the border). You’ll need:
- 2 skeins of the lighter color for the blanket
- 1 skein of the darker color for the border
- Crochet Hook: G/4mm hook
- Optional Tools: Yarn needle (for weaving in ends), scissors, and stitch markers

Pattern Instructions
Foundation Steps:
- Start with the base chain:
- Multiply 6 by an odd number based on the desired size of your blanket. Add 1 for the turning chain. For a sample, chain 31 stitches (6 × 5 + 1).
- Half Double Crochet Foundation Row:
- Begin in the second chain from the hook and work 6 half double crochets.
- After completing the 6th stitch, yarn over and pull up a loop but stop before finishing the stitch.
- Add your second color by laying it on the hook and pulling it through to finish the stitch.
- Switching Colors:
- Work the next group of 6 HDC stitches, carrying the first color along the row by working over it.
- On the 6th stitch, switch back to the first color by pulling it through to complete the stitch.
- Key Color-Carrying Rule:
- Keep one color at the front and the other at the back to avoid twisting yarn.
- Repeat:
- Alternate colors every 6 stitches for the full row, ending with the first color.
- Chain 1 and turn your work.
Building the Checkerboard:
- Continue for Four Rows:
- Alternate colors every 6 stitches, carrying the yarn along the row.
- After 4 rows, switch the color sequence so the initial color starts as the second group of stitches.
- Expand the Blanket:
- Repeat the alternating color technique until you reach your desired height. For a baby blanket, Tiffany recommends 23 blocks high (6 × 23 + 1).
- This creates a 36×36-inch blanket.
Border Instructions:
Step 1:
After finishing the blanket, cut the lighter color yarn and pull through with the darker color to start the border.
Step 2:
- Work 3 half double crochets (HDC) along the end of every other row on the sides of the blanket.
- At the corners, work 3 HDC into the corner space to create a neat turn.
Step 3:
- Across the bottom and top edges, skip 2 stitches and work 3 HDC into the next stitch. Repeat this all the way across.
Step 4:
- Complete the first round of the border and chain 2 to prepare for post stitches.
Post Stitch Border:
Step 1:
- For the second border round, alternate front post double crochet (FPDC) and back post double crochet (BPDC) stitches for a ribbed texture.
Step 2:
- Work double crochet, chain 2, double crochet into the chain spaces at the corners to maintain sharp edges.
Step 3:
- On the following round, reverse the post stitches (work FPDCs into previous BPDCs and vice versa) for a ridged effect.
Final Round:
Step 1:
Work a final round of single crochet (SC) stitches.
Step 2:
At the corners, add just 2 single crochets to the chain spaces.
Step 3:
Slip stitch into the first SC to finish the border and tie off.
Step 4:
Use a yarn needle to weave in all ends neatly.
Troubleshooting and Suggestions:
- Color Changes: Keeping the carried yarn tension just right is key. Tug the unused yarn gently before switching colors to ensure it lays flat without puckering the fabric.
- Stitch Consistency: Maintain even stitches throughout the border to avoid rippling edges. Counting your stitches along the sides ensures balanced spacing.
- Clean Transitions: Always lay the working yarn in the correct placement (front or back) when switching colors as described in the tutorial to prevent tangling or twisting.
Creative Modifications:
- Play with Colors: Try three shades for a gradient effect or make a bold statement with high-contrast tones like black and white.
- Alternate Textures: Replace HDC blocks with textured stitches such as mini puff stitches for a plush, tactile blanket.
- Repurposing the Pattern: Adapt the checkerboard motif for scarves, placemats, or pillow covers by adjusting the starting chain to suit your pattern size.


