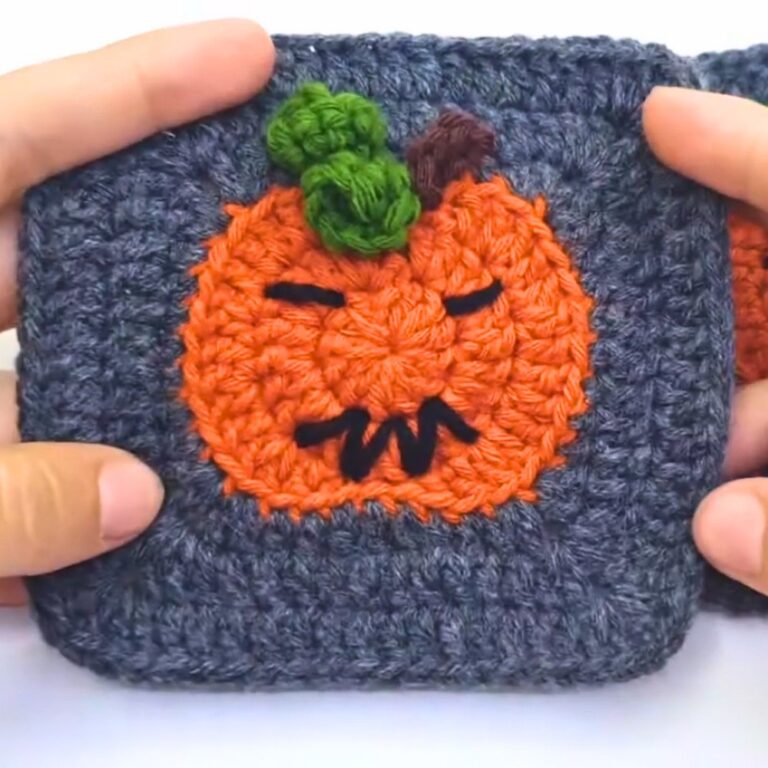
Whip up the perfect fall décor with a pumpkin stitch coaster—cozy, textured, and just right for your favorite hot beverage or autumn gatherings.

The crochet pumpkin-stitch coaster is a charming, simple creation that perfectly complements any table. It’s shaped like a cute, textured pumpkin, making it a fantastic way to celebrate the autumn season or add a cozy touch to your home. Whether you’re sipping on hot cocoa, tea, or coffee, this coaster keeps your surfaces safe while adding a festive flair.
Unique Crochet Pumpkin Stitch Coaster Pattern
What makes this coaster so special is its versatility. You can use it under mugs, glasses, or even as part of a festive fall table setting. It’s small enough to complete quickly, making it a relaxing and satisfying crochet experience for beginners. No need to worry about complicated instructions, this design is beginner-friendly and focuses on easy, repetitive stitching to create a pumpkin-inspired shape.
Credit Mushyy2
Key Features and Construction Overview:
- Features the Pumpkin Stitch: A textured, dimensional design mimicking the charming ridges of a pumpkin.
- Centered Around a Round Base: Starts with a magic circle or foundation chain, worked outward in the round.
- Playful Shaping: Alternating stitch heights create the iconic pumpkin-like ridges for stunning visual texture.
- Quick & Fun Project: Ideal for beginners to intermediate crocheters or as a stash-busting project.
- Flexible Design Options: Color choices and embellishments can make your coasters unique!
How It’s Made:
This pumpkin stitch coaster is worked in rounds, starting with a classic magic circle or adjustable foundation chain for a smooth, seamless beginning at the center. The pumpkin stitch—a clever blend of alternating stitch heights—is introduced early, creating ridged columns that give texture and charm to the coaster. You’ll work outward in an intuitive pattern that’s easy to pick up after a few rounds.

Shaping the pumpkin effect comes from using a mix of taller and shorter stitches (like double crochets and single crochets), adding depth and dimension to the coaster’s design. Expect a rich, raised texture that feels perfect under your mug or glass.

Choosing yarn in pumpkin-inspired hues—vibrant oranges, soft neutrals, or even spicy rust tones—brings the autumnal theme to life. If you’re feeling adventurous, you can edge your coaster with slip stitches or scallops for a polished finish.

This project is quick to complete, making it ideal for those cozy fall evenings or as part of your seasonal décor collection. Consider making a set to spread the festive cheer across your home or giving them as handmade gifts.

Video Tutorial
Step-by-Step Pattern
Materials
To get started, you’ll need the following materials:
- Yarn: Worsted weight cotton yarn in three colors:
- Orange (for the pumpkin body)
- Green (for the stem)
- Brown (optional, for shading or detailing)
- Hook Size: 4mm (G/6) crochet hook
- Scissors: For cutting yarn ends
- Tapestry Needle: To weave in ends
- Measuring Tape (optional): To check gauge and final size
Optional: Stitch markers can help keep track of your rounds or sections.
Pattern Instructions
Round 1: Start with the Pumpkin Base
- Create a Magic Ring (MR) using the orange yarn.
- Work 8 Single Crochet (sc) into the MR, then pull it closed.
- Join the round with a Slip Stitch (sl st) into the first sc.
You should have 8 stitches.
Round 2: Increasing for the Body
- Chain 1 (does not count as a stitch).
- Work 2 sc into each stitch around.
- Join with a sl st.
You should now have 16 stitches.
Round 3: Building the Pumpkin Shape
- Chain 1, starting in the first stitch:
- 1 sc in the first stitch.
- 2 sc in the next stitch.
- Repeat this increase pattern (1 sc in one stitch, 2 sc in the next) around.
- Join with a sl st.
You should have 24 stitches.
Round 4: Adding Texture
- Switch to Half-Double Crochet (hdc) for added height:
- [Hdc in each stitch around].
- Optionally, add a few Double Crochet (dc) for rounded edges.
- Join with a sl st.
You’re now ready to shape the final pumpkin details!
Round 5: Creating the Pumpkin’s Segments
- Add a decorative touch by stitching “lines” over the pumpkin’s body:
- Use a tapestry needle and matching (or contrasting) yarn. Insert the needle at the center and bring it down and around. Repeat to create 5–6 “segment lines.”
Step 6: Add the Stem
- Join green yarn at the top of the pumpkin.
- Chain 4, and work back down the chain using 3 sl st.
- Fasten off and weave in all ends.
Optional: Add a leaf or spiral vine made from chaining 8–12 and slip stitching back along the chain.
Finishing Touches
- Weaving In Ends: Use a tapestry needle to securely weave in all loose ends.
- Blocking: Steam-block your coaster to relax the stitches and shape it perfectly.
Troubleshooting and Suggestions:
- Stitch Consistency: Focus on keeping your tension even—loose stitches can soften the ridges, while tight ones may cramp the design.
- Working in Rounds: Slip-stitch joins can create bumps if pulled too tightly—practice a gentle gauge for a smoother transition.
- Creative Color Combos: Go beyond pumpkin orange! Try greens, yellows, or variegated yarns for a playful twist. Combine subtle pastels for a spring-ready coaster!
- Functional Variations: Add a back layer for extra thickness, or sew on felt to the underside for added stability on slippery surfaces.
- Embellishments: Attach a small crocheted leaf or stem to sell the pumpkin theme—or even embroider vines with a tapestry needle for extra flair.