
This charming mini flower bouquet keychain is a pocket-sized burst of nature, featuring lifelike flowers, leaves, and a crochet wrapper, a perfect handmade gift or accessory.

Make your day brighter with the crochet mini flower bouquet keychain. With their small, lightweight design, they make perfect keychain accessories, bag decorations, or thoughtful gifts. These little bouquets are elegantly simple yet filled with beautiful flower details that add a cheerful touch wherever you carry them.
Flower Bouquet Keychain With Crochet Pattern
The following pattern uses basic crochet techniques to create flowers, leaves, and a neat wrapping sheet. You’ll stitch adorable sunflowers, set sturdy stems with wire for structure, and finish with a yarn-wrapped bouquet. The addition of a wrapping paper detail and the ability to attach a keychain make it not just pretty, but also practical. Have fun with your colors and shapes to create crochet bouquets that are uniquely yours.
Credit Chubby Cheeks
Pattern’s Key Features:
- Adorable Mini Blooms: Includes a sunflower, daisy, and tulip, each made with vibrant colors and delicate petals.
- Simple Leaf Construction: Sturdy, wire-reinforced leaves add realism and structure.
- Wrapped Stem Design: Green yarn-wrapped wire forms lifelike flower stems, providing stability and a polished look.
- DIY Wrapping Paper: A crocheted wrapper ties it all together, mimicking the look of a real flower bouquet.
- Compact and Versatile: Finished bouquet can be attached to keychains or used as décor.
How It’s Made
This pattern begins by creating the flowers, each showcasing unique details and techniques. The sunflower, with its cheerful yellow petals and textured brown or green center, uses a magic ring and rounds of single crochet to design the central disc. Petals are formed using chains, double crochets, and slip stitches to add shape and dimension, while the centers are stuffed lightly for puffed texture.

The daisy and tulip follow similar approaches but feature distinct differences to reflect their natural counterparts. The daisy’s seven white petals are more delicate, worked using a simple two-double-crochet repeat for each point. Meanwhile, the tulip’s rounded shape requires working several rounds of single crochet to build height before sculpting the flower’s top with subtle increases.

Realistic wire-reinforced leaves are crocheted to enhance the bouquet’s effect. Chains are transformed into almond-shaped leaves by working single, half-double, and double crochets along both sides. A thin piece of wire is crocheted into the center to ensure the leaf stays firm and adjustable. Wrapping the stems with green yarn and adhering the leaves turns each bloom into a finished flower ready for arranging.
The bouquet is pulled together with a rectangular crocheted wrapping paper, made with 22 stitches of row-by-row double crochet. Once the flowers are tied together, the piece resembles a miniature wrapped bouquet, complete with a yarn bow as a final flourish.

Video Tutorial
Materials and Preparation
To create this adorable crochet mini flower bouquet keychain, you will need:
- Yarn:
- Milk cotton yarn in yellow, green, brown, white, and additional colors (for flowers and leaves).
- Scrap yarn for stuffing.
- Hook Size: 2.5 mm crochet hook
- Additional Tools:
- Stitch markers
- croche wire (1–1.5 mm thickness)
- Yarn needle for sewing and hiding ends
- Glue (standard crochet glue or hot glue)
- Scissors
- Keychain rings (optional)
- Yarn Weight Requirements: Light to medium-weight yarn works best for this pattern.
Abbreviations and Notes
Abbreviations:
- MR: Magic Ring
- SC: Single Crochet
- DC: Double Crochet
- HDC: Half Double Crochet
- CH: Chain
- SL ST: Slip Stitch
- INC: Increase (two stitches worked into one stitch)
Pattern Instruction
Part 1: Sunflower
Sunflower Center Base
- Create a magic ring (MR) with brown yarn.
- Round 1: Work 6 SC into the MR. Pull the yarn tail to close the ring. Place a stitch marker on the first stitch.
- SL ST into the first stitch and CH 1.
- (6 SC total)
- Round 2: Work 6 INC (2 SC in each stitch).
- SL ST into the first stitch and CH 1.
- (12 SC total)
- Round 3: Alternate 1 SC, 1 INC for a total of 6 repetitions.
- SL ST into the first stitch and fasten off brown yarn.
- (18 SC total)
Repeat the above steps with green yarn for the second sunflower center base.
Assemble the Centers
- Place the brown and green bases together, with the wrong sides facing each other. Insert yarn tails into the center to secure.
Sunflower Petals
- Pick up yellow yarn and attach it to the base with a SL ST at the starting space.
- CH 2, work 1 DC into the next stitch, CH 2, and SL ST into the center of the DC to create a sharp petal tip.
- Repeat for a total of 9 petals, working around the sunflower center.
- Fasten off yellow yarn and weave in ends.
Part 2: DIY Flower
Flower Base
- Create a magic ring (MR) with green yarn.
- Round 1: Work 7 SC into the MR. Pull yarn tail to close.
- SL ST into the first stitch and CH 1.
- (7 SC total)
- Round 2: Work 7 SC evenly around the base, making 1 SC per stitch.
- SL ST into the first stitch and cut the yarn.
- (7 SC total)
Repeat with yellow yarn for the front, and assemble similarly to the sunflower.
DIY Flower Petals
- Join white yarn with a SL ST at the base.
- Make 2 CH and 2 DC in the same stitch, then CH 2 and SL ST into the next stitch.
- Repeat this pattern for 7 petals total.
- Fasten off yarn and weave in ends.
Part 3: Tulip
Tulip Base
- Create a magic ring (MR) and work as follows:
- Round 1: 6 SC into MR.
- Round 2: Work 6 INC (12 SC total).
- Round 3: Alternate 1 SC and 1 INC (18 SC total).
- Round 4: Work 8 SC, 1 INC twice. (20 SC total).
- Rounds 5–8: Work 20 SC evenly in each round.
- SL ST, fasten off, and leave a long tail for sewing.
Stuff and Shape the Tulip
- Stuff the tulip with scrap yarn.
- Use the tail to stitch the petals into a tulip shape, securing the top with tight stitches.
Part 4: Leaves
Leaf Base
- Make a slip knot and crochet 9 CH.
- Beginning from the 2nd CH:
- Follow this sequence: 1 SC, 2 HDC, 2 DC, 2 HDC, 1 SC.
- Insert the wire along the stitches while crocheting to create rigidity.
Crochet Around the Base
- Bend the wire and cut it slightly shorter than the leaf.
- Work on the opposite edge using the same stitch sequence (1 SC → 2 HDC → 2 DC → 2 HDC → 1 SC).
- Wrap the wire stem with green yarn and glue the ends for secure wrapping.
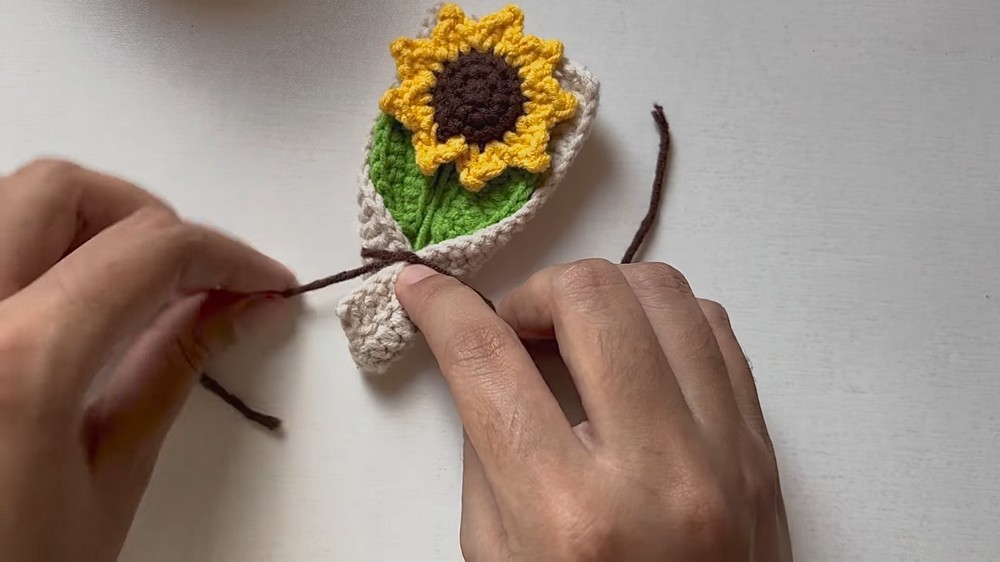
Part 5: Bouquet Assembly
Make Stems
- Cut wire (approx. 7 cm for each stem).
- Wrap stems in green yarn, leaving 1–2 cm exposed at the ends.
- Attach leaves by holding them against the stem while wrapping the yarn around.
Attach Flowers
- Use glue to attach each flower securely to its stem. Ensure alignment for a polished look.
Create Wrapping Paper
- Crochet a rectangle with 24 CH and work 22 DC evenly for 6 rows.
- After each row, CH 2 and turn.
Wrap and Tie
- Fold the wrapper edges and position flowers.
- Tie tightly with yarn and secure with a bow.
- Attach a keychain ring for a final touch.
Troubleshooting and Suggestions
- Petal Shaping: Consistency is key when crocheting petals. Make sure to count your stitches carefully so each petal has the same size and shape.
- Working With Wire: When inserting wire into the leaves, ensure it’s cut to the appropriate length to avoid it poking out. Bend wire ends with pliers for added safety.
- Color Coordination: Experiment with different color combinations for your flowers to match seasonal themes (e.g., pastels for spring or autumn tones for fall).
- Alternative Wrapping Paper: Swap the crocheted wrapper for a piece of real, colored crochet paper or fabric if you prefer a quicker finishing step.


