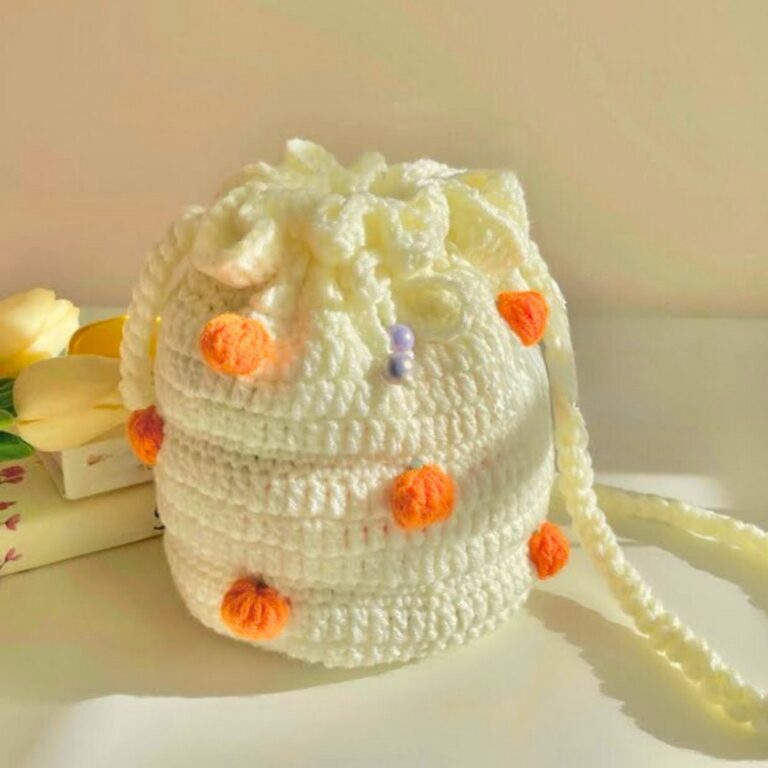
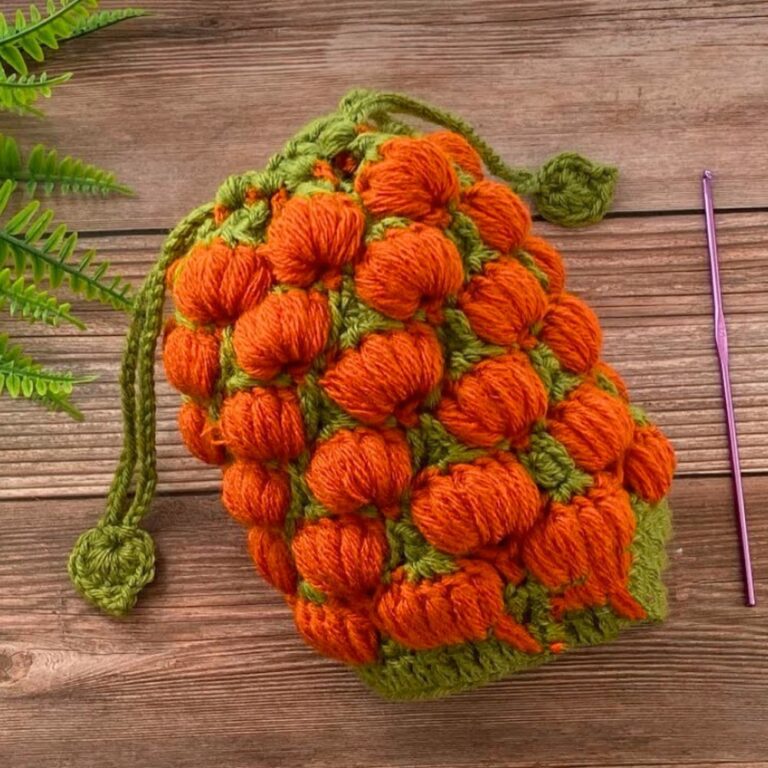
This adorable pumpkin pouch is a small, round drawstring bag shaped like a pumpkin, perfect for holding treats or tiny treasures in the fall.

This crochet pumpkin pouch is not just a fun decoration; it’s also super useful. Shaped like a cute, plump pumpkin, it’s the perfect way to bring a festive and cozy vibe into your life. Whether you use it to hold candy, small gifts, or trinkets, this crochet pouch adds a playful touch to fall or Halloween celebrations. It’s small, stylish, and functional all at once.
Festive Crochet Pumpkin Pouch for Thanksgiving
Making this crochet pumpkin pouch is easier than you think, especially for beginners. The simple crochet stitches form the pumpkin’s round and textured shape, while the little leaf on top gives it extra charm. It’s a great chance to practice basic techniques while creating something you can actually use or gift to someone special.
Credit Crochetartcraft – Crochet Tutorial
Key Features and Construction Overview:
- Worked from the bottom up in the round to form a plump pumpkin base
- Uses simple stitches (like single crochet) and increases to create a rounded shape
- Vertical “pumpkin ridges” are formed with strategic stitch placement or surface detail
- Finished with a cinching drawstring opening at the top
- Topped with a stem and a curly vine or leaf for a classic pumpkin look
- Sized just right for candy, coins, or small gifts
How It’s Made:
The pumpkin pouch starts at the very bottom, usually with a small circle worked in the round. Using basic stitches such as single crochet, you’ll build outwards, increasing evenly so the base lies flat before gradually curving up into the sides. This bottom-up construction gives the pouch its sturdy, rounded foundation and helps it hold its shape when filled.

As you move up the body, the pouch grows into a chubby pumpkin shape. Increases shift and then stop, allowing the sides to rise straight or slightly tapered. The “pumpkin” effect often comes from creating gentle vertical ridges—either by working in the back loops only, adding slip-stitch lines, or using simple surface crochet. These subtle details give the impression of pumpkin segments without over-complicating the stitching.

Near the top, the pattern transitions into the opening of the pouch. Here, stitches are worked more evenly and sometimes spaced to form small gaps or an easy pathway for the drawstring. When the cord is threaded through and pulled, the top cinches closed, transforming the open cylinder into a neat, gathered pouch that safely holds whatever you tuck inside.

To finish, you’ll crochet a short, sturdy stem at the top center, often worked tightly so it stands up and keeps its shape. A little vine—usually a simple chain that’s curled with increases, or a slim spiral strip—is added next to the stem for extra charm. The drawstring itself might be a crocheted chain, an i-cord, or even a ribbon woven through the top rounds, adding both function and a cute decorative touch.

Video Tutorial
Step-by-Step Pattern
Materials
You’ll need the following items to get started:
- Yarn: Worsted weight yarn in:
- Orange (main color for the pumpkin body)
- Green (for the stem and leaves)
- Brown (optional for added vine details)
- Crochet Hook: Size 4.0 mm (G-6) or size suitable for your yarn.
- Stitch Markers (optional): To keep track of rounds.
- Scissors
- Yarn Needle: For weaving in ends and assembly.
Pattern Instructions
Let’s make your crochet pumpkin pouch step by step!
Step 1: Start the Pumpkin Base
- Create a magic ring with orange yarn.
- Round 1: Into the magic ring, work 6 single crochets (sc). Pull the ring tight. (6 stitches)
- Round 2: Increase in every stitch (2 sc in each stitch). (12 stitches)
- Round 3: 1 sc in the next stitch, inc in the next stitch — repeat around. (18 stitches)
- Round 4: 1 sc in the next 2 stitches, inc in the next stitch — repeat around. (24 stitches)
- Continue increasing similarly until the base is the desired width of your pouch. For a 5-inch base, stop at 42 stitches.
Step 2: Build the Pumpkin Body
- Rounds 5–12: Work 1 single crochet (sc) in each stitch around, working the first round in the Back Loop Only (BLO). (No increases)
- This will create the height of the pouch. Adjust the number of rows for a taller or shorter pouch.
Step 3: Shape the Pouch Opening
- Round 13: 1 sc in the next 5 stitches, dec across the next two stitches — repeat around.
- Round 14: Work 1 single crochet in every stitch around.
- Repeat for 1–2 more rows, gradually decreasing if desired, to create a tighter top.
Step 4: Create the Drawstring Closure
- With orange yarn, crochet a chain approximately 30–40 stitches long.
- Weave the chain through the top row of stitches to cinch the pouch opening.
Step 5: Add the Stem and Leaves
Stem
- Using green yarn, attach to the top center of the pouch.
- Round 1: Create 6 single crochets into a magic ring.
- Round 2–4: Work 1 sc in each stitch around.
- Finish off and sew the stem securely to the top of the pouch.
Leaves and Vines (Optional)
- For a leaf, chain 8, then work back along the chain – sl st, sc, sc, hdc, dc, hdc, sc. Fasten off.
- For vines, attach green or brown yarn, chain 15, and sl st back along the chain for a curly effect.
- Attach the leaves and vines near the stem.
Decorative Touches
- Embroider face details for a jack-o’-lantern look!
- Use contrasting yarn to add stripes or ribbing for texture.
- Sew a zipper inside if you’d like the pouch to work as a functional coin purse.
Troubleshooting and Suggestions
- If your base is ruffling or cupping, check your stitch count on the increase rounds and adjust your tension—too many stitches or very loose tension can cause ripples.
- For clean, defined pumpkin ridges, be consistent about where you insert your hook (e.g., always into the back loop or into the same line of stitches for surface crochet).
- If the top doesn’t cinch well, try using a slightly thinner yarn or tighter tension for the drawstring, and make sure you’ve woven it evenly around the opening.
Creative ideas:
- Change the main color: try white for a “ghost” pumpkin, deep green for a spooky vibe, or a variegated autumn yarn for a multi-toned pumpkin.
- Add a face: embroider or applique simple triangle eyes and a mouth to turn it into a jack-o’-lantern pouch.
- Vary the size by using thicker yarn and a larger hook for a bigger candy bag, or cotton thread and a small hook for tiny party favors.
- Swap the drawstring for a longer braided strap, and you’ve got a mini pumpkin crossbody bag that’s perfect for kids’ trick-or-treating.