A fun and colorful addition to your handmade wardrobe, this wavy crochet sweater features bold textures with a retro aesthetic that’s perfect for all seasons.

The Wavy Crochet Sweater is a cozy and colorful piece of wearable art. Its unique wavy design adds a playful, textured look, making it a great addition to your wardrobe. Perfect for cold days, transitional seasons, or layering, this sweater allows you to express your personal style by choosing colors that fit your vibe. Whether it’s a mix of soft pastels, warm autumn shades, or bold brights, this sweater stands out, blends comfort with creativity, and can be tailored to anyone’s aesthetic.
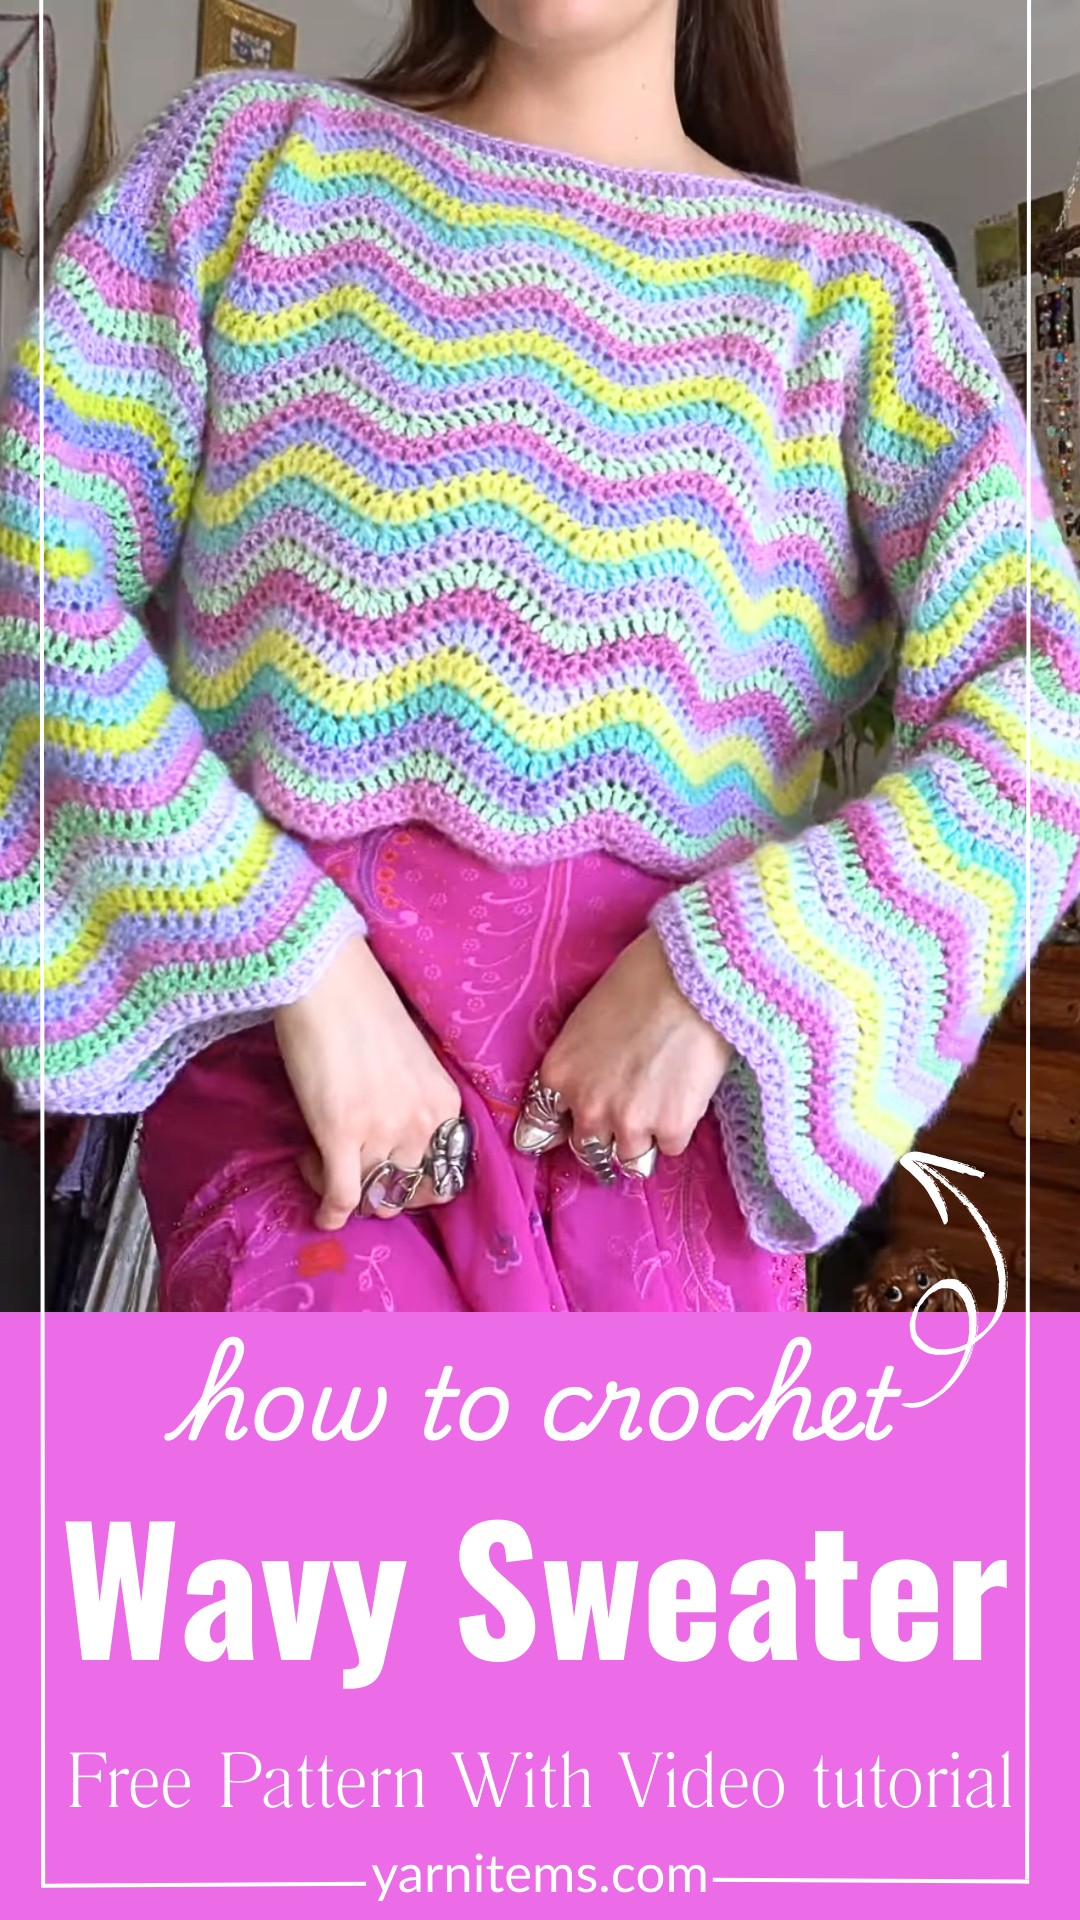
Wavy Crochet Sweater Tutorial
Using simple stitches like double crochet, you’ll stitch together panels for the front, back, and sleeves. The tutorial shows you how to make the wavy edges flat for easy assembly, making this sweater beginner-friendly. Once joined together, the finished look is truly satisfying, and you’ll love having something unique that you made with your own hands.
Credit Hannah Drapinski
Key Features and Construction Overview
- Wave stitch pattern: Creates a bold, wavy texture that stands out in your chosen color palette.
- Panels construction: Made from four rectangular panels (two body panels and two sleeves), making it beginner-friendly.
- Straightening edges for seaming: The wavy edges are straightened using varied stitch heights (single crochet, half-double crochet, and double crochet), allowing for neat assembly.
- Customizable fit: Modify the size of the panels for a boxy fit or more form-fitting style. The width and length of the sleeves and body are personalized through simple changes in row count or starting chain.
- Color variations: Play with color changes to reflect your aesthetic, whether it’s bold and bright or toned down with earthy hues.
Expanded Overview of the Pattern
This wavy crochet sweater is a playful yet straightforward pattern, perfect for beginners ready to tackle a textured garment. The sweater is worked in separate pieces: two body panels for the front and back, plus two sleeve panels. The iconic wavy pattern is achieved by strategically alternating increases and decreases using double crochet and double crochet-two-together stitches. It’s a meditative and repeatable stitch sequence that produces a beautifully rippled texture throughout the sweater.

To create the panels, a multiple of 14 stitches plus 3 is used for the foundation chain. The tutorial goes step-by-step to show how to work the wave design, including reducing at the dips and increasing at the peaks of the waves. The front and back panels are worked to the same height (matching your desired length), while the sleeves begin with a smaller chain and are made slightly shorter. The regularity of the wave stitch results in a consistent texture, making it easy to track your progress.

One clever innovation in this design is the way the wavy edges, which naturally occur during stitching, are flattened for cleaner assembly. By mixing single crochets, half-double crochets, and double crochets in a specific pattern, the designer makes the ends of the panels straight and uniform. After adding an optional row of single crochet for refined edges, you’re ready to begin seaming.

The panels are joined through simple whip stitching, aligning the straightened edges for neat seams. The shoulders and sides of the body panels are connected first, followed by the attachment of the sleeves. Stitch markers help maintain symmetry to ensure the garment feels balanced when worn. Once the pieces are joined, the sweater is ready for a try-on—just give it a quick steam blocking for a polished finish.

Video Tutorial
Step-by-Step Pattern
Materials
To crochet this sweater, you’ll need the following:
- Yarn: Hobie Jade, worsted-weight yarn. Bright colors are recommended for a vibrant aesthetic.
- Hook: 5mm crochet hook.
- Tapestry Needle: For seaming panels together.
- Stitch Markers: Helpful when marking sections for precise seaming.
- Scissors: To cut ends neatly.
- Optional Tools: Steam iron or blocking tools to finish your sweater beautifully.
Pattern Instructions
Step 1: Create the Front and Back Panels
- Foundation Chain
- Begin with a slip knot.
- Chain a multiple of 14 + 3 (e.g., chain 84 + 3 for a boxy fit).
- Row 1: Establish the Wave Pattern
- Work your first DC in the 4th chain from the hook (chain 3 counts as a DC). This section now has two DC stitches.
- Double crochet 4 more times into the next 4 stitches.
- Work 2 DC2Tog stitches (refer to the Stitch Guide for technique).
- Double crochet in the next 4 stitches.
- Increase (work 2 DC stitches) in the next 2 stitches.
- Repeat the pattern until you reach the end, ending with 2 DC in the final stitch.
- Row 2 and Beyond
- Chain 3, turn your work, increase in the first stitch.
- Follow the same pattern sequence for subsequent rows: 4 DC, 2 DC2Tog, 4 DC, 2 increases, repeat.
- Work until your panel reaches the desired length (e.g., 26 rows for boxy sweater panels).
Step 2: Make the Sleeves
- Foundation Chain
- Chain 56 + 3 for the sleeves (adjust as desired for more fitted or oversized sleeves).
- Recreate the Wave Pattern
- Follow the same stitch sequence as the panel.
- Work approximately 27 rows or adjust to your preference.
Step 3: Create Straight Edges
Since the wave pattern results in uneven edges, we’ll make them flat for clean seaming:
- Attach yarn and chain 1. Turn your work.
- Work the straightening row as follows:
- 1 SC into the first stitch.
- 1 HDC into the next 3 stitches.
- 1 DC into the next 6 stitches.
- 1 HDC into the next 3 stitches.
- 1 SC into the next 2 stitches.
- Repeat this sequence until the end.
- Chain 1 and turn. Work 1 row of SC across the entire edge for uniformity.
Repeat this process on one side of every panel (front, back, sleeves).
Step 4: Assemble the Sweater
- Seam Shoulders
- Place the panels flat and align shoulder sides. Use stitch markers to measure the neckline and shoulder seam locations.
- Using a tapestry needle, whip stitch the front and back panels at the shoulders.
- Attach Sleeves
- Count rows to find the center of your panels and sleeves. Mark the attachment points with stitch markers.
- Whip stitch sleeves onto the sweater body, aligning colors or rows for symmetry.
- Seam Sleeves and Body
- Turn the sweater inside out. Whip stitch the sleeves closed from the cuff to the armpit, then continue seaming down the body panels.
- Finishing Touch
- Turn the sweater right-side out. Use steam blocking to smooth out stitches and ensure a polished look.
Pattern Question
Question: Can beginners easily make this sweater?
Answer: Yes! While some basic stitches like double crochet and seaming are needed, the tutorial clearly explains every step, making it simple for those new to crochet. The pattern is beginner-friendly and adaptable.
Troubleshooting and Suggestions
Tips for Success
- Count stitches as you go: This wavy pattern requires accurately placed increases and decreases in every row. Count to ensure uniformity and consistent waves.
- Mind the gauge: Keep your tension even to avoid wavy rows that feel too tight or loose compared to others. A worsted-weight yarn and 5mm hook combination works well here.
Creative Customizations
- Aesthetic matches: Use seventies-inspired earth tones (like oranges, browns, and golds) for a cozy retro feel, or go monochromatic with blues and whites for calming ocean vibes.
- Shape adjustments: For a slimmer fit, tailor your starting chain length to match your shoulder width rather than making an oversized panel.
- Design enhancements: Add embellishments like crochet flowers, fringe, or ribbed cuffs to make it uniquely yours.