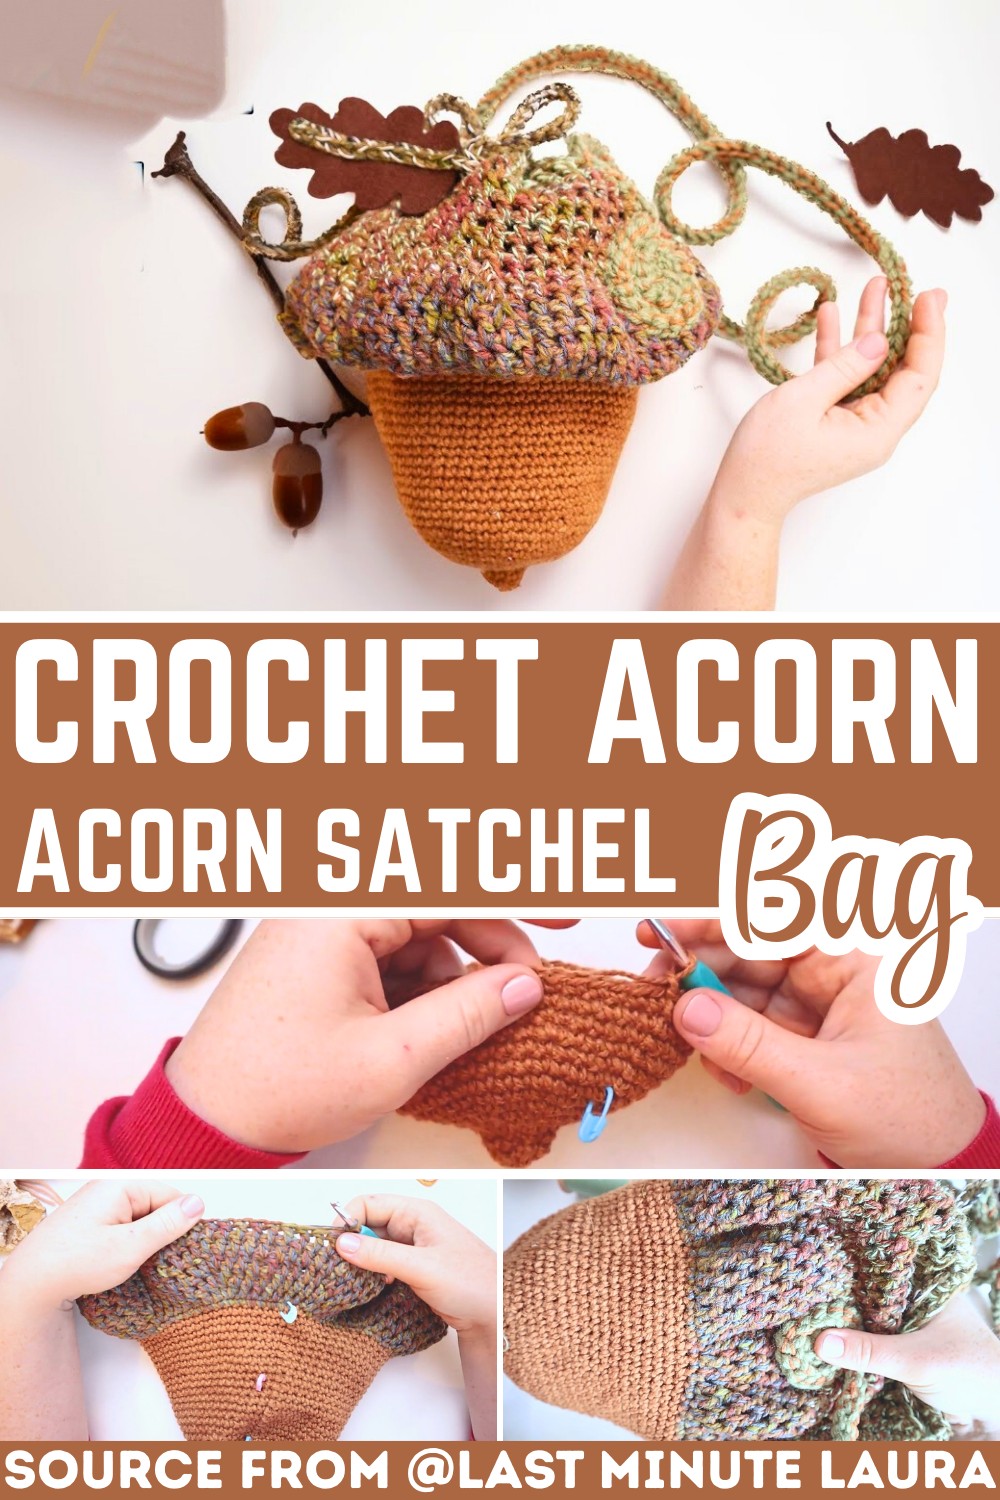
This whimsical acorn-shaped satchel is the perfect accessory for autumn outings, Renaissance fairs, or adding a touch of woodland charm to your wardrobe.

The crochet acorn satchel bag is a playful and unique accessory that looks just like a little fall-inspired acorn. It’s perfect for carrying small treasures while adding a touch of autumn fun to your outfit. With its rounded shape, drawstring top, and long strap, this bag is not only charming but also a great conversation starter.
Crochet Acorn Satchel Bag Pattern
This Crochet Acorn Satchel Bag is simpler than you might think to create this fun design. Using basic crochet techniques such as single crochets, double crochets, and slip stitches, you’ll create the acorn’s rounded base and textured cap. A drawstring closure not only looks great but also keeps items safely inside. The strap adds a functional crossbody element, perfect for everyday wear or costume-themed events.
Credit Last Minute Laura
Key Features & Pattern Construction:
- Shaped like an acorn: The bag features a structured, rounded base and a textured cap topped with a drawstring closure.
- Working in the round: The pattern begins with a single crochet base, gradually widening to form the acorn’s body.
- Textured cap detailing: Double crochets are used for the cap portion, adding a visual resemblance to a real acorn.
- Customizable drawstring: Woven through eyelets, the drawstring creates the acorn’s signature “cap” closure.
- Whimsical straps: A long, rope-like strap adds functional flair, with a subtle swirling attachment for added charm.
- Felted oak leaf embellishment: Stitched to the drawstring, the leaf completes the acorn theme.
How the Acorn Bag Comes Together
This pattern begins by building the acorn base with a continuous round of single crochet stitches. Starting with a small slipknot, you’ll work in the round, increasing gradually to create the rounded, structured “nut” base. The dense fabric from single crochets ensures durability and opacity, making the bag functional as well as adorable.

Once the base is complete, the design transitions into the wider top section that will form the textured acorn cap. This section uses double crochets to provide a softer, more open texture that mimics an acorn’s natural surface. Strategic increases are added to shape the cap, and a fun color change introduces a darker or contrasting tone for a realistic acorn look.

Eyelets are incorporated near the top of the cap to accommodate a drawstring, which is both practical and decorative. You’ll weave a sturdy braided cord or a slip-stitched chain through these openings, allowing the bag to cinch closed in classic satchel style. The addition of a tassel or felt embellishment (like the oak leaf in this pattern) adds a delightful touch of whimsy to the drawstring.

The strap construction keeps functionality and style in mind. A long chain, worked with multiple strands of yarn for strength, is completed with slip stitches that give the final piece a rope-like texture. The straps are creatively attached with a charming swirl pattern, offering an aesthetic detail that’s also practical for adjusting strap length.

Finally, a felt oak leaf embellishment is secured to the bag’s drawstring as a finishing touch. This simple addition truly ties the acorn theme together, creating a one-of-a-kind pattern that celebrates the beauty of fall.

Video Tutorial
Step-by-Step Pattern
Materials
To complete this pattern, you will need:
- Yarn:
- Light brown wool yarn (for the bottom of the acorn)
- Dark brown or any multicolor yarn blend for the acorn’s “cap” (e.g., green, brown, and gray tones)
- Optional: A contrasting cotton yarn to pair with wool for added strength in the strap and drawstring.
- Crochet Hook: 5.5mm
- Tools:
- Scissors
- Yarn needle (for weaving in ends)
- Stitch marker
- Optional Accessories:
- Pre-made felted oak leaf(s) for decoration
- Needle and thread (to attach decorative elements like the oak leaf or secure straps)
Pattern Instructions
Step 1: Form the Bottom of the Acorn
- Start with the light brown yarn to create the base.
- Make a Slip Knot and CH 3.
- Use a Slip Stitch (SL ST) to join the round, creating a small loop. Secure with a stitch marker for clarity. This is the “donut” base of your satchel.
- Round 1: CH 1 and work 8 SC into the center of the donut. Slip stitch to the chain to close. (9 stitches total).
- Rounds 2-4: CH 1 and place 1 SC in each stitch around. SL ST to join. By Round 4, your acorn will start to take shape as a small bowl.
Step 2: Shape the Wider Body
- Round 5 (Increase Round): CH 1. In each stitch around, work 2 SC. You’ll now have 18 stitches.
- Round 6 (Increase): Work 2 SC in every third stitch. Total of 27 stitches at the end.
- Continue increasing every few rows (following the same pattern, SC 1-2+ before adding an extra) until you reach Round 10 (45 stitches).
Tip: It may look round now, or even a little misshapen, but trust the process—it’ll mimic an acorn’s bottom soon!
Step 3: Transition to the Acorn “Cap”
- Switch to your darker yarn or multicolored yarn blend.
- Continue building up the body of the bag through Rows 11-16 with no increases. Work one SC in each stitch for 5 straight rows. By Row 16, your acorn shape should be obvious!
Step 4: Add the Decorative Cap
- Replace SC with DC to allow more texture and flexibility.
- Add increase rounds in DC (following earlier increase patterns). For example: Double crochet in the first 5 stitches, then work 2 DC in the sixth.
- Alternate increase rounds with straight rows of DC to create the bulb-like rounded top of the acorn.
- Once your cap is shaped (around Row 35), move into the final rows of uniform DC.
Step 5: Add the Drawstring Eyelets
- Work an eyelet row: CH 2, DC 1, skip 2 stitches, CH 2, repeat. This creates small holes around the opening of the bag.
- For the next row, SC into every stitch and space to stabilize the opening.
Step 6: Create the Drawstring
- Take 2-3 strands of yarn (any colors you like) for strength and vibrancy.
- Create a long chain (approx. 100 CH).
- SL ST back along the chain to form a strong cord.
- Weave the drawstring through the eyelets and tighten to close the bag. Add a knot or tassel for decoration.
Step 7: Design the Strap
- Choose a durable yarn for your strap and chain 200 CH (or adjust based on preferred length).
- SL ST down the entire chain for a rope-like texture.
- Attach both strap ends to either side of the satchel:
- For added flair, spiral the strap’s base and stitch it securely to the bag with needle and thread.
Step 8: Decorate with Oak Leaves
- Add your oak leaf decoration to one end of the drawstring for a whimsical touch.
- Secure the leaf with needle and thread or crochet it directly onto the drawstring if possible.
Troubleshooting and Suggestions
Common Issues:
- Maintaining consistent tension: Working in the round, especially with increases, can cause uneven stitches. Use a stitch marker to track the beginning of each round and count your stitches regularly to ensure accuracy.
- Color transitions: For the cap, blending two yarns or switching colors can leave visible joins. To avoid this, carry the unused yarn along the inside or use a seamless color change technique.
- Attaching straps securely: If the straps feel loose where attached, reinforce them with additional stitches or use a sturdier thread.
Creative Modifications:
- Customize colors: Go classic with brown tones or experiment with playful hues like soft orange and green for a fantasy-inspired look.
- Add more embellishments: Incorporate embroidered designs, appliqués, or beads along the strap or bag body for extra flair.
- Repurpose the pattern: Modify the size or skip the straps to create a storage pouch, small gift bag, or decorative piece for your home.
- Play with textures: Swap double crochets for popcorn or puff stitches in the cap to mimic the bumpy texture of a real acorn top.