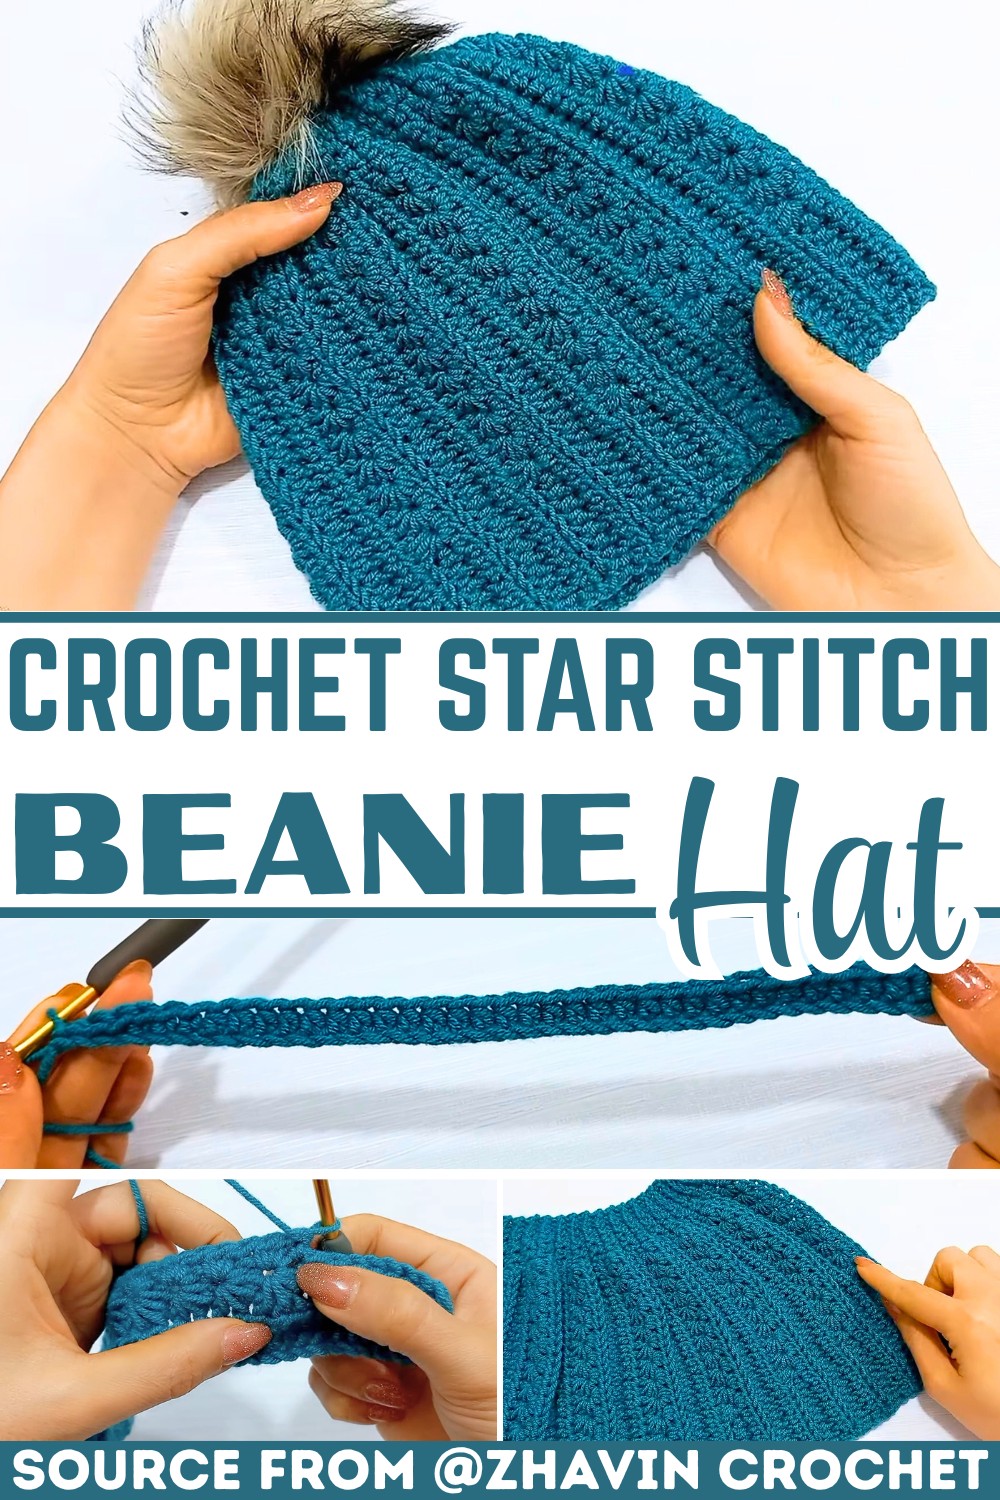
This stylish star stitch beanie offers a cozy texture and a trendy pom-pom finish, perfect for keeping warm and adding flair to your seasonal wardrobe.

This sideways crochet beanie, made with star stitches and half double crochets, is both beautiful and practical. It’s perfect for chilly days, adding a touch of elegance to any outfit. If you’re gifting it to someone special or keeping it for yourself, this warm, textured hat is sure to bring joy and comfort.
Crochet Star Stitch Beanie With Easy Tutorial
The making process is simple yet creative. You work the hat back and forth in rows, repeating a few basic steps until it fits perfectly. Adding the star stitch pattern gives the hat a unique design that stands out. It’s made with worsted-weight yarn and a 5 mm hook, but you can customize the size to fit any head comfortably. Finish it off by joining the edges and closing the top, and don’t forget to add a fun pom-pom for extra charm.
Credit zhavin crochet
Construction Highlights
- Sideways construction: Worked flat in rows, making it beginner-friendly.
- Star stitch texture: Features a decorative yet sturdy star stitch for the body of the hat.
- Half-double crochet foundation: Combines single, slip, and half-double crochet for shaping and structure.
- Customizable sizing: The length of chains determines the height, and rows are repeated to achieve the desired circumference.
- Seamless finishing: Sides are joined with slip stitches, and the top is cinched for an elegant closure.
- Added detail: A pom-pom provides a playful and cozy final flourish.
How It’s Made
This beanie uses a sideways construction, worked back and forth in rows. Starting with a chain foundation, the height of the hat can be adjusted simply by increasing or decreasing the number of chains. After establishing the base, the design alternates between textured star stitch rows and simpler rows worked in half-double crochet stitches, each bringing a unique shape and feel to the design.

The star stitch is the highlight of this beanie, and it adds a soft yet striking texture. It’s crocheted by pulling up loops in strategic points to form small, radiant stars across the body of the hat. For ease and balance, the brim and top sections of the beanie are worked using simpler techniques (single crochet and slip stitches), providing a clean edge and structure.

Shaping the hat involves repeating a sequence of four rows (half-double crochet, star stitch, and transitional rows). This creates a panel that stretches horizontally across the head. Once the desired circumference is reached, the edges of the panel are joined together using slip stitches, forming a tube shape. The top is finished by gathering the stitches with a tapestry needle for a snug, seamless look, closing the opening entirely.

Adding a pom-pom transforms the hat into a stylish accessory that’s both fun and functional. The pom-pom can be customized in color and size for a unique finishing touch that matches your style.

Video Tutorial
Step-by-Step Pattern
Materials
To make your own Crochet Star Stitch Beanie Hat, gather the following materials:
- Yarn: Worsted-weight yarn
- Hook: 5 mm crochet hook
- Tapestry needle (optional, for finishing the top)
- Pom-pom: Optional decorative touch for the top of your beanie
- Scissors
Feel free to experiment with different colors for a unique look or solid tones for a classic finish.
Pattern Instructions
Step 1: Foundation Chain
- Begin with a slip knot and crochet 38 chains (or adjust the chain count based on your desired hat height).
Step 2: Row 1 – Half Double Crochets
- Skip the first two chains. Start in the third chain and work 1 half double crochet into every chain except the last six stitches.
- For the last six stitches:
- Make single crochets into the next three chains.
- Make slip stitches into the last three chains.
- Chain one and turn your work.
Step 3: Row 2 – Back Loop Detail
- Slip stitch into the first three stitches of the row.
- Make single crochets into the next three stitches.
- Work half double crochets into the back loop only across the remaining stitches.
- At the end of the row, work 1 half double crochet into the skipped chains from row 1.
- Chain one and turn your work.
Step 4: Row 3 – Star Stitch
- For clean edges, start the row by working 1 half double crochet under both loops of the first stitch.
- For the main body:
- Skip the first stitch and use the next five points to create a star stitch:
- Insert hook into the base of the previous half double crochet and pull up a loop.
- Pull up loops from the next stitches across.
- Once you have six loops on your hook, yarn over and pull through all loops.
- Chain one.
- Repeat this process across until the last six stitches.
- Skip the first stitch and use the next five points to create a star stitch:
- For the last six stitches:
- Make single crochets into the next three stitches.
- Make slip stitches into the last three stitches.
- Chain one and turn your work.
Step 5: Row 4 – Half Double Crochet into Chain Spaces
- Slip stitch into the first three stitches.
- Make single crochets into the next three stitches.
- Work two half double crochets into each chain one space created by the star stitches from the previous row.
- For clean edges, make half double crochets into the last few stitches on the brim section.
- Chain one and turn your work.
Step 6: Repeat Rows 2 through 5
- Repeat the sequence of rows (2, 3, 4, and 5) until the length of the rectangular piece matches the circumference of your head.
Step 7: Join the Edges
- Align the edges of your rectangle, right side facing outward, and use slip stitches to join the two edges together.
- Be careful to join neatly for a seamless finish.
Step 8: Close the Top
- Using a tapestry needle, weave the yarn tail through stitches around the top opening of the hat. Pull tightly to close the hole.
- Secure the closure with additional stitches and tie off securely.
Step 9: Decorative Touches
- Add a pom-pom to the top for extra flair.
- Weave and trim any loose ends.
Troubleshooting and Suggestions
Common Issues:
- Star stitch tension: If your star stitches look uneven or loose, double-check your loop placement and ensure consistent tension throughout each stitch.
- Clean edges: To maintain a neat brim, work under both loops for edge stitches and pull tighter on slip stitches when joining the panel.
- Circumference fit: Test the circumference of the repeated rows against your head often to ensure the hat fits comfortably before joining.
Creative Modifications:
- Color changes: Alternate colors for the star stitch rows to create stripes or highlight the texture.
- Adjust shapes: Make the hat taller for a slouchy style by adding more chains to the starting foundation.
- Embellishments: Add a decorative button, bead, or stitch embroidery to the brim for extra flair.
- Alternative finishes: Skip the pom-pom for a minimalist look or use faux fur for a luxurious variation.