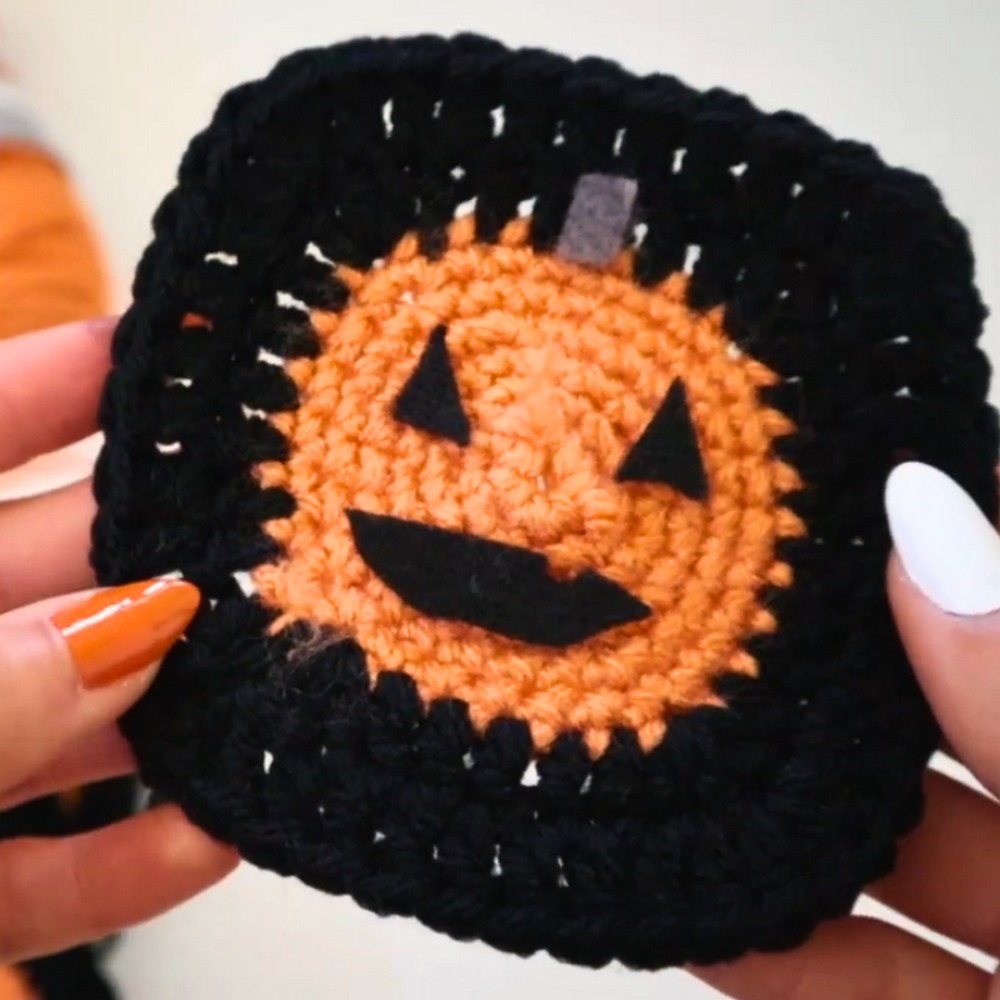
Craft a festive Crochet Pumpkin Granny Square, perfect for brightening up Halloween décor or incorporating into larger seasonal projects. It features a bold pumpkin centerpiece framed by black yarn, creating a playful and charming design.
Crochet Pumpkin Granny Square Pattern

A pumpkin granny square is a charming crochet design that’s perfect for autumn and Halloween. Its warm colors and playful jack-o’-lantern face make it a wonderful addition to your festive decor. You can use it in so many ways, whether as part of a blanket, a coaster, or even cute wall art. This pumpkin granny square is simple, fun, and great for beginners to try.
This crochet design starts with a round pumpkin made of orange yarn, framed by a black square to give it structure and balance. Once your basic square is complete, you can personalize it by adding felt pieces to create fun jack-o’-lantern faces or leave it as a classic pumpkin. Use green or brown for the stem, or customize the colors depending on your style. Whether used for a Halloween-themed design or as cozy seasonal decor, these squares are practical, creative, and easy to make.
Credit Krystal Everdeen
Key Features & Construction Highlights
- Materials: Size 4 acrylic yarn in orange and black, optional green/brown for the stem, and felt for embellishments. A 5mm hook is used for this project.
- Pumpkin Base: Starts in the center with rounds of single crochets (working in the round) to form the pumpkin shape.
- Granny Square Formation: Black yarn transforms the circular pumpkin into a square using double crochet stitches and strategic corner increases.
- Customization: Felt is used to create the Jack-o-Lantern’s face and stem, but crochet alternatives are possible for a full-yarn design.
- Skill Level: Beginner-friendly, with simple stitches and increases.
The pumpkin begins as a small circular foundation of single crochets, with each round gradually increasing in stitch count to maintain a flat shape and expand its size. Careful increases—alternating between adding extra single crochets to every stitch and skipping some—ensure the circle doesn’t ruffle or curve prematurely. This simple approach offers a stress-free way to create a neat pumpkin base while keeping the design scalable for your preferred size.

Once the pumpkin is complete, the pattern dramatically shifts as the black yarn is introduced to transform the circle into a classic granny square. This clever construction focuses on forming corners that define the square. By incorporating chains and clusters of double crochets, you build four distinct points, evenly spaced around the circle. Additional rounds of double crochets allow you to grow the square to the desired size without losing the shape’s crispness. Maintaining a consistent stitch tension is key to achieving the smooth transition from round to square.

The finishing touch lies in embellishments. While the tutorial suggests felt for decorating the pumpkin’s face and crafting the stem, you can easily adapt this step to use small yarn shapes for an entirely crocheted look. Sculpting triangles for the eyes and playful details like a jagged grin can give your jack-o-lantern a unique personality, or you might choose a simple, classic pumpkin by leaving off the face entirely.

For added flair, experiment with color options. A green stem adds a lively touch, while a yellow “glowing” face offers a whimsical Halloween aesthetic. The designer cleverly suggests modifying the pattern based on the larger project you’re envisioning—be it décor, clothing, or accessories. A full blanket made of pumpkin granny squares? Yes, please!
How To Crochet Pumpkin Granny Square
Materials & Tools Needed:
- Yarn:
- Orange yarn – Size 4 (100% acrylic) for the pumpkin center.
- Black yarn – Size 4 for the granny square border.
- Optional: Green or brown yarn for the stem.
- Optional: Felt (black, brown/green) for facial details (if making a jack-o’-lantern version).
- Hook:
- 5 mm crochet hook.
- Other Tools:
- Yarn needle (for securing loose ends).
- Scissors.
- Optional: Hot glue or sewing needle/thread for attaching felt decorations.
Finished Size & Customization Ideas:
- The pattern size can vary depending on the number of rows added for the border. You can make the granny square wider by adding more rows of black yarn.
- Customization ideas:
- Use felt or crochet additional face decorations (eyes, mouth, stem).
- Change colors (e.g., yellow face accents or green stems).
- Make multiple squares and join them into larger Halloween-themed projects (blankets, bags, banners).
Pattern Abbreviations & Terminology (US Terminology):
- ch: Chain.
- sc: Single crochet.
- dc: Double crochet.
- sl st: Slip stitch.
- st: Stitch.
- rep: Repeat.
- Rnd: Round.
Step-by-Step Crochet Instructions:
Pumpkin Center:
Round 1:
- Start with the orange yarn and make a slip knot.
- Ch 3.
- Insert your hook into the first chain to create a small loop.
- Sc into the loop 1 time. You should have created a small ball-like structure that serves as the center.
- Work 5 more sc into the same center loop to form a small circle (6 stitches total).
- Tip: If the center isn’t perfect, it’s okay to insert the stitches where they fit properly.
Round 2:
- For this round, sc 2 times into each st around (inc = increasing stitches).
- Total stitches: 6 sts × 2 = 12 stitches.
Round 3:
- Begin the next round by working 1 sc in the first st, then 2 sc in the next st. Continue the pattern as 1 sc, 2 sc around.
- Total stitches: 18 stitches.
Round 4 & Beyond:
- Continue to grow the circle by alternating increases. Repeat the previous pattern but space increases farther apart:
- Every other stitch in earlier rounds. For larger sizes, consider every third stitch.
- Stop increasing when the circle reaches the desired pumpkin size.
Finish the Pumpkin:
- Cut the orange yarn, leaving a tail. Pull it through the last loop to secure.
- Weave in the loose ends on the back.
Black Border:
Round 1:
- Begin with black yarn. Start anywhere on the pumpkin edge by inserting your hook into a stitch.
- Attach the black yarn by pulling the yarn through the stitch.
- With the yarn on your hook, create a secure base: ch 1, and then ch 3. This counts as your first dc.
- Make 2 more dc into the same stitch to create the first corner.
Corners:
- For each corner, repeat:
- 3 dc into the stitch designated as the corner.
- Repeat this for 4 corners spaced evenly around the pumpkin edge.
Sides:
- Fill in the gaps between corners with a dc into every stitch along the edge of the circle.
- When you return to the starting corner, join at the top of the 3-chain with a sl st.
Round 2:
- Start Round 2 by chaining 3.
- Work 3 dc into the middle stitch of each corner.
- Continue adding dc into every stitch between corners.
- At the end of the round, join with a sl st into the first stitch.
- Finish the square by weaving in the loose ends or repeat additional rounds for a larger square.
Decorating the Pumpkin (Optional):
- Use black felt to cut out eyes, a nose, and a mouth.
- Example: Triangles for eyes and a jagged smile for the mouth.
- If using brown or green felt for the stem, cut a small rectangle or oval.
- Attach decorations with hot glue or sew them onto the pumpkin.
Finishing:
- Trim any excess yarn ends on the back.
- Crochet additional squares following the same steps to create larger projects like blankets or banners!
Troubleshooting & Creative Suggestions
Troubleshooting
- Ruffling Circles: If your rounds of single crochet look wavy, reduce how often you’re increasing stitches in each round. Conversely, if the piece starts curling into a cup shape, add more increases.
- Clean Edges for the Square: Pay attention to maintaining crisp corners. Ensure you always make three double crochets in the middle stitch of each corner cluster to preserve the square shape.
- Color Transitions: Tie and secure your color changes neatly, weaving in excess yarn to prevent unraveling or gaps in the finished piece.
Creative Suggestions
- Alternative Color Schemes: Use soft neutrals for a cozy fall aesthetic or neon hues for playful Halloween fun.
- Face & Stem Variations: Experiment with crochet embellishments instead of felt. Try embroidery for delicate details, or make alternating pumpkin faces for quirky variety.
- Repurposing: Beyond granny squares, you can adapt the motif into coasters, bunting, or appliqués for totes or sweaters. Consider working the design into a patchwork blanket or seasonal table runner.
This Crochet Pumpkin Granny Square is bursting with crafty possibilities! Whether you’re a beginner starting a festive project or a seasoned pro adding playful touches to your creations, you’ll love making your own patch of pumpkin-shaped magic.