
A stretchy and stylish crochet ribbed tank top that’s perfect for summer, offering comfort, versatility, and a flattering custom fit you can easily adjust to your style.

The summer ribbed tank is a light, breathable, and stylish crochet top, perfect for warm days. Its stretchy ribbed design hugs the body beautifully and ensures it keeps its shape over time, making it a reliable choice for casual outings or layering under jackets. With its flattering fit and simple texture, it’s a timeless piece you’ll love wearing.
Crochet Summer Ribbed Tank
Creating this crochet top is simple and beginner-friendly. The pattern alternates between slip stitches and single crochets, making beautiful ribbed sections that give the top its distinct look. It’s highly customizable; you can adjust the length and strap placements to get the perfect fit. The result is a top that’s both fashionable and practical with a seam that’s cleverly hidden on the side.
Credit Granny Gaia
Key Features and Pattern Construction:
- Made with size 3 (DK weight) yarn and a 4mm crochet hook.
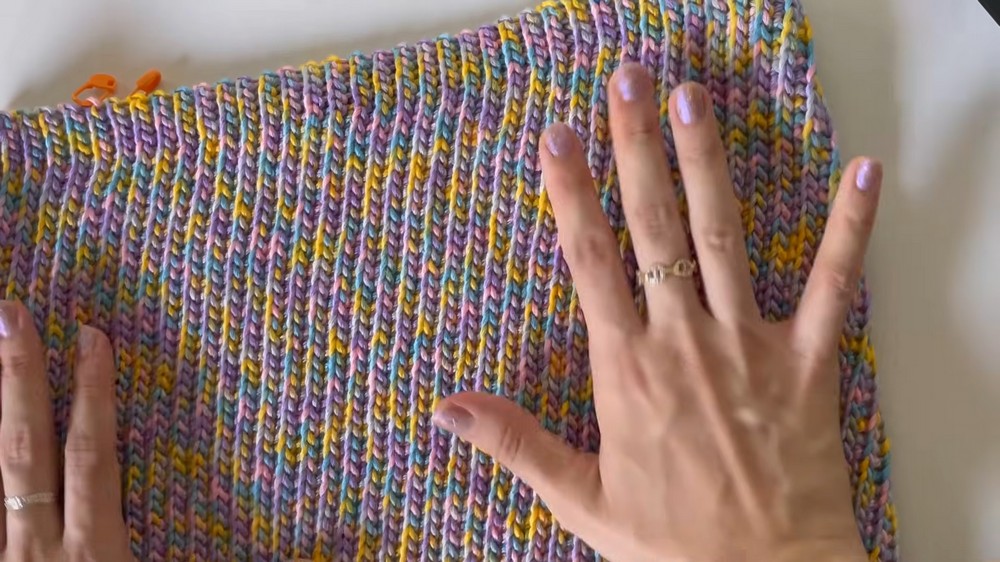
- Worked as a single rectangular panel in slip stitch and single crochet, both in the back loops only, to create a beautiful ribbed texture.
- Customizable length and width for a perfect fit—tailored to your body measurements.
- Features a unique ribbing technique at the top and bottom edges for extra stretch and durability.
- Seamless joining of the panel for a clean, professional finish.
- Includes simple chain straps that are adjustable for comfort and a perfect fit.
This summer tank top is created from a single rectangular panel that is worked back and forth in rows, making it a beginner-friendly pattern that looks stylish and polished. You’ll begin by chaining the desired length of your top and adding a few extra chains to account for any natural tension that may arise from working slip stitches (as they tend to tighten the work).

Once the foundation chain is ready, you’ll mark off sections at both ends with stitch markers to create the ribbed portions of your tank top. These ribbed sections are worked using incredibly stretchy slip stitches in the back loop, while the middle section is worked in single crochet through the back loop. This clever technique creates a gorgeous ribbed texture and ensures the top is both snug and comfortable, holding its shape perfectly even with regular wear.

As you build the fabric row by row, you’ll alternate between rows of complete slip stitch and rows of a mix of slip and single crochet. One of the key tips here is to keep your tension loose, especially with slip stitches, as they can become too tight and make the work harder to manage. While working, you can try the pattern against yourself frequently to ensure it fits correctly around your body. Don’t worry if the edges seem uneven—they’ll even out perfectly once you seam the panel.
After completing the rectangular panel long enough to fit snugly around your torso, fold it in half and align the edges with the “wrong side” facing outward. You’ll use slip stitches to seam up the edges, which creates a smooth and almost invisible join on the outside of the tank top.
With the body complete, you’ll then move on to creating the straps. Strap placement is customized based on your measurements after trying the top on. Using simple chains made to the length of your preference, the straps are secured to the front and back using slip stitches. A quick round of single crochet along the straps provides additional durability and a neat finish.

After adding the straps, all that’s left is weaving in the ends, and your summer-ready ribbed tank top is complete!
Video Tutorial
Materials and Preparation
To create this ribbed tank top, you’ll need the following materials:
- Yarn: Number 3 weight/DK weight yarn (amount varies based on size).
- Size S: 120–130 grams
- Size M: ~180 grams
- Crochet Hook: 4mm crochet hook
- Additional Tools:
- Scissors
- Tape measure
- Stitch markers
Abbreviations and Notes
Here are abbreviations used in the tutorial:
- SC – Single Crochet
- SS – Slip Stitch
- CH – Chain

Step-by-Step Pattern
Foundation/Base
- Create the Chain:
- Start with a slip knot and chain the required length for your desired top height.
- Measure the chain against your body or use a tape measure to ensure accuracy (e.g., 28 cm for the tutorial).
- Add 2–3 cm of extra chains to account for shrinkage caused by slip stitches.
- Block Ribbing Sections:
- Using stitch markers, mark off:
- Bottom Ribbing Section: 7th chain from the starting slip knot (~4 cm of chains).
- Top Ribbing Section: 5th chain from the hook (~2.5 cm of chains).
- Using stitch markers, mark off:
Step 1: Begin Slip Stitch and Single Crochet Rows
- Row 1:
- Skip the first chain.
- Slip stitch (SS) into the next chain until you reach the purple stitch marker (bottom ribbing).
- Remove the purple marker, add a slip stitch, and replace the marker on the last stitch.
- Switch to single crochet (SC) and continue in the back loop only until the yellow stitch marker (top ribbing).
- Remove the yellow marker, add a slip stitch, and replace the marker on the last stitch.
- Row 2:
- Chain 1, turn the work, and begin again with slip stitches (SS) into the back loop only until the yellow marker.
- Remove the marker, switch to single crochets (SC) in the back loop until the purple marker, and finish with slip stitches (SS).
- Repeat Rows:
- Alternate between the following two rows:
- Slip Stitch in the Back Loop Only (full row).
- Slip Stitch + Single Crochet Combination: Slip stitches for ribbing sections and single crochets for the middle sections.
- Continue alternating rows and adjust number until the panel measures enough to wrap fully around your body.
- Alternate between the following two rows:
Step 2: Seaming the Panel
- Choose Your Right Side:
- Decide on the “right side” (preferred texture/design look) and fold the panel, ensuring the wrong side is facing up.
- Seam Using Slip Stitch:
- Pick up the back loop of the last row on one side and the corresponding chain on the opposite side, then slip stitch through.
- Continue seaming across the panel, completing one stitch at a time.
- At the end, chain 1 and cut your yarn, pulling to tighten.
- Turn the work inside out—your seam should be clean and even on the right side.
Step 3: Add Straps
- Mark Strap Placement:
- Wear the top and use stitch markers to mark strap placement on the front and back.
- Ensure even spacing by counting raised rows to match front and back strap placements.
- Crochet the Straps:
- Start at the marked position for the strap.
- Join yarn, chain the desired length for the strap, and check the fit while pulling/stretching the chain.
- Note the chain count for consistency on the other strap.
- Attach Straps:
- Attach the chain to the back side by slip stitching in the marked position.
- Turn the work and work single crochets (SC) down the chain.
- Finish by slip stitching at the base of the strap connection.
- Chain 1, cut the yarn, and weave in the ends.
Final Touches
- Weave in Loose Ends:
- Securely weave in all loose ends for a clean finish.
- Check Fit:
- Try it on one final time to ensure the fit is snug and the straps sit comfortably on your shoulders.

Troubleshooting and Suggestions:
- Slip Stitch Tension: Slip stitches can easily become too tight, which may shrink the fabric or make it harder to crochet the next row. To avoid this, keep your stitches loose by holding your working yarn more gently and angling your hook upwards slightly when pulling through loops.
- Consistent Edges: Use stitch markers at the beginning of each row to keep track of your first and last stitch. This is key to ensuring even edges when seaming the panel and achieving a polished look.
- Fit Adjustment: To achieve the perfect fit, frequently try on your pattern as you work. Remember to account for the stretchiness of the fabric, especially while measuring the width and length of the top.
Modifications to Try:
- Colors: Experiment with color-blocking or add stripes for a bold, summery look.
- Texture Addition: Incorporate puff or bobble stitches in the middle section for a unique touch.
- Length Variations: Create a cropped version for a fun twist or add extra length to make it more versatile.
- Alternatives to Straps: Swap out the thin straps from the pattern for wider straps or even halter ties for additional support and style.


