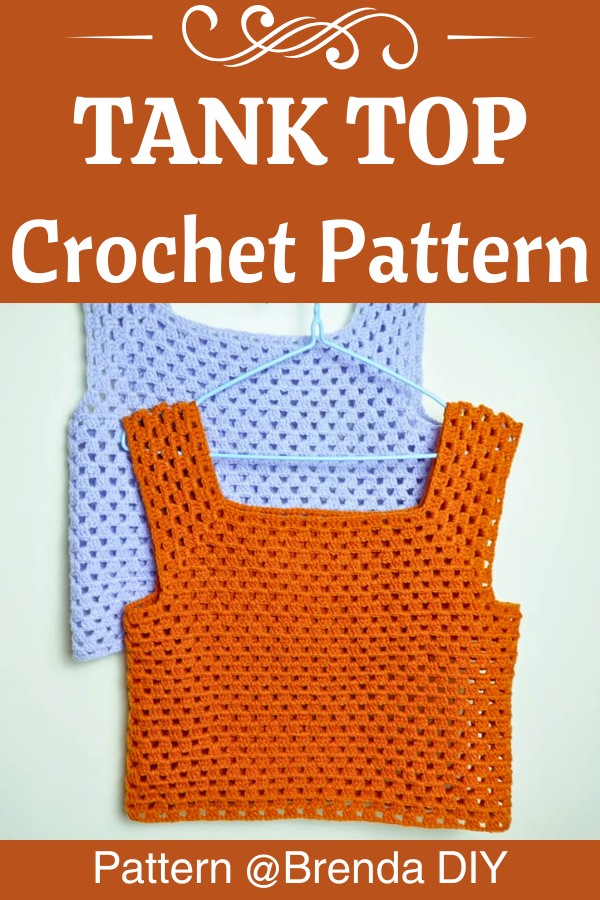
This comfortable and stylish Crochet Granny Tank Top combines the timeless granny stitch with a simple, wearable shape, perfect for summer days.

There’s something magical about taking a timeless crochet and giving it a fresh spin. This Crochet Granny Tank Top blends the nostalgia of crochet with a modern, wearable design. Inspired by the geometric charm of granny stitch patterns, this top elevates traditional crochet pieces into an airy, fashionable statement. It’s perfect for bright summer afternoons, casual spring outings, or even layered under cozy cardigans.
Crochet Granny Tank Top Pattern for Summer Vibes
This tank top features a mesh-like openwork stitch, creating a breathable feel with a structured, grid-like aesthetic. While not a true granny square, the stitch arrangement is reminiscent of the symmetrical charm seen in granny-style designs. Its clean square neckline and straight edges bring a polished look, ensuring that it can be easily styled for any occasion.
Credit Brenda DIY
Key Features of the Pattern
- Foundation Row: Establish the base with a sturdy row of double crochets to provide support for granny stitch clusters.
- Granny Stitch Construction: Build rows of classic granny stitch clusters to form the tank top’s panels.
- Armhole Shaping: Gradually decrease granny clusters to create tapered armholes for a flattering fit.
- Panel Joining: Seam the front and back panels together at the sides and shoulders, leaving armhole openings.
- Straps & Finishing Touches: Add customizable straps and optional edging to complete the garment.
How the Tank Top is Made
Section 1: Foundation Row
The design begins with a simple foundation row of double crochets. First, you chain 50-100 stitches depending on your size (small, medium, or large). Double crochet into the 4th chain from the hook, which forms the sturdy base. Continue working 1 DC stitch into each chain across the row. This initial row acts as the foundation for the granny stitch clusters, keeping the structure secure.

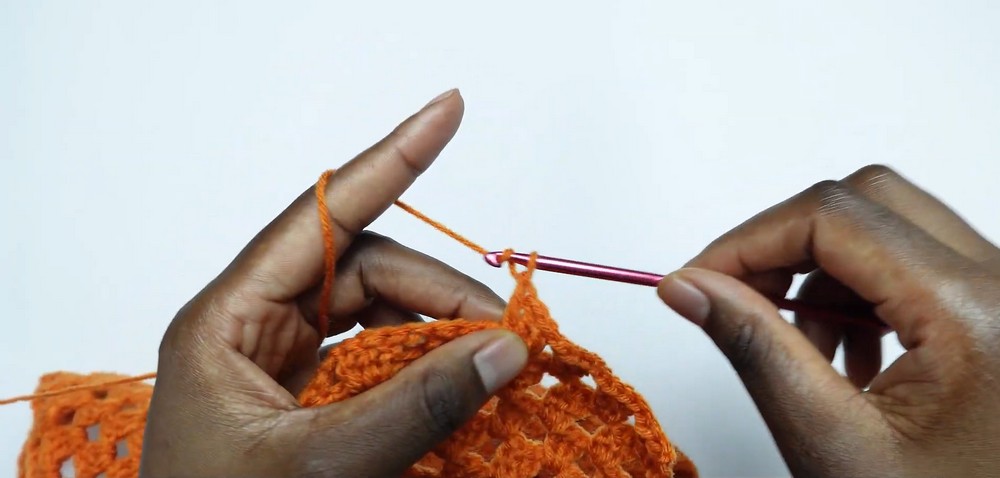
Section 2: Granny Stitch Rows
Transitioning into granny stitches, you’ll turn your work and chain 3, which counts as the first DC. Then, skip 2 stitches and crochet 3 DCs into the next stitch to form your first granny stitch cluster. Skip another 2 stitches and repeat the clusters across the row, ending with 1 DC in the last stitch. Repeat this row pattern, building up the fabric for 12-15 rows—or until the tank reaches your desired length. The granny stitch clusters create an airy, breathable texture, perfect for summer.

Section 3: Shaping the Armholes
To shape the armholes, you’ll use decreases at each end of the rows. Skip the first and last granny stitch clusters for each row over 3-5 rows, gradually tapering the sides. These decreases establish the openings for the arms and help contour the tank top shape. This technique ensures a comfortable fit while maintaining the granny stitch aesthetic.
Section 4: Joining the Panels
Once your front and back panels are complete, fold them together and align the edges. Using a slip stitch seam or a yarn needle, join the sides of the panels together, but leave the top openings for the armholes. This step is quick and keeps the assembly tidy.

Section 5: Adding Straps
Work the straps by attaching yarn near the armholes and chaining 30-40 stitches—or your desired strap length. Once the foundation chain is complete, add a row of double crochets along the straps for sturdiness. Attach the straps to the opposite side of the tank top, ensuring they are even and secure. Repeat for both sides to finalize the tank’s structure.

Section 6: Finishing Touches
Finishing touches elevate the design to a polished piece! Weave in all loose ends with a yarn needle for a clean look. Blocking the completed tank lightly ensures the stitches are uniform and forms a better fit. For added flair, edge the neckline and armholes with single crochet or a decorative border, like picot stitches.

Video Tutorial
Materials
Before starting your Crochet Granny Stitch Tank Top pattern, gather these materials:
- Yarn: Choose a lightweight (Category 3) or DK yarn for a soft and breathable fabric ideal for a tank top. Cotton or cotton-blend yarn works great for summer wear.
- Hook Size: Use a crochet hook size recommended for your yarn (typically 4.0 mm or 4.5 mm). Adjust the hook size based on your tension.
- Tools:
- Yarn needle for weaving in ends
- Scissors
- Stitch markers (optional, particularly for marking decreases or shaping sections)
- Gauge Swatch: If required, make a small swatch of the granny stitch to test your tension. Matching the recommended gauge ensures your tank top fits properly.
Step-by-Step Pattern
Section 1: Foundation Row
- CH: Begin by chaining the foundation row. Start with a chain length that matches the tank top width you need (e.g., 50-100 CH for small, medium, or large).
- DC in the 4th CH: Work your first double crochet into the 4th chain from the hook.
- Continue: Repeat 1 DC into each CH across the row until the end. This forms a sturdy base for the granny stitch clusters.
Section 2: Granny Stitch Rows
- CH 3: Turn your work, and chain 3 (counts as the first DC).
- Granny Stitch Cluster: Skip 2 stitches, then work 3 DC into the next stitch (this forms your first granny stitch cluster).
- Repeat: Skip 2 stitches, and work another granny stitch cluster. Continue across the row until the last 2 stitches.
- End of Row: Work 1 DC into the last stitch.
- Repeat Rows: Turn your work and repeat this granny stitch row pattern until your tank top reaches your desired length (typically 12-15 rows).
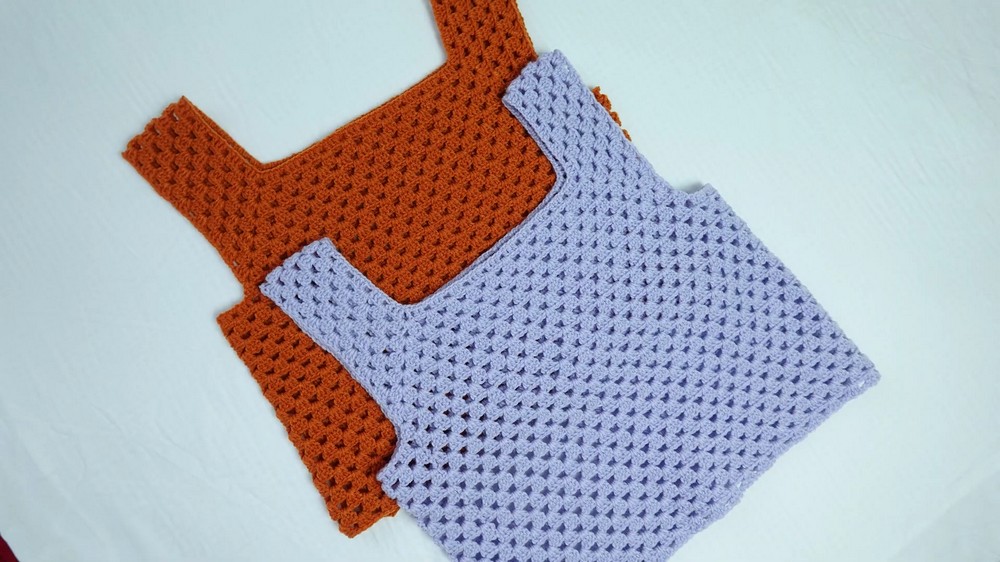
Section 3: Shaping the Armholes
- Decrease Rows: To shape the armholes, you will start decreasing. For each end of the row, skip the first granny cluster and the last granny cluster. This tapers the sides for armhole openings.
- Repeat: Decrease rows for 3-5 rows or until the armholes are wide enough for your size.
Section 4: Joining the Front and Back
- Seam Sections: Fold the front and back panels together, aligning the edges. Use a SL ST seam or a yarn needle to sew the sides together. Leave openings at the top for the armholes.
Section 5: Adding Straps
- Start Strap Foundation: Work on one side of the tank top (near the armhole). Attach your yarn and CH 30-40 (or desired strap length).
- DC Row: Work DC carefully across the strap foundation, ensuring it’s sturdy.
- Attach Strap: Join the strap to the opposite side of the tank top.
- Repeat: Complete straps on both sides.
Section 6: Finishing Touches
- Weave in Ends: Use a yarn needle to weave in any loose ends.
- Blocking: Lightly block the tank top to make stitches uniform and enhance fit.
- Optional: Add decorative edging (SC or picot stitches) around the neckline and armholes.
Troubleshooting and Suggestions
- Tension Issues: If your granny squares or clusters look uneven, double-check your tension. Blocking can also help reshape your squares.
- Strap Attachment: Be precise when placing straps; try on the tank top during this step to ensure a comfortable fit and alignment with the armholes.
- Custom Fit: Adjust the number of granny stitch rows for length or add more decreases for narrower armholes to suit your preference.
- Creative Modifications: Use gradient yarn for an ombre effect, or alternate colors in granny stitch rows for a playful, striped look. You can also crochet additional panels to extend the tank top into a tunic dress.