
This cheerful daisy-inspired crochet baby blanket combines delicate flower granny squares with soft pastel tones for a cozy and timeless keepsake.

The Crochet Daisies Baby Blanket is a simple yet delicate masterpiece filled with soft floral patterns. This blanket is not just a cozy wrap for a little one; it’s a heartfelt way to welcome a baby into the world. The daisy-themed design and soft pastel colors make it perfect for nurseries, keepsakes, or as a thoughtful handmade gift. If you use it for snuggles, tummy time, or simply as room decor, this crochet blanket is timeless and full of charm.
Crochet Daisies Baby Blanket
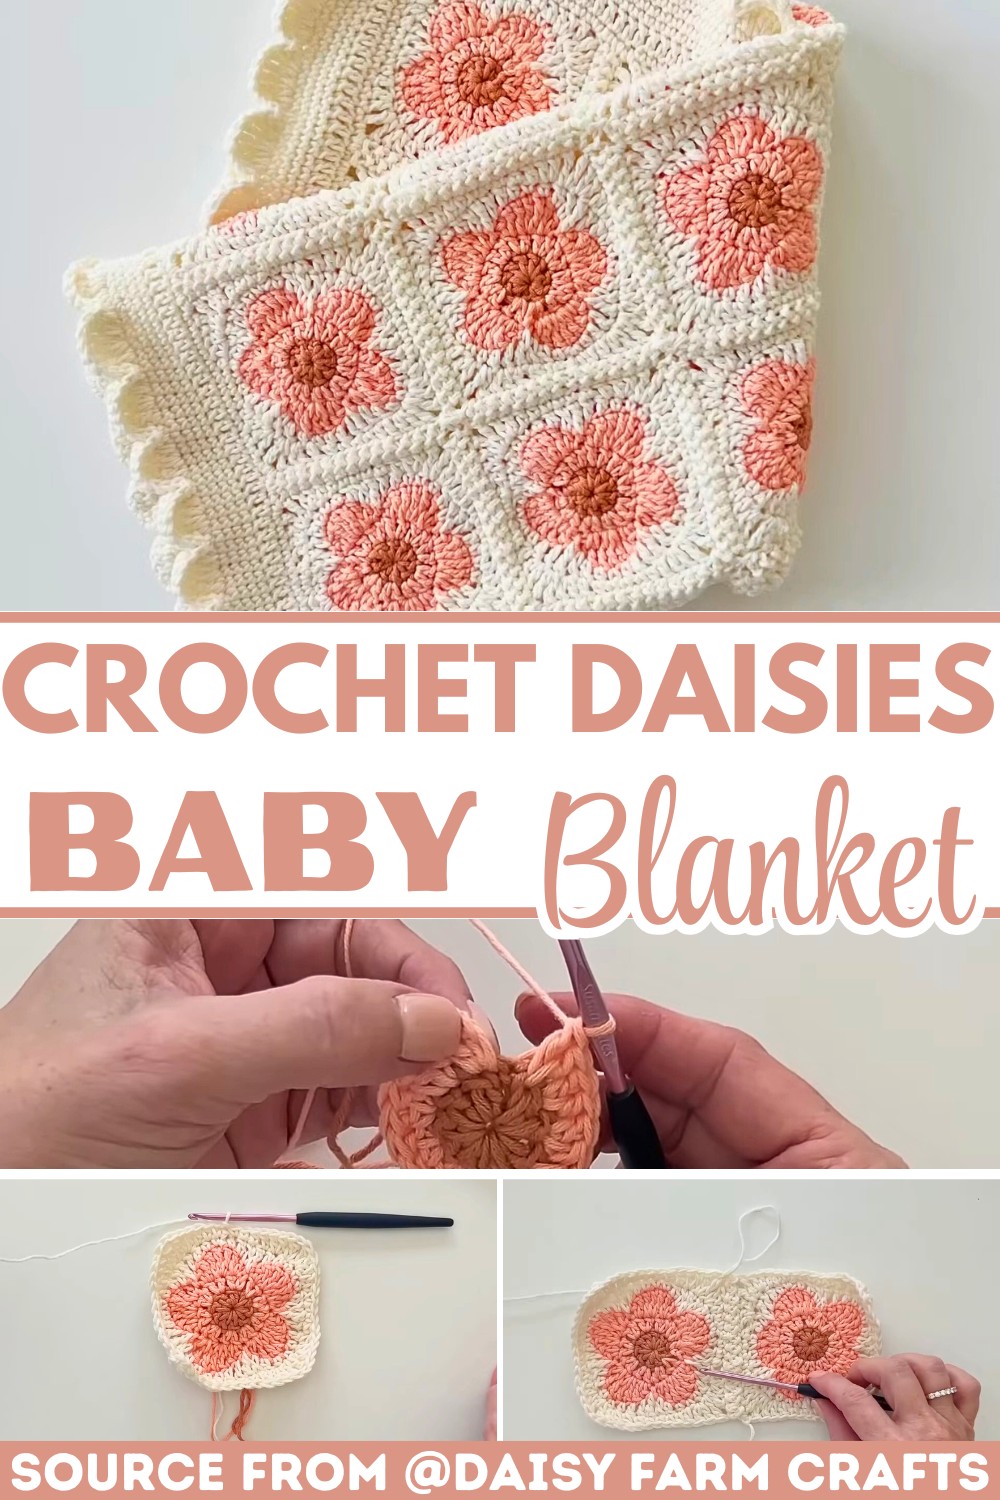
This crochet blanket’s daisy granny square pattern combines layers of textures and soft tones to create a cheerful, warm feel. It’s creatively joined together using a zigzag stitching method that looks neat yet beautifully decorative. For finishes, a wavy border resembling delicate flower petals adds a final gentle touch. The tutorial’s techniques are simple enough for beginners looking for a fun way to create something special, yet versatile enough for seasoned crocheters. It’s all about creating a piece that combines function with beauty.
Credit Daisy Farm Crafts
Pattern Highlights
- Individual Daisy Granny Squares: Each square features an intricately crocheted floral design with petal details.
- Zigzag Slip Stitch Join: A flat, decorative join method connects the squares seamlessly.
- Charming Border: A textured petal-inspired edge mimics the flower motifs and adds a polished, playful touch.
- Materials and Tools: Made with Bernat Softee Cotton yarn in curated colors using a 4mm (G) crochet hook.
This beautiful baby blanket starts with creating individual flower granny squares. Beginning with a simple chain circle as the foundation, the center uses double crochet stitches to ensure a secure and structured base. The flower petals are shaped using a combination of double and treble crochet stitches, lending each daisy a soft, dimensional look. With five elegant petals in blush-colored yarn surrounded by a cream-colored background, the granny squares reflect classic and delicate floral motifs.

Once the granny squares are completed, they’re joined together using a zigzag slip stitch method. This approach ensures the blanket lies flat while adding a touch of decorative flair with alternating chain spaces in the join. Tiffany adds a creative twist here by opting for an extra chain one in each slip stitch sequence, adjusting the technique to keep the join stable and visibly neat.

The border follows after all granny squares have been connected. It starts with rounds of single crochet and double crochet stitches to build a solid frame around the blanket. The final touch is a round of ‘petal’ stitches, inspired by the flower motif. By alternating double and treble crochet combinations and slip stitches, the border mirrors the playful texture of the daisy petals. To refine this design even further, a final round of single crochet is worked to highlight the petal details and give the edges a delicate, ruffled look.

Brightly colored yarn, clever techniques, and thoughtful details bring this blanket to life, making it as much fun to crochet as it is to see unfold.
Video Tutorial
Step-by-Step Pattern
Materials
To make this crochet daisies baby blanket, you will need the following:
- Yarn: Bernat Softee Cotton in the following colors:
- Sandstone: For the flower center.
- Blush: For the flower petals.
- Cotton (Cream): For the two neutral rounds and the borders.
Note: Blush is a limited-edition color; check for availability or pick a similar substitute!
- Hook: G/4mm crochet hook.
- Other Supplies:
- Scissors
- Yarn needle (for weaving in ends)

Pattern Instructions
Step 1: Create the Flower Granny Square
- Center of the Flower (Sandstone Color):
- Chain 4. Join with a slip stitch to form a circle.
- Chain 3 (counts as the first DC). Work 9 more DCs into the center of the circle.
- Join with a SL ST to the top of the starting CH-3. You should have 10 DCs.
- Fasten off Sandstone.
- Petals (Blush Color):
- Join Blush to any DC stitch with a pull-through loop. Chain 3 (counts as 1st DC). Work 1 DC in the same stitch.
- Continue working 2 DCs into each DC around (total of 20 DC).
- Fasten off Blush.
- Shaping the Petals:
- Rejoin yarn to any DC. Chain 3 and work into the stitches to create petals:
- [DC, TR] in 1st stitch, 3 TRs in the next stitch, [TR, DC] in the next stitch.
- Slip stitch into the following stitch to secure the petal.
- Repeat this sequence around to create 5 petals (total).
- Fasten off.
- Rejoin yarn to any DC. Chain 3 and work into the stitches to create petals:
- Neutral Filler Layer (Cream Color):
- Join Cream in the center stitch of any petal. CH 1, SC in the same stitch.
- Work HDC in the next stitch, DC in the next stitch.
- TR in the SL ST between petals.
- DC in the next stitch, HDC in the next, SC in the next (the top of the petal).
- Repeat this sequence all the way around; fasten off.
- Square Corners (Cream Color):
- Rejoin Cream color on top of any petal. Work SC, HDC, DC, and 2 DCs in the next stitch.
- Work a corner by making [TR, CH 1, TR] into the next stitch.
- Mirror back the sequence: Work 2 DCs, 1 DC, 1 HDC, and three SCs.
Step 2: Joining the Squares
- Zigzag Slip Stitch Join with Chain:
- Lay two squares with the right side facing up. Align the corners.
- Join yarn to the CH-1 space of a corner on one square. Chain 1, then SL ST into the corner of the second square.
- Chain 1, return to the next stitch of the first square, SL ST, then chain 1 again.
- Repeat this pattern—slip stitching into corresponding stitches back and forth across the squares, always chaining 1 between slip stitches for added flexibility.
- Row and Blanket Joining:
- Repeat the Zigzag Join technique row by row until all squares are assembled in your desired layout.
Step 3: Adding the Border
- Round 1 (Single Crochet):
- Pull up a loop of Cream in any corner. Chain 1, work SC in the same corner space.
- Work 1 SC in each stitch around. In corners, work SC, CH 2, SC.
- Round 2 (Double Crochet):
- For this round, begin with a CH 2. DC across each SC. In corner CH-2 spaces, work DC, CH 2, DC.
- Single Crochet Rounds:
- Add four rounds of SC. In corners, work SC, CH 2, SC to preserve the square shape.
- Final Round (Petal Trim):
- Mimic the petal design used on the squares for the edging. Work: [DC, TR] into a stitch, 3 TRs in the next stitch, [TR, DC] in the next stitch, SL ST into the following stitch.
- Optionally, add one more SC round to define the petals further.
Final Tips:
- Weave in all ends securely with a yarn needle.
- Block the blanket to shape it and smooth the edges.
Troubleshooting and Suggestions
Common Issues:
- Petal Stitch Precision: Since treble crochets are tall stitches, beginners may struggle with keeping tension consistent. Focus on maintaining an even yarn flow to ensure uniform petals.
- Clean Joins: When working the zigzag slip stitch join, ensure your squares are facing right-side up, as it’s easy to accidentally work on the wrong side.
- Border Alignment: Pay close attention to your stitch count, especially at corners, to preserve symmetry throughout the border.
Creative Modifications:
- Color Choices: Swap out the blush and cream tones for bold, contrasting colors or opt for a rainbow theme to suit your personal style.
- Size Adjustments: Increase or decrease the number of squares to make a larger throw or a smaller lovey.
- Embellishments: Add tiny, embroidered accents in the center of each flower for extra detail, or weave metallic thread into the border for a delicate shimmer.


