A Crochet Hydrangea Bouquet Blanket turns clusters of hydrangea blooms into a blanket that feels fresh, colorful, and full of handmade charm. The layered flower design creates a garden-inspired look without overwhelming the overall piece.
Making it a lovely choice for a sofa, reading corner, or thoughtful handmade gift. Every floral section adds dimension, giving the crochet blanket a beautiful appearance from every angle.

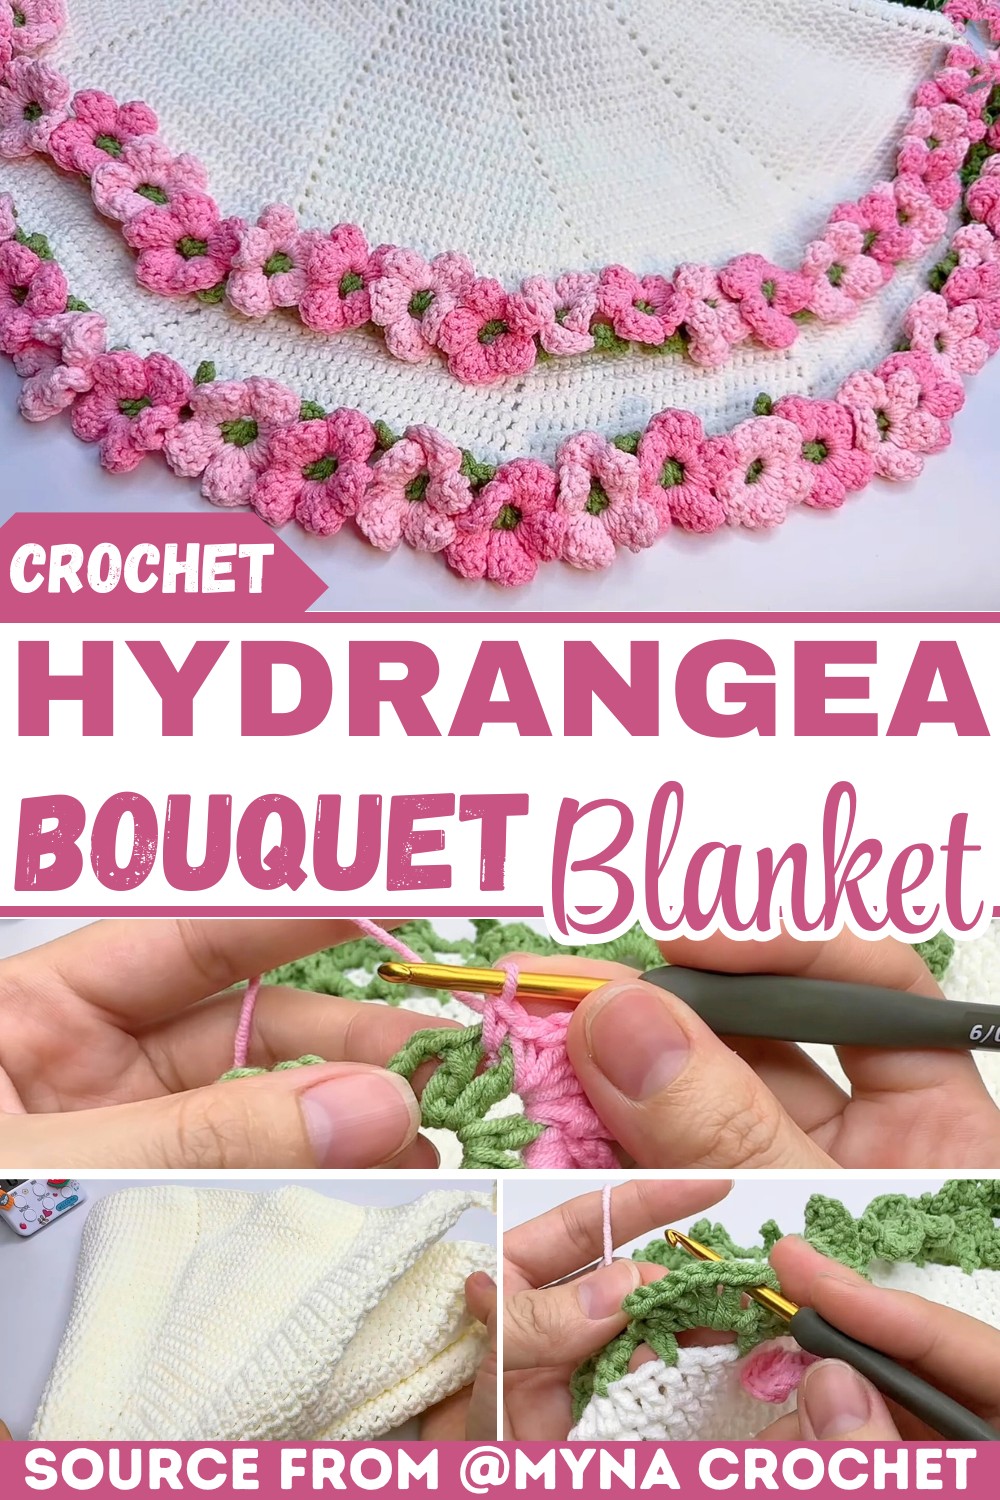
This crochet pattern shows how those blooming clusters come together one step at a time to create a striking floral blanket. You’ll build individual flower motifs before joining them into a design that gradually reveals the bouquet effect. As each section comes together, the crochet blanket becomes more impressive, making it hard to stop until the final bloom is in place.
Credit Myna Crochet
Materials & Tools Needed
- Yarn: Milk Cotton Yarn (5-ply, ~2mm thick)
- White: Main blanket/cone
- Green: Leaves/Vine border
- Dark Pink & Light Pink: Hydrangea flowers
- Crochet Hook: 3.5mm (6/0)
- Tools:
- Stitch markers
- Scissors
- Tapestry needle (for sewing ends)
Pattern Abbreviations & Terminology
- MR: Magic Ring
- ch: Chain
- sk: Skip
- slst: Slip stitch
- sc: Single crochet
- dc: Double crochet
- tr: Treble crochet
- inc: Increase

Step-by-Step Crochet Instructions
Component 1: The Main Blanket (White Yarn)
Create a swirl/pinwheel effect blanket using rounds:
- Round 1:
Create a Magic Ring. Work 12 dc into the ring. Join with slst to the first stitch. (12 sts). - Round 2:
slst, ch 2, [dc, inc, ch 1] – repeat 12 times. Join with slst. - Round 3:
slst, ch 2, [2 dc, inc, ch 1, sk 1st] – repeat 12 times. Join with slst. - Round 4:
slst, ch 2, [3 dc, inc, ch 1, sk 1st] – repeat 12 times. Join with slst. - Round 5:
slst, ch 2, [4 dc, inc, ch 1, sk 1st] – repeat 12 times. Join with slst.
- General Formula (Round
$n$):
slst, ch 2, [(n – 2) dc, inc, ch 1, sk 1st] – repeat 12 times. Join with slst.
➡ Total Rounds: Work 28 rounds total using White Yarn before moving to the border.

Component 2: The Leaf Border (Green Yarn)
- Round 1:
Attach Green Yarn to the edge of the blanket.- [sc, ch 5, sk 2 sts] repeat around the edge.
- Join the last ch-5 with slst, ch 1.
- Round 2:
Work leafy shells into ch-5 spaces:- [1 sc, ch 3, (1 dc, ch 1) x 3, 1 dc, ch 3, 1 sc] into each loop.
- Between shell clusters: [ch 7, sk 3 sts, slst, ch 3, 1 sc].
- Continue until the border forms alternating leaf clusters.
➡ Finish: slst, cut yarn, and use a tapestry needle to sew ends securely.

Component 3: Hydrangea Flowers (Dark & Light Pink Yarn)
Alternate flowers in spaces between green leaf clusters:
- Petal Rounds:
- Secure Dark Pink yarn into space.
- Work [1 sc, ch 2, 4 tr, ch 2, 1 sc] 5 times into the loop for a 5-petal blossom.
- slst into stitch structure center, ch 1, cut yarn, and sew ends.
- Repeat with Light Pink Yarn for alternating flower colors.
➡ Continue adding blossoms around the blanket border until lushly packed.

Finished Size & Customization Ideas
Transformation
- Spread flat: Functions as a decorative throw with floral trim.
- Fold into thirds and gather tightly: Becomes a standalone faux floral bouquet for home décor.
Customization
Adjust the blanket size by altering the number of rounds in Component 1:
- Adult throw: Add more rounds using formula [(n-2) dc, inc, ch 1, sk 1st].
- Baby blanket: Reduce the round count for smaller dimensions.
Notes
Take your time with the border and flowers for an intricate, polished finish. Always weave ends cleanly for a tidy result. Enjoy creating your floral masterpiece!