
Crochet Monkey Amigurumi: Charming Handmade Toy Pattern
Craft a delightful crochet monkey amigurumi with expressive features and a playful design! This handmade creation is built with soft, kid-friendly yarn and showcases flexible limbs, making it perfect for climbing poses or hanging décor. Add character by experimenting with vivid color swaps, unique stitches, or embroidered details to personalize your monkey’s look and charm.

The design offers creative freedom for customization. Use textured yarn for a fluffier finish or incorporate multi-colored stripes on the hands and feet for a whimsical touch. The pattern also includes detailed steps for shaping the tail, ears, and expressive smile using contrasting yarn shades, ideal for making the monkey truly one-of-a-kind. It’s a versatile project—great for gifting or as a fun addition to your handmade collection!
Credit crochet_toys_patterns
Step-by-Step Pattern
Materials And Tools
- – 2.0 mm hook or size suitable for yarn used.
- – Tapestry needle
- – 2 safety eyes size 4 mm
- – Fiberfill for stuffing
- – Yarn in the same size (I used 4-ply, cotton blend yarn) for the following colors: MC (main colour, you can choose any colour that you like), light beige, red, black
Abbreviations
- -R = Row/Round
- -MR = Magic ring
- – st = stitch/stitches
- -sc = single crochet
- – inc = sc increase
- – dec = sc decrease
- – hdc = half double crochet
- -hdc inc = hdc increase
- – tr = treble crochet
- – ch = chain
- – ss = slip stitch
- – FL = Front loops
- – FLO = Front loops only

Pattern Instructions
Face
First, you will make an oval by crocheting around the foundation ch. Start with light beige.
- R1: make a foundation ch: 9ch. Then from the second ch from the hook, 7sc, 3sc in the last st. continue to work on the other side of the foundation ch: 6sc, inc (18).
Then continue crocheting in spiral.
- R2: 18sc (18)
- R3: 3ss, 3tr in the next st, hdc inc, 3tr in the next st, 3ss.
Fasten off. Leave a long tail for sewing.

Head To Body
- Start with MC yarn to make the head.
- R1 : 6sc in MR (6)
- R2 : 6inc (12)
- R3 : [sc, inc]x6 (18)
- R4 : [sc, inc, sc]x6 (24)
- R5 : [3sc, inc]x6 (30)
- R6-9 (4 rounds): 30sc (30)
- R10 : [14sc, inc]x2 (32)
- R11: 32sc (32)
- R12 : [2sc, dec]x8 (24)
- R13 : [sc, dec] x8 (16)
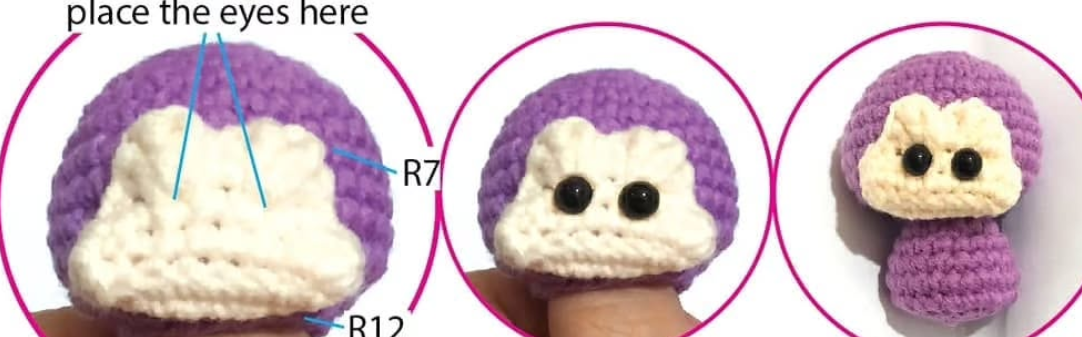
After working R13, sew the face between R7-12, and place the safety eyes between R2-3 of the face, at the st which has 3 tr.
Start stuffing the head with fiberfill.
- R14: 8dec (8)
Continue to make the body.
- R15: FLO [sc, inc]x4 (12)
- R16 : [sc, inc]x6 (18)
- R17: 18sc (18)
- R18 : [2sc, inc]x6 (24)
- R19-20 (2 rounds): 24sc (24)
- R21: [sc, dec]x8 (16)
Start stuffing the body with fiberfill.
- R22: 8dec (8)
Fasten off and leave a long tail to complete. Using a tapestry needle, pass the tail through all FL of the last round, and pull. Make a knot and hide the yarn inside the body.
Arms (Make 2)
First, you will make the hand by working in rounds (light beige) and then continue to make the arm by working some ch (MC).
Start with light beige yarn.
- R1: 5sc in MR (5)
- R2: 5sc (5)
Change to MC yarn. Leave a long light beige yarn tail (about 10 cm) to complete the hand later. Now, continue to make the arm, by making 15ch. Cut the yarn, and leave a long MC tail for sewing.
Now, we complete the hand. Using a tapestry needle, pass the tail through all FL of the R2, and pull. Make a knot and hide the tail inside the hand.
Sew the arms between R15-16 of the body.
Ears (Make 2)

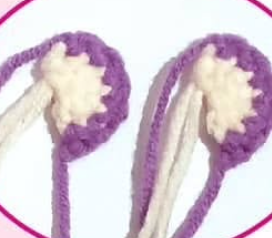
Start with light beige yarn. Work in rows.
- R1: 6hdc in MR do not join the MR, (6), Change to MC, and make 1 turning ch
- R2:turn, 6sc (6)
Fasten off. Leave a long tail for sewing. Attach the ears between R6-10 of the head.
Tail
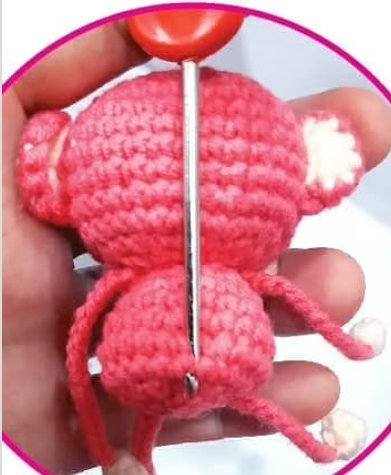
Start with MC yarn to make the tail which is located at back side of the body. Between R20-21, make a loop (see picture), then make 10ch (you can make more chains if you want a longer one). Cut the yarn (you may secure the yarn end using fabric glue).
Legs (Make 2)
First, you will make the foot by working in rounds (light beige yarn) and then continue to make the leg by working some ch (MC yarn).
Start with light beige yarn.
- R1: 6sc in MR (6)
- R2: 6sc (6)
Change to MC yarn. Leave a long light beige yarn tail (about 10 cm) to complete the foot later. Now, continue to make the leg, by making 10ch. Fasten off. Leave a long MC tail for sewing.
Now, we complete the feet. Using a tapestry needle, pass the tail through all FL of the R2, and pull. Make a knot and hide the tail inside the feet.
Mouth & Tongue

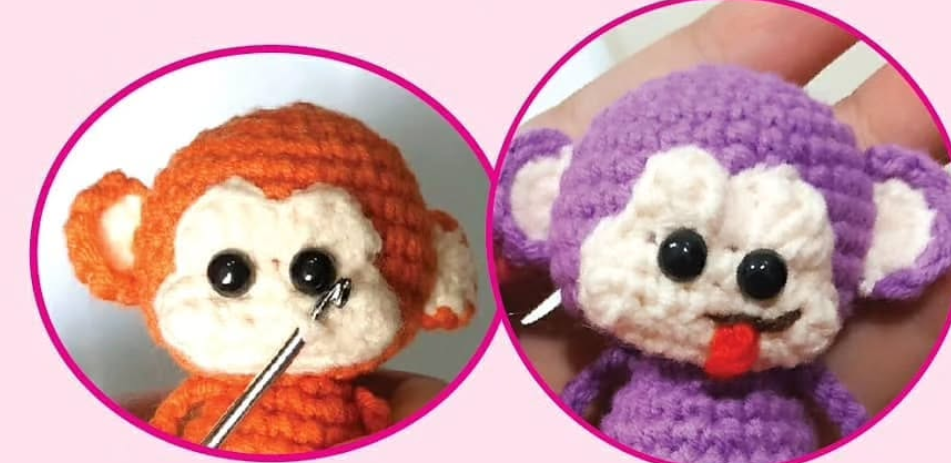
First, make the tongue by attaching the red yarn to the face (see picture). Make 3ch, then start from the second ch from the hook, and make 2ss. Fasten off and secure the ends inside the head.
Then, embroider the mouth using black yarn (I split the 4-ply yarn into 2-ply).
That’s it. Your crochet monkey is now complete.


