
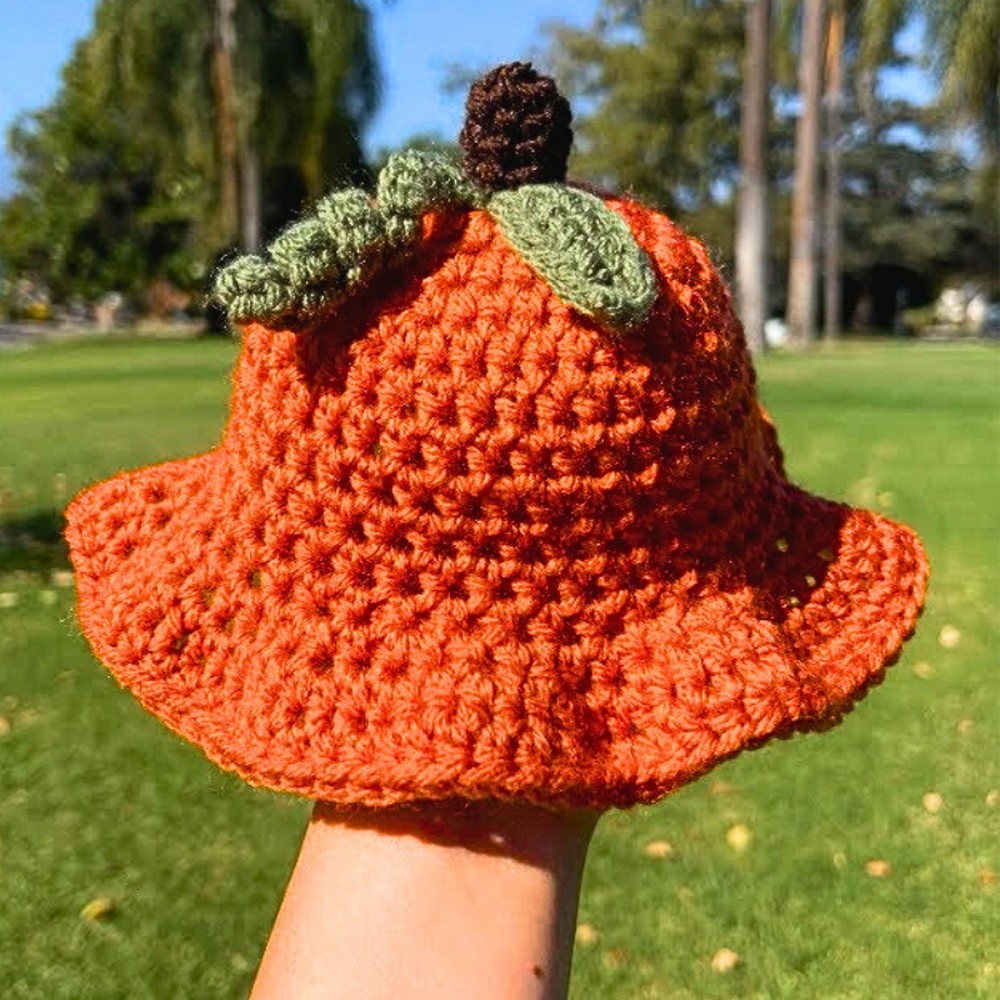
This adorable pumpkin-inspired crochet hat is perfect for autumn outfits and seasonal celebrations.

Let’s make a pumpkin crochet hat that’s not only fun to wear but also brings a touch of autumn charm to your day. This crochet hat is perfect for Halloween, cozy fall outings, or simply dressing up as something unique and playful. With its little stem, curly vine, and adorable leaf, it’s sure to grab smiles wherever you go. You can even use it for cute baby photoshoots or as a thoughtful handmade gift for friends or family.
How To Crochet a Hat Tutorialt
This crochet hat is made using warm, earthy tones like orange for the pumpkin body and green for the vine and leaf accents. The process is straightforward, starting with the pumpkin’s rounded shape, then adding charming details like the curly vine and leaf. Simple tools like yarn, hooks, scissors, and stitch markers are all you need to create this delightful accessory.
From its snug fit to its festive look, this crochet pumpkin hat is truly something to enjoy. Wear it, gift it, or make several for all your loved ones; it’s a lovable piece to bring smiles.
Credit natgiso
Pattern Overview and Key Features:
- Materials: Weight 4 yarn, a 6 mm crochet hook (for the hat body), a 4.5 mm crochet hook (for embellishments), scissors, a yarn needle, and a stitch marker.
- Construction: The hat is worked from the top down, starting with a magic circle, and features rounds of half double crochet stitches to shape the crown and brim.
- Design Elements: Includes a textured pumpkin “stem,” a curling tendril, and a small leaf for embellishment, worked in separate pieces and attached afterward.
- Techniques: Magic circle, half double crochet increases, single crochet detailing, shaping for embellishments, and basic assembly.
- Skill Level: Beginner-friendly but requires basic knowledge of working in the round and increasing stitches.
The Pumpkin Crochet Hat begins by shaping the crown, working with vibrant orange yarn in rounds of half double crochets (HDC). The pattern starts with a magic circle, a common technique for creating a secure and seamless rounded base. Following the magic circle, gradual increases are made across five rounds to expand the crown. Stitch markers play a vital role for tracking progress, ensuring smooth transitions and stitch accuracy during the increases.

Once the crown is complete, the pattern shifts to creating the length of the hat. This part is straightforward—crocheters simply work several rounds of half double crochet stitches, maintaining consistent stitch counts to form the body of the hat. The use of weight 4 yarn and the larger crochet hook ensures the hat remains cozy yet lightweight.

The brim adds character and structure to the hat design. Two rounds of increases are worked to give the brim a slight flair, followed by a final round of single half double crochets which creates clean edges and finishes the brim nicely.

Now comes the fun part—the pumpkin embellishments! You’ll switch to smaller yarn hooks and different colors to crochet charming details. The stem is a simple cylindrical shape worked in brown yarn and single crochet stitches. The leaf is created using single crochets and half double crochets combined in intriguing shaping techniques that give it a natural look. Finally, the curly tendril is made by crocheting into a chain to form a springy spiral—this playful addition completes the pumpkin theme.

To finish, all embellishments are sewn onto the hat using a yarn needle. Placement of decorations is up to the maker, allowing personal creativity to shine. The tutorial suggests aligning the leaf and tendril in an “L” shape and attaching the stem first for neat results.

Video Tutorial
Step-by-Step Pattern
Materials
To make this adorable pumpkin bucket hat, you’ll need:
- Yarn: Weight 4 yarn (three colors: orange, green, and brown).
- Hooks:
- 6 mm crochet hook (for the main hat).
- 4.5 mm crochet hook (for the leaf, curly vine, and stem).
- Tools:
- Scissors.
- Yarn needle.
- Stitch markers.
Pattern Instructions
Step 1: Crochet the Hat Base
- Begin with the magic circle (orange yarn, 6 mm hook).
- Chain 1, and make 8 half double crochets (hdc) into the magic circle. Pull the circle tight to close it.
- Slip stitch into the first hdc from the round to join.
Step 2: Round 2 (Increase Round)
- Chain 1. Make 2 hdc in each stitch around (16 hdc total). Use a stitch marker to mark the beginning of the round.

Step 3: Round 3
- Chain 1. Alternate stitches:
- Make 1 hdc in the first stitch.
- Make 2 hdc in the next stitch.
- Repeat this pattern all the way around (24 hdc total).
Step 4: Round 4
- Chain 1. Alternate stitches:
- Make 1 hdc in the next 2 stitches.
- Make 2 hdc in the next stitch.
- Repeat this pattern all the way around (32 hdc total).
Step 5: Round 5 (Last Increase Round)
- Chain 1. Alternate stitches:
- Make 1 hdc in the next 3 stitches.
- Make 2 hdc in the next stitch.
- Repeat this pattern all the way around (40 hdc total).
Step 6: Create the Hat Length
- Chain 1. Work 1 hdc in each stitch around for 5 rounds (40 hdc per round).
Step 7: Crochet the Brim
- Round 1: Alternate stitches:
- Make 1 hdc in the next stitch.
- Make 2 hdc in the next stitch.
- Repeat all the way around.
- Round 2: Repeat the same pattern as Round 1.
- Final Round of the Brim: Work 1 hdc in each stitch around.
Step 8: Finish the Hat
- Chain 1. Work single crochet stitches in the next two stitches and a slip stitch into the third stitch.
- Cut the yarn and weave in the ends.
Decorative Elements
Leaf (Green Yarn, 4.5 mm Hook)
- Chain 7.
- Working in the second chain from the hook:
- Single crochet into the next two chains.
- Half double crochet into the next two chains.
- Double crochet into the next chain.
- Make 3 single crochets into the last chain (this turns your work).
- Working back up the opposite side:
- Double crochet into the next stitch.
- Half double crochet into the next two stitches.
- Single crochet into the last two stitches.
- Chain 1, cut the yarn, and weave in the ends.
Curly Vine (Green Yarn, 4.5 mm Hook)
- Chain 15.
- Starting in the second chain from the hook, make 2 single crochets into each chain.
- Chain 1, cut the yarn, and weave in the ends.
Stem (Brown Yarn, 4.5 mm Hook)
- Begin with a magic circle.
- Chain 1, and make 6 single crochets into the circle. Slip stitch to join the round.
- Chain 1, and work 1 single crochet into each stitch for two more rounds.
- Optionally, add an extra round to lengthen the stem.
- Chain 1, cut the yarn, and weave in the ends.
Assembly
- Attach the stem: Place the stem at the top center of the hat, push the loose end inside, and sew it down securely.
- Add the leaf and vine: Position the leaf and curly vine next to the stem in an “L” shape, or arrange them as desired. Sew them down securely.

Pattern Question
Question: Can I adjust the hat size for adults or kids?
Answer: Yes! To make the hat larger or smaller, simply adjust the number of increase rounds at the top and use different yarn weights or hook sizes.
Troubleshooting and Suggestions:
Tips for Success:
- Magic Circle Mastery: Struggling with slipping stitches in the circle? Pull your yarn tail tightly to ensure the circle is closed securely.
- Stitch Marker Use: Always place a stitch marker at the beginning of each round—it’s a lifesaver for ensuring even rows and consistent stitch counts.
- Consistent Tension: Work on maintaining an even tension, especially during the stem and tendril creation, as small pieces often show irregularities more prominently.
Creative Modifications:
- Switch up the color palette! Try burnt orange, soft white, or even deep greens to mimic unique gourds.
- Add embellishments like embroidered vines or small crochet flowers for extra flair.
- Transform the pattern into a larger adult-size hat or shrink it down for a baby beanie by adjusting the initial increase rounds.


