These trendy crochet shorts are a fun and quick pattern, designed for style and comfort—perfect for lounging at home, a trip to the beach, or pairing with your favorite summer top.

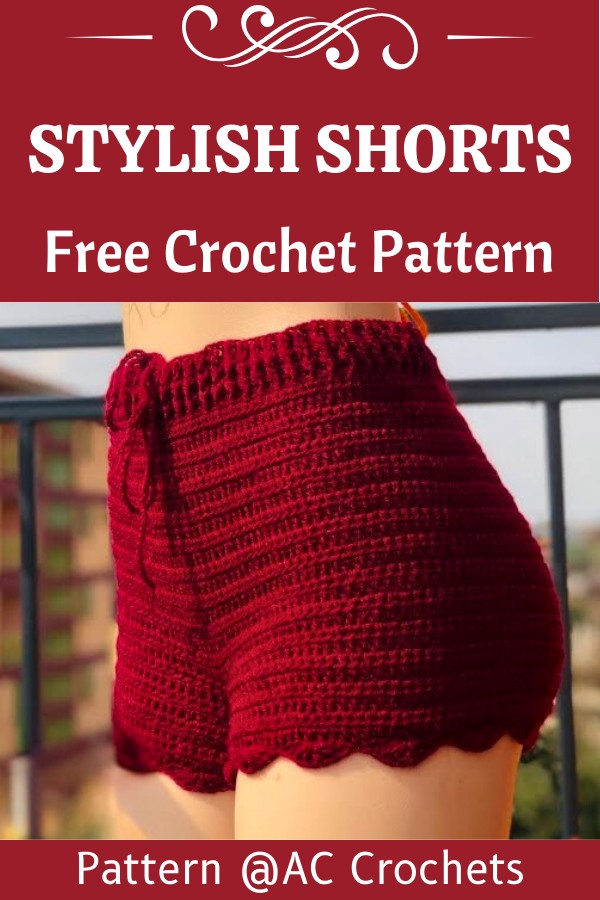
These stylish crochet shorts are soft, cute, and perfect for warm days. They are designed with a stretchy waistband and pretty shell edging at the legs, giving them a sweet, feminine look. The best part is that you can make them to fit any body size, so they feel comfortable and personal to wear.
Stylish Crochet Shorts Pattern
The pattern focuses on simple stitches and a clear shape. You start from the waistband, then build the body of the shorts, and finally form the leg openings. The waistband is adjustable with a long crochet drawstring that you weave in and out, so the shorts can sit just right on your hips. The leg edges are finished with a shell design that makes them look neat, stylish, and a bit dressy.
Credit AC Crochets
Key Features & Construction Overview:
- Made to fit any size, simply by tailoring the waistband to match your hip measurements.
- Features a ribbed, adjustable waistband created using front post and back post double crochet stitches.
- The body of the shorts is crocheted in half-double crochet rows for a clean, sleek texture.
- Includes two leg openings shaped with a crotch area and finished with a decorative shell stitch edging.
- Adjustable drawstring closure ensures a snug, customizable fit around the waist.
Pattern Overview:
These charming crochet shorts start with a foundation chain for the waistband. The chain is worked to the length of your hip measurement (measured when slightly stretched) and then joined to form a circle. From this point, a combination of front post and back post double crochets is used to create a ribbed texture that adds stretch and style to the waistband.

The body of the shorts is worked below the waistband using rows of half double crochet stitches. This simple stitch creates a smooth texture, and the length of the body can be easily adjusted, depending on how long or short you prefer your shorts. A total of 20 rows creates a standard booty-short style, but longer lengths can be added effortlessly.

Once the body is complete, the middle is split to form two leg openings. A chain is added to create the crotch area, and each leg opening is worked individually in the round using more half double crochets. To finish the legs, a beautiful shell stitch is added to the bottom edges, bringing elegance and flair to the design.

The final touch is an adjustable drawstring that is threaded through the ribbed waistband. The tutorial suggests using about 180 chains for the drawstring, but this can be customized based on personal preference. This not only adds functionality but also enhances the shorts’ aesthetic.

Video Tutorial
Materials and Key Pattern
- 3.5 mm crochet hook
- Size 3 acrylic yarn, 100% (e.g., Winter King brand)
- Tape measure
- Scissors
Key Crochet Techniques:
- Slip knot
- Chain stitch (ch)
- Slip stitch (sl st)
- Double crochet (dc)
- Half double crochet (hdc)
- Front post and back post double crochet (fp dc, bp dc)
- Shell stitch
Detailed Pattern
- Foundation Chain:
- Create a slip knot and chain a number of stitches equivalent to your hip measurement when stretched. For example, with a 40-inch hip measurement, chain 132.
- Row 1:
- Straighten the chain, join with a slip stitch.
- Chain 3, double crochet into the first chain, then in each chain across. Join with a slip stitch on top of the chain 3.
- Row 2:
- Chain 3, work a front post double crochet (fp dc) around the first double crochet (dc) from the previous row, then a back post double crochet (bp dc) around the next dc. Continue alternating fp dc and bp dc. Join with a slip stitch on top of chain 3.
- Row 3:
- Repeat Row 2 following the same fp dc and bp dc pattern.

- Rows 4-23:
- Chain 2, work half double crochets (hdc) in each stitch. Join and turn after each row until you complete 20 rows.
- Crotch Area:
- Find the midpoint of the waistband. Chain 20 to connect the two sides, creating the crotch area. Join with a slip stitch and cut the yarn.
- First Leg Hole Rows 1-6:
- Reattach yarn at the midpoint of the crotch chain. Chain 2, work hdc in each stitch around. Complete 6 rows.
- Shell Edging:
- Chain 3, skip 3 stitches, work 3 dc into the fourth stitch, chain 2, work 3 more dc in the same stitch to create a shell. Skip 3 stitches, make a slip stitch in the fourth. Continue this pattern around.
- Second Leg Hole:
- Repeat the same steps as the first leg hole for the other side.
- Drawstring:
- Chain 180 stitches or enough to go around your waist. Weave the chain through the front post and back post stitches at the waistband.
Troubleshooting and Suggestions:
- Common Issue – Twisting the Foundation Chain: When joining the foundation chain for the waistband, be careful to avoid twisting it. Make sure the chain lies flat before you slip-stitch to join. A twisted chain can ruin the structure of the shorts.
- Ensuring Sizing Accuracy: If you’re unsure about your hip measurement, measure while wearing an undergarment or shorts you plan to layer underneath. Crochet fabric has stretch, but accurate sizing ensures the perfect fit.
- Neat Edging: When adding the shell stitch to the legs, make sure to count your stitches carefully to avoid uneven shells. Use stitch markers at intervals to maintain consistency.
Creative Modifications:
- Color Play: Experiment with color-blocking or striping by incorporating different yarn colors in the waistband, body, and leg areas.
- Finer Details: Add a playful tassel or decorative beads on the ends of the drawstring for a trendy boho vibe.
- Versatile Use: Extend the leg lengths to create comfortable loungewear or beach-ready shorts that are longer and more modest.