The Crochet Rose Bouquet Blanket combines richly textured floral motifs and classic granny squares, bringing warmth and elegance to your home decor.

A crochet rose bouquet blanket is an elegant and versatile creation. It’s both stunning and practical, offering a combination of artistry and functionality. If you’re making it as cozy home décor, a unique gift for a loved one, or even a decorative centerpiece, this blanket pattern is a wonderful way to express creativity. The addition of detailed roses and leaves gives the blanket a fresh and lively look, making this crochet blanket feel like a garden you can carry indoors.
Crochet Roses Flower Bouquet
This Crochet Rose Bouquet design is perfect for beginners because it starts with simple, repetitive techniques like creating a circular base and adding layers that grow at your pace. You can keep it small to use as a coaster, turn it into a placemat, or expand it into a full-sized blanket. The flowers and leaves bring charm and delicacy to every piece, and you can enjoy experimenting with different colors for a personal touch. The step-by-step approach used in this tutorial makes it easy to follow, even if you’re new to crochet.
Credit Hopeful Turns
Key Features of the Pattern
- Main Design: 3D roses worked into granny squares to create a bouquet-like effect.
- Construction: Individual squares are crocheted and then joined together to create the full blanket.
- Stitch Details: Features rich textures like puff stitches, petals, and layered crocheting for the roses.
- Edging: A decorative frame adds a polished and cohesive finish to the piece.
- Customization: Easily adaptable in size and color to match your aesthetics.
This pattern begins with creating individual roses at the center of each granny square. The roses are crocheted in a dynamic 3D style with techniques like puff stitches or layered petals, giving them a realistic and intricate look. These motifs serve as the focal point for each square, making it feel like you’re stitching a bouquet into place.
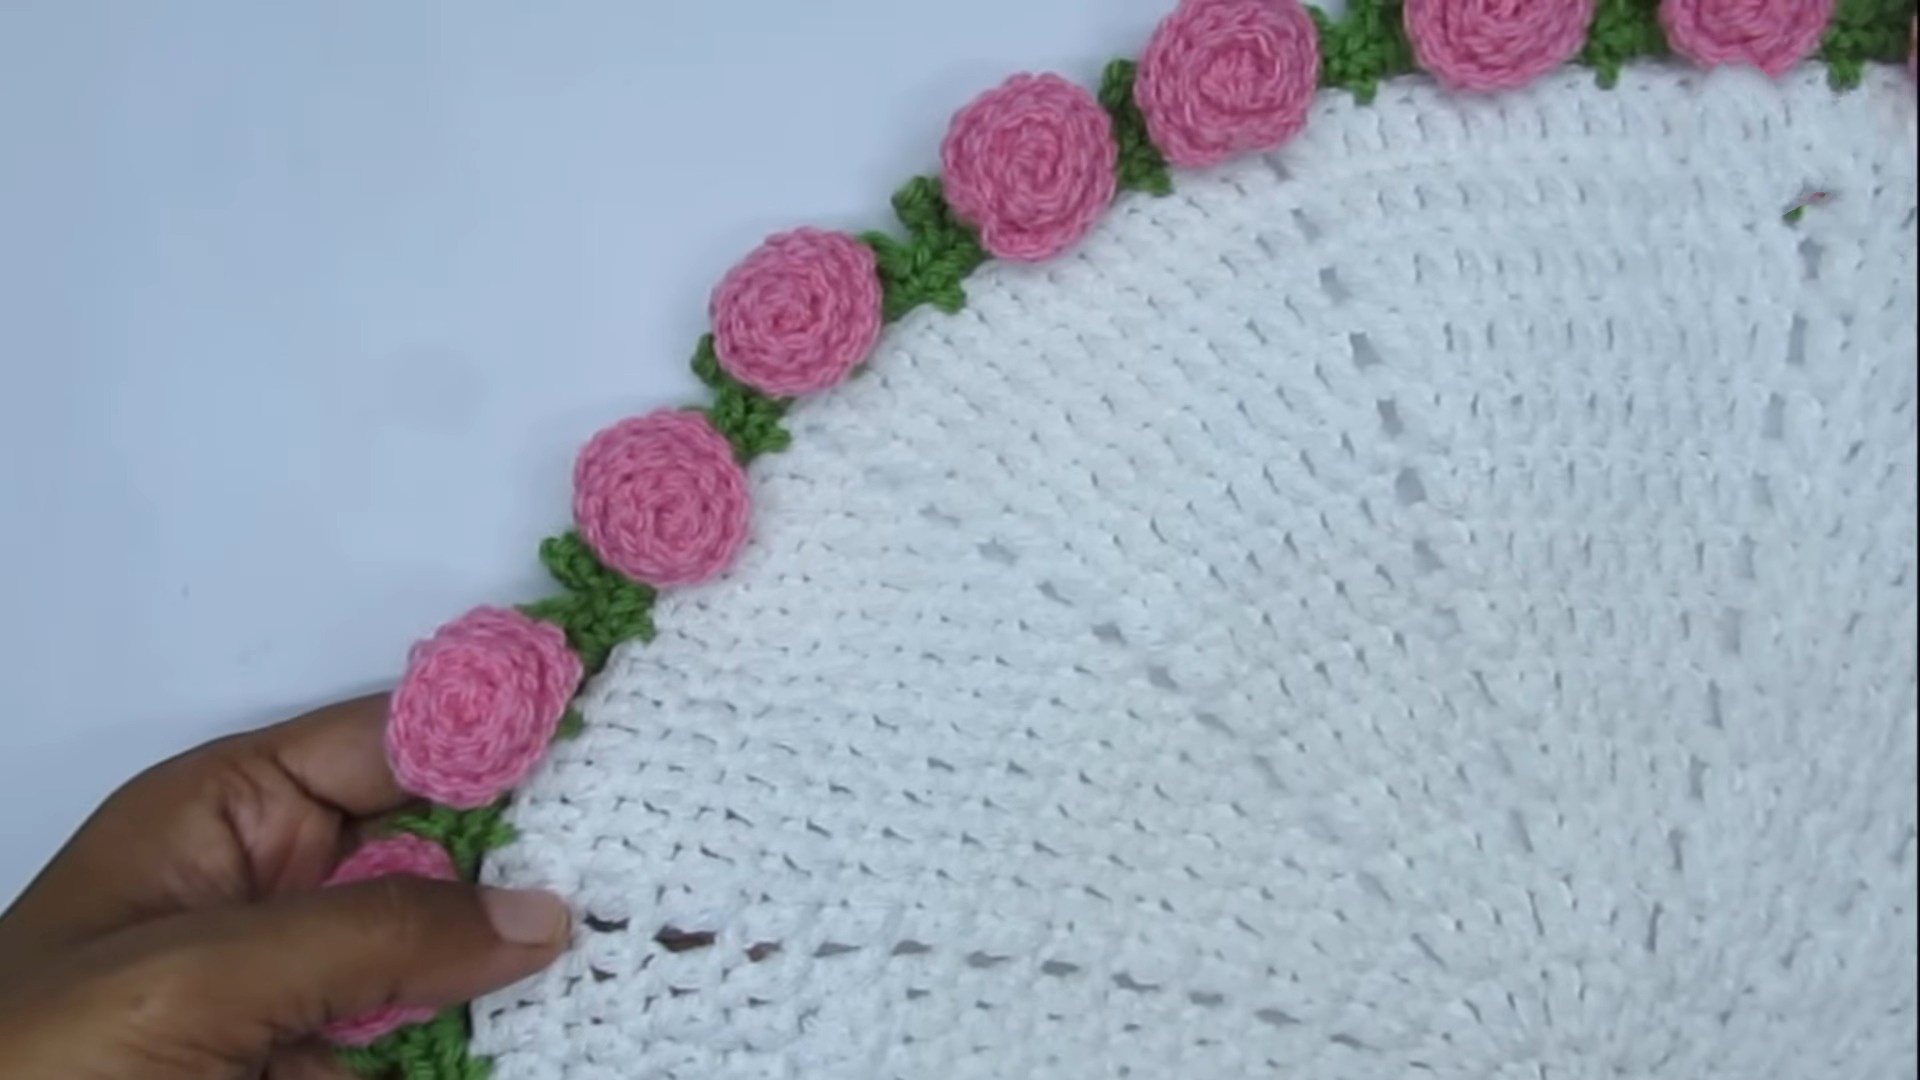
Once the roses are complete, you’ll work the surrounding square sections to frame the flowers. These sections are done in classic granny square style, with simple stitches like double crochets and chains, creating a clean geometric background that complements the organic shapes of the roses.

After completing the squares, the blanket comes together with a joining method of your choice—many crocheters opt for a join-as-you-go approach or a whipstitch to seamlessly connect the squares. This step is where the blanket transforms from scattered elements into a cohesive masterpiece.
Finally, a decorative border is worked around the entire blanket. Here, you can play with a scalloped edge, picots, or shells to mimic the softness of the roses and bring a unified frame to the design. The finishing touch combines beauty and functionality, giving the blanket a clean, polished appearance.

Video Tutorial
Step-by-Step Pattern
Materials
Here’s what you’ll need:
- Yarn:
- Main base (white and green): 100% acrylic medium-weight (Weight 4 or worsted).
- Rose petals (pink): 100% acrylic light-weight (DK, Weight 3).
- Hooks:
- Size H or 5 mm for white and green portions.
- Size G or 4 mm for pink flowers.
- Optional Tools:
- Yarn needle for assembling flowers and sewing loose ends.
- Scissors for cutting yarn.

Pattern Instructions
Step 1: Foundation Base (Rounds 1–14)
Round 1:
- Create a magic circle and chain 2.
- Crochet 12 double crochets into the magic circle.
- Pull the loose yarn tail to close the circle.
- Slip stitch into the first double crochet to complete the round.
Round 2:
- Chain 2 (acts as a buffer stitch).
- In each stitch, make 2 double crochets (increase).
- Separate each set by a chain 1.
- Slip stitch to finish the round.
At this point, you should have 24 double crochets divided into 12 sets separated by chain 1.
Round 3:
- Chain 2.
- In the first double crochet, create 1 double crochet; in the next, add 2 double crochets (increase).
- Follow the pattern of “1 dc, 1 dc, 2 dc” for each set, separated by chain 1 after each set.
- Slip stitch to finish.
Repeat rounds, increasing the double crochets per set by 1 each time (Round 4: 1 dc, 1 dc, 1 dc, 2 dc). By Round 14, you’ll have wider sets with approximately 14 double crochets in each set.
Step 2: Leaf Details
- Attach green yarn with a slip stitch to any double crochet.
- Chain 1, then single crochet into the same stitch.
- Chain 3, skip 2 stitches, and make a single crochet into the third stitch.
- Repeat “Chain 3, skip 2, single crochet” around the circle. Slip stitch into the first single crochet to close the round.
Creating Leaves (in chain spaces):
- In a chain-3 space, single crochet, double crochet, picot stitch (chain 4, slip stitch into the first chain).
- Add another double crochet and single crochet into the same space.
- Repeat for all remaining chain-3 spaces.
Step 3: Crochet Roses
- Using pink yarn, make a slip knot and chain 13.
- Skip the first 3 chains, double crochet into the fourth chain.
- In the next stitch, make 2 double crochets. Then, in all remaining stitches, add 3 double crochets per stitch.
The resulting piece should naturally coil into a rose. Secure the shape with a yarn needle, sewing through layers for stability.
Step 4: Assemble the Bouquet
- Attach roses to the base where desired (alternating between leaf junctions or consistently at each junction).
- Using the yarn needle, sew the flower securely onto the base.
- Weave in any loose ends and snip extra tails.
Final Touch
Take a step back and admire your bouquet or blanket. You can continue adding flowers, embellishments, or expand the size of the base. This pattern can be as flexible as you want it to be!

Pattern Question
Question: Can I use a different type or size of yarn for this pattern?
Answer: Yes! You can use any yarn or hook size you have. Just ensure the recommended hook size complements the yarn’s weight for the best final result. Adjustments might affect the size and texture slightly.
Troubleshooting and Suggestions
- Handling Your Roses: Creating consistent petals can be tricky. Be mindful of your tension when working puff stitches or layered petals to ensure all your roses look even. Blocking the squares can also help the petals lie flat.
- Joining Squares: If your squares aren’t the same size, double-check your stitch counts around the edges and adjust where necessary. Adding an extra round of single crochet can help even them out before joining.
- Color Variations: Experiment with different flower colors on a neutral or contrasting background. You could do a single-color blanket for a minimalist look or use a variety of pastel shades for a garden-inspired vibe.
- Additional Uses: You can adapt the design into smaller patterns like pillows, table runners, or even wall hangings by just working with fewer squares.
- Work in Sections: To keep the process manageable, tackle a few squares at a time rather than all in one go. It’s easier—and more enjoyable—when you break the pattern into smaller steps.