Easy Crochet Beret Pattern – Chunky French Style Hat
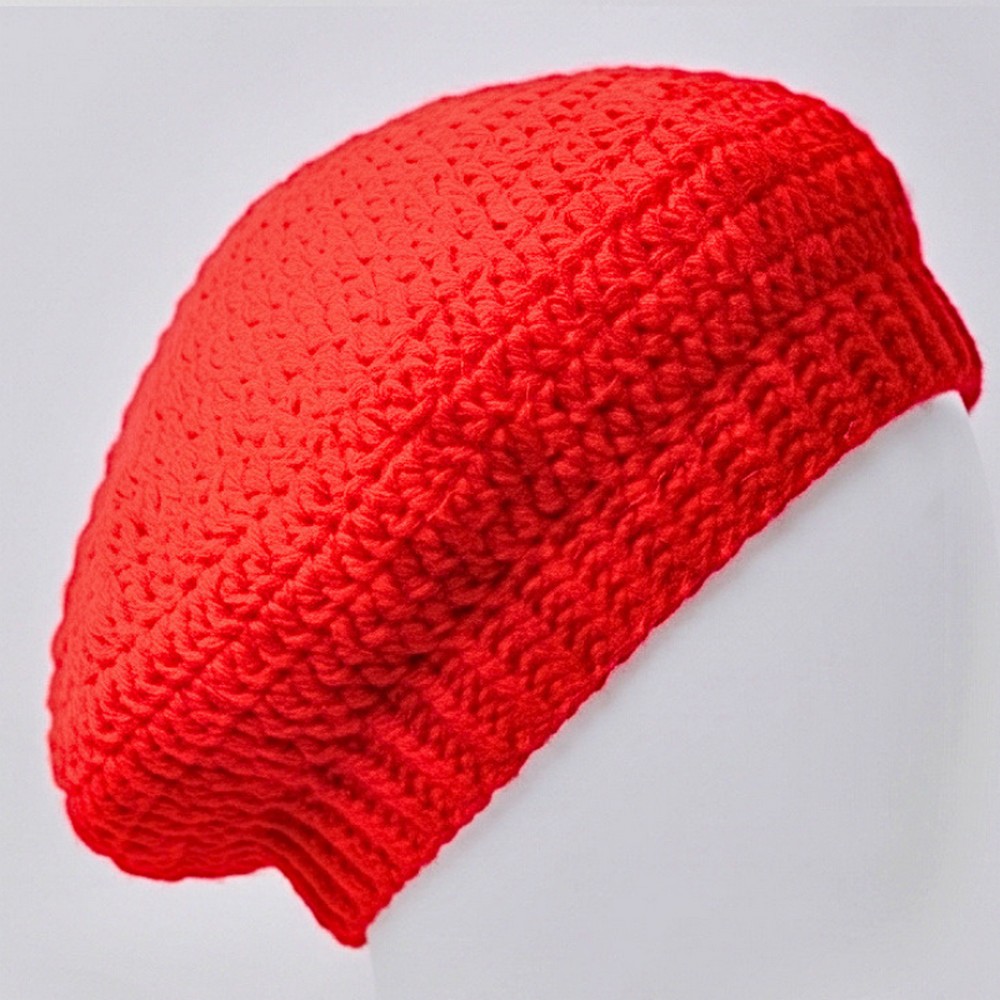
Want a cozy beret with a classic French-inspired shape? This chunky crochet hat features a textured crown, softly draping sides, and a snug single-crochet band.

Add a stylish finishing touch to your everyday outfits with this chunky crochet beret. Its rounded crown and gently draping shape create a relaxed look, while the thick yarn gives it warmth and structure. The stretchy band keeps the crochet hat comfortable on your head, making it a lovely accessory for cooler days.
Begin with a magic ring and build the crown using double-crochet clusters and evenly spaced increase shells. Once the crown reaches the desired size, work straight rounds to form the beret’s sides, then shape the band with single crochet decreases and finish with a neat brim.
Credit LaDenser Crochets
Materials & Tools Needed
- Yarn: Medium-weight (#4 / worsted / aran) yarn held doubled, using two strands simultaneously, either one strand from each end of a skein or two separate skeins. Alternatively, use 1 strand of bulky or chunky yarn.
- Crochet Hook: 5.0 mm (US H-8).
- Tapestry or Darning Needle: For weaving in yarn tails.
- Scissors: Standard yarn or embroidery scissors.
- Stitch Markers: 1 or 2 locking stitch markers.
Finished Size & Customization Ideas
The standard pattern is designed for an adult small-to-medium head circumference. Its fabric stretches comfortably to fit approximately 21–23 inches (53–58 cm).
Smaller or Child Size
Stop the crown increase section after Round 6 instead of completing Round 7. Then move directly into the straight side rounds.
Larger or Slouchier Fit
Add a Round 8 to the increase sequence before beginning the straight side rounds. Continue the shell increase points, keeping them separated by 6 plain 2-dc clusters.
Extra Depth and Slouch
The standard pattern uses 3 rounds without increases for the sides (Rounds 8–10). For extra hair volume or a deeper slouch, extend this section to as many as 5 straight rounds before starting the band.
Optional Color Changes
The sample beret is worked in a solid shade. If you want to add another color, change yarn seamlessly at the beginning of any round during the final slip-stitch join.
Pattern Abbreviations & Terminology
The pattern uses US crochet terms.
- ch: Chain stitch
- sl st: Slip stitch
- dc: Double crochet
- sc: Single crochet
- sc2tog: Single crochet 2 stitches together (decrease)
- MR: Magic Ring / Magic Circle
- ch-sp: Chain-1 space or gap
- Cluster: A group of double crochet stitches worked into the same stitch or space
- Increase Shell: (2 dc, ch 1, 2 dc) worked into a single chain-1 space
Step-by-Step Crochet Instructions
Part 1: The Crown
The crown is worked in joined rounds, beginning at the center of the hat. The increase shells create the expanding shape needed for the rounded top.
Round 1
- Form a magic ring.
- Chain 3. This counts as your first double crochet here and throughout the pattern.
- Place a stitch marker into the third chain to identify your joining target.
- Work 2 double crochet stitches directly into the magic ring.
- Chain 1, then work 3 double crochet stitches into the magic ring.
- Repeat the sequence from the asterisk 3 more times: chain 1 and work 3 double crochet stitches into the ring.
- Pull the short yarn tail firmly to close the center ring.
- Chain 1, remove the stitch marker, and slip stitch into the top of the beginning chain-3 to close the round.
Stitch Count: 5 clusters of 3 double crochet stitches (15 dc total) and 5 chain-1 spaces.
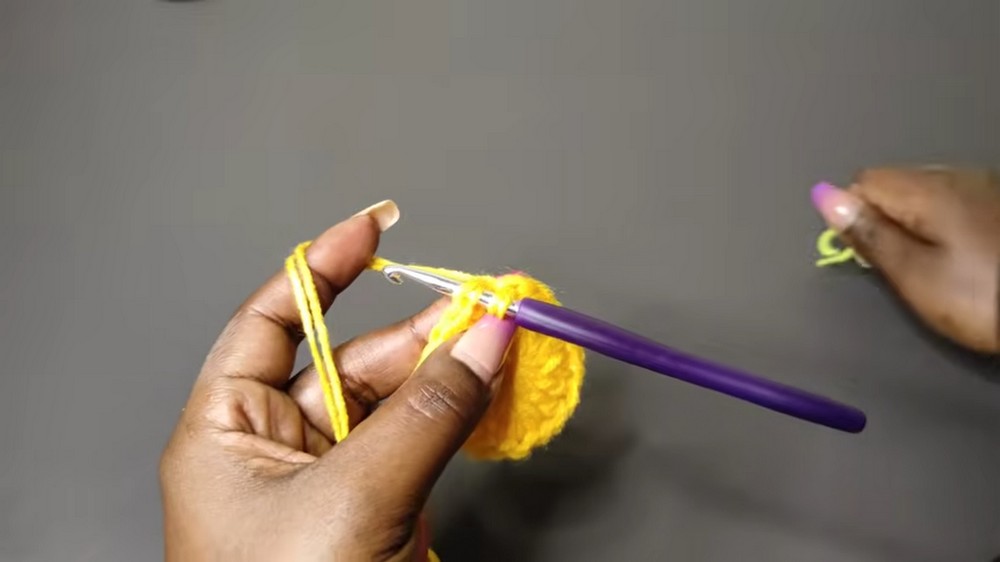
Round 2
- Slip stitch into the middle (second) double crochet of the first cluster.
- Chain 3, counting as the first double crochet, and mark the third chain.
- Work 1 double crochet into that same stitch.
- Chain 1, skip to the next chain-1 space, and work 2 double crochet stitches into the space.
- Chain 1, skip 1 double crochet, and work 2 double crochet stitches into the middle (second) double crochet of the next 3-dc cluster.
- Chain 1, then work 2 double crochet stitches into the next chain-1 space.
- Repeat the sequence from the asterisk around the perimeter.
- Chain 1 and slip stitch into the top of the marked beginning chain-3 to join.
Stitch Count: 10 clusters of 2 double crochet stitches (20 dc total) and 10 chain-1 spaces.
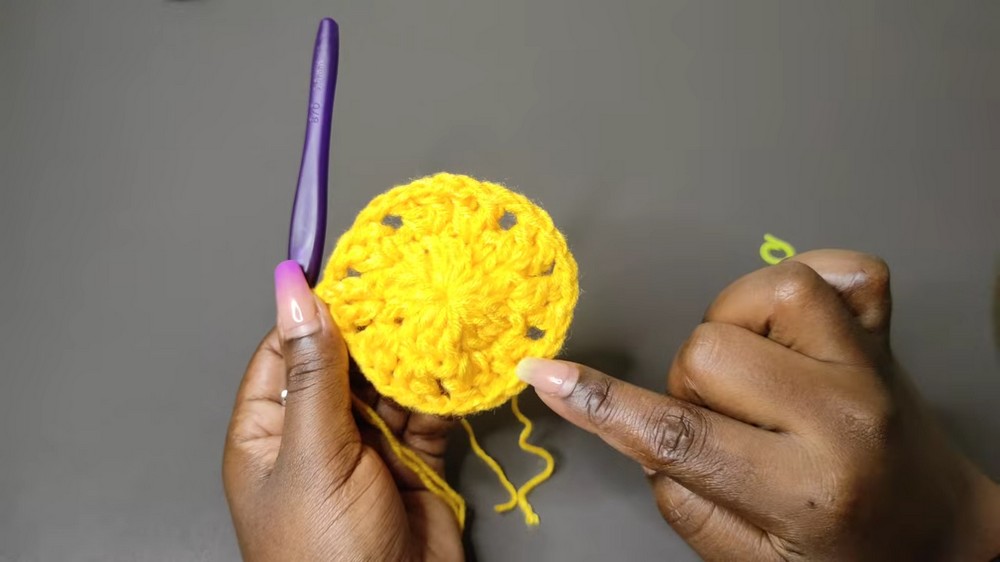
Round 3
- Slip stitch into the next double crochet, then slip stitch into the first chain-1 space.
- Chain 3, counting as the first double crochet.
- Work 1 double crochet into the same chain-1 space.
- Chain 1, move to the next chain-1 space, and work an Increase Shell: (2 dc, ch 1, 2 dc) all into that same space.
- Chain 1, then work 2 double crochet stitches into the next chain-1 space.
- Chain 1, then work an Increase Shell into the next chain-1 space.
- Repeat the sequence from the asterisk around the crown, alternating between one 2-dc cluster and one Increase Shell.
- The final space will contain an Increase Shell.
- Chain 1 and slip stitch into the top of the beginning chain-3 to join.
Stitch Count: 5 Increase Shells and 5 individual 2-dc clusters (30 dc total), separated by chain-1 spaces.
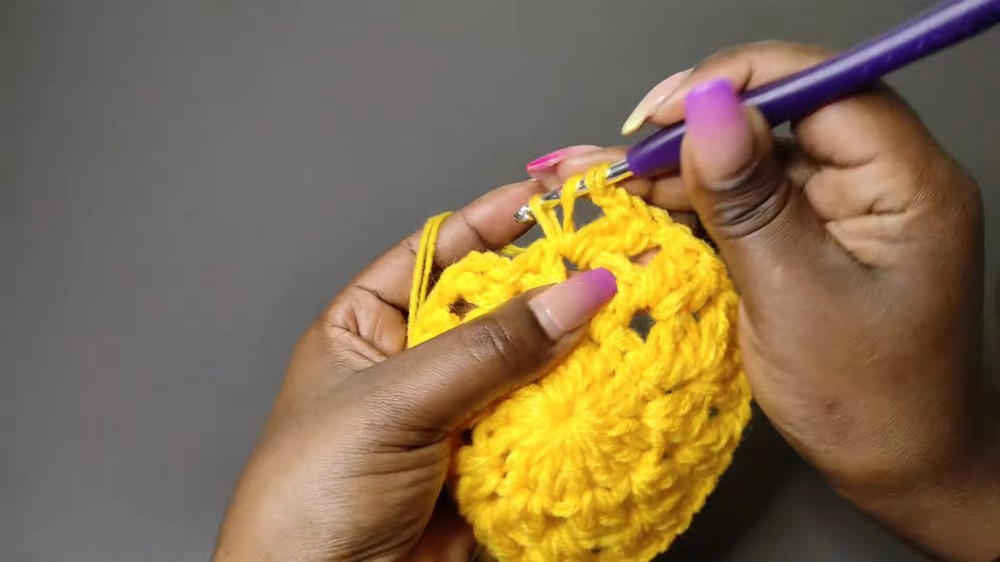
Round 4
- Slip stitch into the next double crochet, then slip stitch into the first chain-1 space.
- Chain 3 and work 1 double crochet into the same space.
- Chain 1.
- Work an Increase Shell (2 dc, ch 1, 2 dc) directly into the chain-1 space at the center of the previous round’s first Increase Shell.
- Chain 1, then work 2 double crochet stitches into the next chain-1 space.
- Chain 1, then work another 2 double crochet stitches into the following chain-1 space.
- Chain 1 and work an Increase Shell into the center of the next increase shell.
- Repeat the sequence from the asterisk around the crown.
- The final segment ends with two individual 2-dc clusters.
- Chain 1 and slip stitch into the top of the beginning chain-3 to join.
Stitch Count: 5 Increase Shells and 10 individual 2-dc clusters, with 2 plain clusters between each increase corner (40 dc total).
Round 5
- Slip stitch across to the first chain-1 space.
- Chain 3 and work 1 double crochet into the same space.
- Chain 1.
- Work an Increase Shell (2 dc, ch 1, 2 dc) into the center of the first increase shell.
- Chain 1, then work 2 double crochet stitches into each of the next 3 individual chain-1 spaces, chaining 1 between each cluster.
- Chain 1 and work an Increase Shell into the next increase shell.
- Repeat the sequence from the asterisk around the crown, keeping 3 plain 2-dc clusters between each increase corner.
- Chain 1 and slip stitch into the top of the beginning chain-3 to join.
Stitch Count: 5 Increase Shells and 15 individual 2-dc clusters (50 dc total).
Round 6
- Slip stitch across to the first chain-1 space.
- Chain 3 and work 1 double crochet into the same space.
- Chain 1.
- Work an Increase Shell (2 dc, ch 1, 2 dc) into the first increase shell.
- Chain 1, then work 2 double crochet stitches into each of the next 4 individual chain-1 spaces, chaining 1 between each cluster.
- Chain 1 and work an Increase Shell into the next increase shell.
- Repeat the sequence from the asterisk around the crown, keeping 4 plain 2-dc clusters between each increase corner.
- Chain 1 and slip stitch into the top of the beginning chain-3 to join.
Stitch Count: 5 Increase Shells and 20 individual 2-dc clusters (60 dc total).
Round 7
- Slip stitch across to the first chain-1 space.
- Chain 3 and work 1 double crochet into the same space.
- Chain 1.
- Work an Increase Shell (2 dc, ch 1, 2 dc) into the first increase shell.
- Chain 1, then work 2 double crochet stitches into each of the next 5 individual chain-1 spaces, chaining 1 between each cluster.
- Chain 1 and work an Increase Shell into the next increase shell.
- Repeat the sequence from the asterisk around the crown, keeping 5 plain 2-dc clusters between each increase corner.
- Chain 1 and slip stitch into the top of the beginning chain-3 to join.
Stitch Count: 5 Increase Shells and 25 individual 2-dc clusters (70 dc total).
Part 2: Sides
Rounds 8-10: Straight Rounds Without Increases
These rounds form the downward sides of the beret. Unlike the crown, no additional increase shells are worked here. Every chain-1 space receives only a regular 2-dc cluster.
- Slip stitch into the next double crochet, then slip stitch into the first chain-1 space.
- Chain 3 and work 1 double crochet into the same space.
- Chain 1, move to the next chain-1 space (including the spaces at the previous increase corners), and work only 2 double crochet stitches. Do not increase.
- Continue working (2 dc, ch 1) into every chain-1 space around the hat.
- After the final 2-dc cluster, chain 1 and slip stitch into the top of the beginning chain-3 to join.
- Repeat the same steps for Round 9 and Round 10.
Work 3 straight rounds in total to establish the downward curve of the beret.
Stitch Count per Round: 35 clusters of 2 double crochet stitches (70 dc total) and 35 chain-1 spaces.
Part 3: Brim & Band Shaping
The final section changes to single crochet stitches. First, a foundation round is worked between the double crochet posts and chain spaces. A decrease round then narrows the band before the remaining straight rounds create its depth.
Round 11: Foundation Single Crochet Round
- Chain 1. This does not count as a stitch.
- Insert the hook directly between the two posts of the first double crochet cluster and work 1 single crochet.
- Work 1 single crochet directly into the adjacent chain-1 space.
- Continue alternating around the entire hat: work 1 single crochet between the 2 dc posts, then 1 single crochet into the chain-1 gap.
- End with 1 single crochet in the last chain-1 space.
- Slip stitch into the very first single crochet of the round to join.
Stitch Count: 70 single crochet stitches.
Round 12: Reduction / Taper Round
- Chain 1 and work 1 single crochet into the very first stitch.
- First Reduction: Work an sc2tog over the next 2 stitches. Insert the hook into the first stitch and pull up a loop. Insert the hook into the second stitch and pull up another loop. Yarn over and pull through all 3 loops on the hook.
- Second Reduction: Work an sc2tog over the following 2 stitches.
- Work 1 regular single crochet into the next stitch.
- Repeat the sequence from the asterisk: work 1 sc2tog over the next 2 stitches, another sc2tog over the following 2 stitches, and 1 plain single crochet into the next stitch.
- Continue repeating around the brim. The round concludes with an sc2tog over the final 2 stitches.
- Slip stitch into the first single crochet to join.
Stitch Count: 42 single crochet stitches.
Rounds 13–15: Straight Brim Depth
- Chain 1 and work 1 single crochet into the first stitch.
- Work 1 single crochet into every stitch around. Do not increase or decrease.
- Slip stitch into the first single crochet of the round to join.
- Repeat the same instructions for Round 14 and Round 15.
These rounds complete the 5 single-crochet rounds of the brim, including the reduction round.
Stitch Count per Round: 42 single crochet stitches.
Assembly & Finishing
This beret is worked seamlessly in joined rounds, from the crown down to the brim. No separate panels or seaming are required.
Fastening Off
- At the end of Round 15, make the final slip stitch.
- Pull up a loop and chain 1 to secure the yarn.
- Cut both working yarn strands, leaving a 4–5-inch tail.
- Pull the tail through the loop to lock it.
Weaving in the Brim Ends
- Thread both yarn tail strands onto your tapestry or darning needle.
- Weave the tail through the back loops and interior posts of the single-crochet band stitches.
- Move through multiple directions to hide and secure the yarn end completely.
- Trim away any excess yarn.
Closing the Crown Center
- Turn to the starting tail at the center of the crown.
- Pull it firmly once more to ensure the magic ring is fully closed with no visible gap.
- Thread the tail onto your needle.
- Weave it around the base of the Round 1 double-crochet clusters.
- Reverse direction at least once to secure the tail.
- Trim the remaining yarn flush.
Finishing Details
Holding two strands of worsted-weight yarn together with a 5.0 mm hook creates a chunky, structured fabric with clearly defined double-crochet clusters. The increase shells allow the crown to expand evenly, while the straight rounds form the characteristic downward curve of the beret.
The decrease round reduces the circumference before the final single-crochet rounds create a comfortable band. This combination gives the hat a secure fit around the head while allowing the crown to drape into its classic French-inspired silhouette.