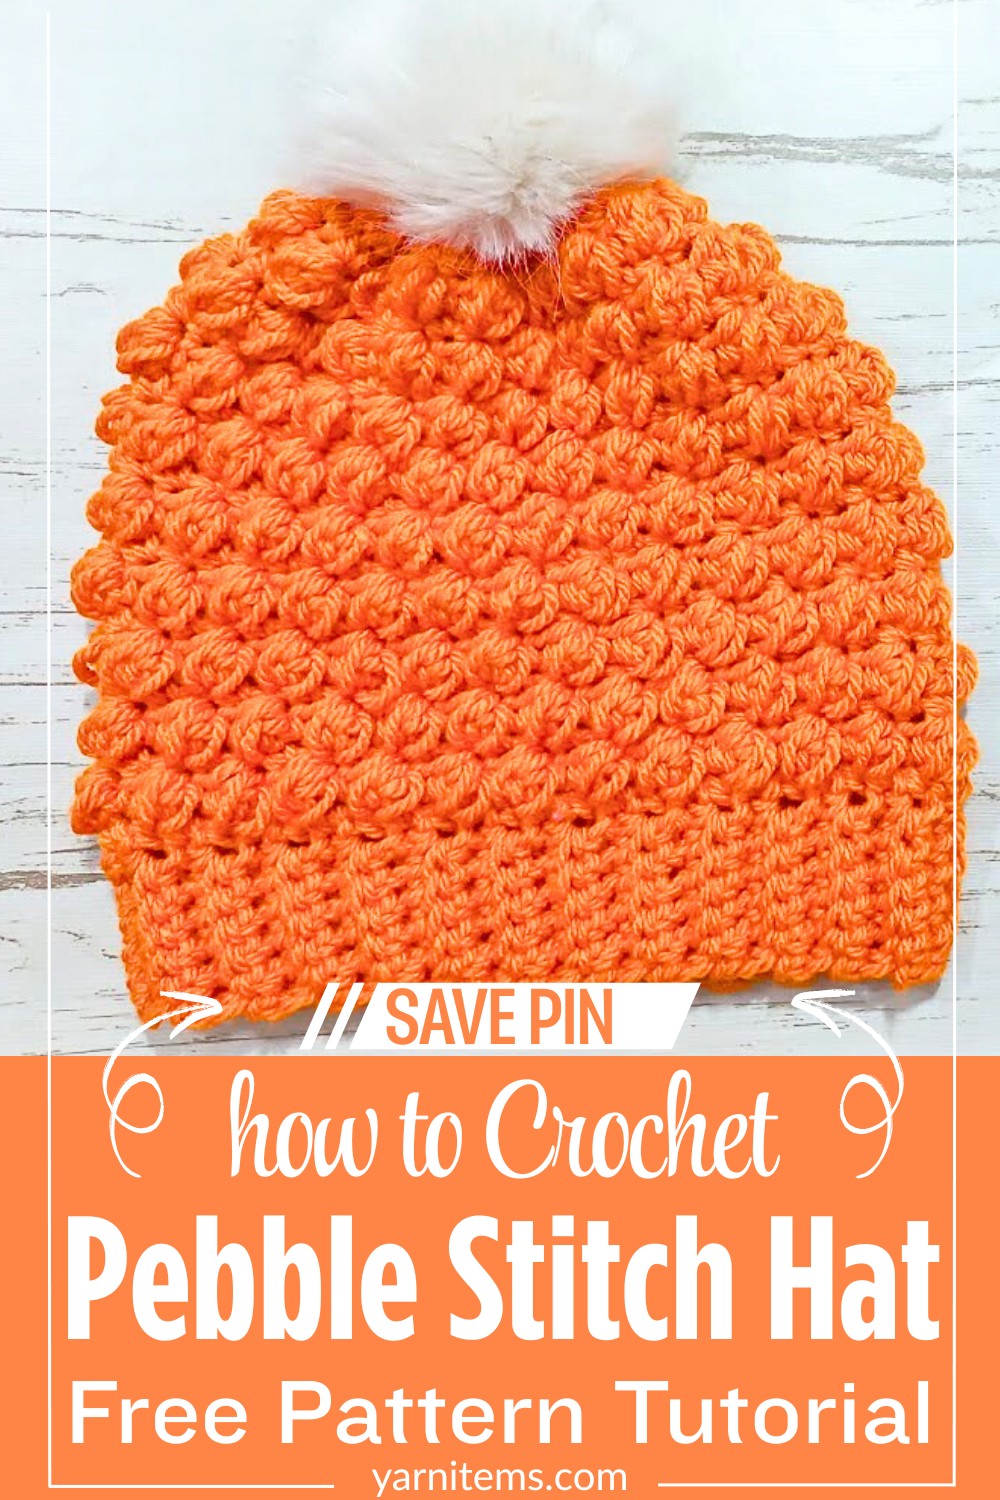
Create a cozy, textured Pebble Stitch Hat with a timeless brim-to-crown design, perfect for all ages and ideal for keeping warm in style.

The crochet pebble stitch hat is a cozy, stylish, and super simple way to crochet a timeless beanie for yourself or loved ones. This hat features a unique pebble stitch that adds a soft texture, making it both fashionable and functional. Whether you’re creating it to keep warm in chilly weather or as a heartwarming gift, this pattern is special because it’s versatile and can be made in any size, from kids to adults.
How to Crochet a Pebble Stitch Hat
This pebble stitch hat is worked “bottom-up,” meaning you’ll start by crocheting the stretchy brim and then move on to the textured body of the hat. The pebble stitch uses simple repeats, so it’s perfect for beginners looking to try a fun stitch pattern. You’ll only need basic materials like worsted-weight yarn and a crochet hook, making it an easy and rewarding design for anyone. Make it in your favorite color or gift it to someone special the possibilities are endless.
Credit zhavin crochet
Key Features of the Crochet Pebble Stitch Hat
- Bottom-up construction: Start with a stretchy ribbed brim, then work upwards to shape the body of the hat.
- Repetitive pattern structure: The body is built using a simple four-round repeat of single crochets and puff stitches.
- Textured pebble design: Puff stitches create a soft, textured pebble effect that adds character and charm.
- Customizable sizing: Modify the brim’s length or body height to fit all ages and preferences.
- Finishing details: Decrease stitches toward the crown, leaving a neat, closed top—perfect for adding a pom-pom!
Let’s Break It Down!
This charming hat starts with a ribbed brim, worked flat using back loop single crochets. This simple yet stretchy technique ensures a snug and comfortable fit around the head. The seam is joined using slip stitches, creating an almost invisible connection that keeps the brim flexible and clean-looking.

Once the brim is complete, you’ll shift to working in the round to create the hat’s body. Along the long edge of the brim, place evenly spaced single crochets to create the foundation row for the pebble stitch pattern. The puff stitches introduced in this section bring delightful texture while remaining straightforward to master. A simple combination of single crochets and puff stitches creates the playful pebble design, making the hat uniquely stylish.

From here, the hat follows a four-round repeat: alternating rows of single crochets and puff stitches to maintain the signature texture. Key to the design is turning your work at the end of each round—this ensures the pebble pattern pops on the hat’s right side, providing crisp, well-defined texture.

As you approach the desired height, the final rounds focus on decreasing stitches to shape the top of the hat. Decrease single crochets, worked in the front loops only, reduce bulk while creating a smooth path to closing the crown. A simple drawstring method is used to cinch the final stitches tightly, leaving a polished finish. Top it off with a pom-pom for a playful flourish (or leave it plain for a more classic look).

Video Tutorial
Materials
To make the pebble stitch crochet hat, you will need the following:
- Yarn: Worsted-weight yarn (choose your favorite color)
- Crochet hooks: 5 mm (for brim and body)
- Tapestry needle: To weave in ends
- Scissors
- Optional: A faux fur pom-pom or yarn pom-pom for decoration
Pattern Instructions
Follow these step-by-step directions to crochet your own pebble stitch hat:
Step 1: Create the Brim
- Make a slip knot and chain 7 (you can adjust this number for wider or narrower brims).
- Row 1: Skip the first chain. Insert your hook into the second chain and make 1 sc. Repeat 1 sc in every chain across (6 stitches total). Chain 1 and turn.
- Row 2: Make 1 sc in the first stitch (under both loops). Then, work 1 BLO sc in the next 4 stitches. Finish with 1 sc in the last stitch (under both loops). Chain 1 and turn.
- Repeat Row 2 until the brim fits the circumference of the desired head size. For example, for an adult hat, you might need around 60 rows.
- When the brim is complete, fold it in half and slip stitch the two ends together to form a ring. Turn it to the right side.
Step 2: Start the Hat Body
Round 1:
- Work evenly spaced single crochets around one long edge of the brim.
- Make 1 sc at the top of each row of the brim so the stitches are evenly distributed. Join with a slip stitch to the first sc and chain 1.
Round 2:
- Turn your work (you’ll now be working on the wrong side).
- Make 1 sc into the first stitch.
- Make a puff stitch into the next stitch.
- Continue alternating 1 sc and 1 puff stitch around. Join with a slip stitch to the first sc and chain 1.
Round 3:
- Turn your work (right side facing).
- Make 1 sc into each stitch (1 sc into the top of the puff stitch and 1 sc into the sc from the previous round) around. Slip stitch to the first sc and chain 1.

Round 4:
- Turn your work (wrong side facing).
- Start with a puff stitch into the first stitch.
- Alternate puff stitch and single crochet around. Join with a slip stitch and chain 1.
Round 5:
- Turn your work (right side facing).
- Make 1 sc into each stitch (1 sc into the top of the puff stitch and 1 sc into the sc from the previous round) around. Slip stitch to the first sc and chain 1.
Step 3: Repeat Rounds
Repeat Rounds 2-5 until the body of the hat reaches your desired height. Remember, you can always add or remove repeats to adjust the size.
Step 4: Shape the Crown
Once the hat is the desired height, reduce the number of stitches to shape the crown as follows:
- Decrease Round 1: Work a single crochet decrease over every 2 stitches (insert the hook into the front loop of the first stitch, then into the front loop of the second stitch, yarn over, pull through both loops, yarn over, and pull through the final 2 loops). Continue around and join with a slip stitch.
- Decrease Round 2: Repeat the same decrease round, working 1 decrease stitch in every 2 stitches, until few stitches remain.
- Cut the yarn, leaving a long tail. Use the tapestry needle to weave the tail through the remaining stitches. Pull tightly to close the top of the hat.
Step 5: Finishing Touches
- Weave in all loose ends with a tapestry needle.
- Attach a pom-pom at the top for added style!
Pattern Question:
Q: Can I adjust the size of the crochet hat?
A: Yes! You can customize the size by adjusting the number of chain stitches for the brim and repeating the main pattern rounds until the desired fit is achieved.
Troubleshooting and Suggestions
Common Challenges:
- Consistent tension: Puff stitches can vary in size if your tension shifts. Keep your loops even for uniform texture.
- Clean decreases at the crown: Ensure you’re working only through the front loops for smoother shaping.
- Joining rounds without gaps: Make sure to slip stitch tightly at the end of each round to avoid noticeable gaps in the pattern.
Creative Modifications:
- Experiment with color changes between rounds to create striped or gradient effects that highlight each puff stitch row.
- Add extra embellishments like faux fur pom-poms, tassels, or buttons to personalize the finished hat.
- Adjust the stitch count for larger or smaller brims, making it easy to customize for any head size.
- Use different yarn weights (like bulky yarn for a cozy winter look or lightweight yarn for a spring beanie).