These stylish and cozy crochet shorts are the ultimate blend of comfort and customization—perfect for lounging at home or rocking as a breezy summer outfit.

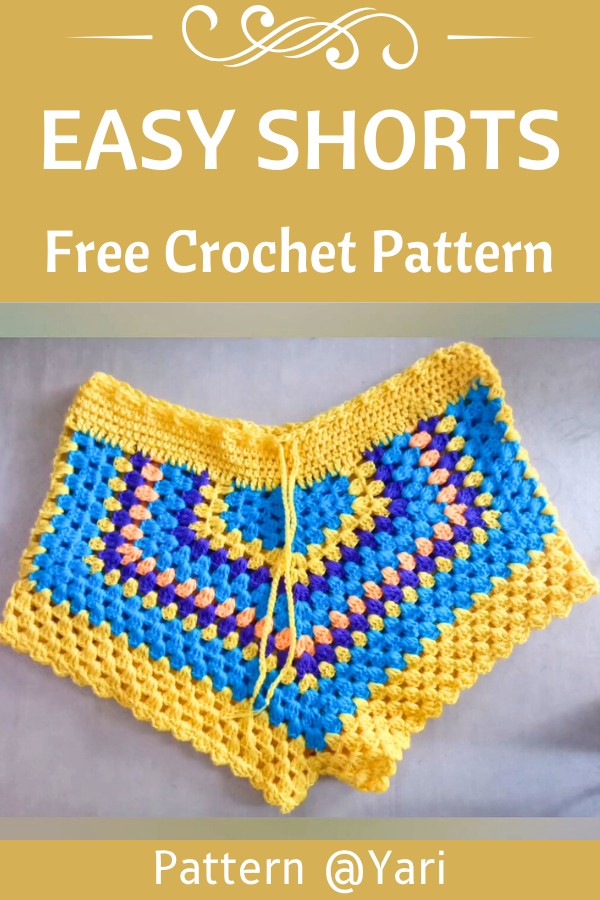
If you’re looking for an eye-catching handmade piece, these crochet shorts are the answer. They combine vintage charm with modern shape, featuring classic granny squares as the foundation. What makes them stand out is the use of bold colors—yellow, blue, purple, and peach—layered in a repeating sequence for a balanced, playful design.
Comfortable Crochet Shorts Pattern
Perfect for spring and summer gatherings, these shorts evoke cheerful vibes, whether you’re lounging at home or strolling on the beach. The breathable openwork texture ensures comfort while showcasing a retro aesthetic.
These crochet shorts aren’t just stylish—they’re practical, too. With a solid yellow waistband for structure and an adjustable drawstring closure for a customized fit, they offer both beauty and functionality. The carefully placed motifs create a snug yet flattering shape with symmetrical details, adding to their polished look.
Key Features of the Pattern:
- Worked in the round starting with a foundation chain to create the waistband and main base.
- Incorporates double crochet increases to add shaping to the shorts.
- Leg holes are created by dividing the circle into two sections with simple slip stitches.
- Offers customization for length, fit, and embellishments, including options for a snug waistband and decorative edging.
- Beginner-friendly stitches with opportunities to expand creativity with additional finishes.
Overview of the Construction:
These crochet shorts begin with a foundation chain, forming a circular base that fits snugly but comfortably around your hips or waist. After slip-stitching into the first chain, the pattern kicks off with a base row of double crochets worked into the circle to lay the groundwork for the shorts’ airy yet secure construction. This step is key to establishing a solid structure that is both durable and fashionable.
Shaping starts in Rows 2–4 with strategically placed increases using clusters of three double crochets followed by chaining and stitch skips. This method encourages smooth widening as the shorts develop, ensuring proper contours to fit your body comfortably. Because the increases are spaced evenly, the shorts create a subtly flared shape perfect for ease of movement.
Next comes the defining feature: custom leg openings. To transition the circle into wearable shorts, you’ll divide the base by marking two areas with stitch markers, shaping openings for the legs. Slip stitching at these points ensures clean separations that won’t unravel over time. From there, additional double crochet rows are worked around the leg holes to create the desired length of the shorts. This step allows flexibility in customizing the fit, whether you prefer shorter summer breezes or more coverage for lounging.
Finally, attention shifts to the top edge, where a half-double crochet waistband is added for extra structure. This step gives the shorts a polished look while adding snug security. If you love the idea of embellishments, the leg openings can be dressed up with decorative edging—try a shell stitch or slip stitching for playful texture.

Step By Step Pattern
Materials
To crochet these shorts, you’ll need the following items:
- Yarn: Choose a lightweight cotton or cotton-blend yarn (ideal for summer garments). The video suggests using velvet yarn, but feel free to choose your preference.
- Hook Size: A crochet hook matching your yarn’s weight (recommended size: 4.0 mm or 5.0 mm).
- Optional Tools:
- Stitch markers
- Scissors
- Measuring tape
- Yarn needle (for weaving in ends)
Stitch Guide
Here are the basic stitches and techniques used in this tutorial:
- Chain (ch): Create a foundation chain by wrapping the yarn around the hook and pulling it through.
- Slip Stitch (sl st): Insert the hook into a stitch, yarn over, and pull through both the stitch and the loop on the hook.
- Double Crochet (dc): Yarn over, insert the hook into a stitch, yarn over again, and pull up a loop. Yarn over, pull through two loops, then yarn over and pull through the last two loops.
- Half Double Crochet (hdc): Yarn over, insert the hook into a stitch, pull up a loop, yarn over, and pull through all three loops on the hook.
Notes
Here are some important tips for personalizing and succeeding with this pattern:
- Gauge Adjustment: To ensure a perfect fit, measure your foundation row against your waist or hips to confirm measurements. Adjust the number of chains as needed.
- Customization Ideas: Experiment with colors by adding stripes or using a variegated yarn. You can also extend the length for longer shorts or reduce the rows for a more fitted look.
- Fitting: Try on the shorts at multiple stages during the process to ensure the custom fit aligns with your measurements.
Step-by-Step Pattern Instructions
1. Create the Foundation Chain
- Start by chaining a length long enough to fit comfortably around your waist or hips. For reference, this might be around 40 cm or adjust to personal preference.
- Slip stitch into the first chain to form a circle.
2. Row 1: Double Crochet Base
- Chain 3 to act as your first double crochet.
- Work double crochets around the entirety of your circle, crocheting into each chain stitch.
- Slip stitch to join at the end of the row.
3. Rows 2–4: Increase Rows
- Begin with chain 3 (counts as the first dc).
- Work the following pattern:
- Crochet 3 double crochets into the same space.
- Chain 1, skip one stitch, and work 3 double crochets into the next stitch.
- Continue increasing every fourth stitch to shape the shorts.
4. Customizing the Leg Holes
- To create leg holes, divide the circle into two sections.
- Mark two areas as openings for the legs using stitch markers.
- Slip stitch into each marked section to shape the holes.

5. Leg Work – Adding Rows
- Attach yarn to the double crochet clusters around the leg openings.
- Crochet additional rows, alternating dc and chain 1, until you reach the desired length of your shorts.
6. Waistband Adjustment
- Add a snug waistband by incorporating half double crochets across the top edge.
- Continue the hdc rows until your waistband feels secure.
7. Finishing Touches
- Add decorative edging around the leg holes (optional). Consider slip stitching or using a shell stitch to add flair.
8. Weaving in Ends
- Use your yarn needle to weave in all loose ends.
Troubleshooting and Suggestions:
- Foundation Chain Size: If your foundation chain feels too tight, consider starting with a larger hook size for the chain or using more chains to ensure comfort around your waist.
- Increase Rows: Practicing consistent tension is key in Rows 2–4 to keep the increases symmetrical. Use stitch markers to track where to place increases if you find yourself losing count.
- Leg Hole Placement: Be precise with stitch markers when marking leg holes to avoid uneven lengths. Double-check both sections for symmetry before proceeding.
- Stretchy Waistband: If your waistband feels stiff or too snug, try increasing the number of half-double crochet rows to add elasticity without compromising fit.
- Creative Modifications: Experiment with color blocking by switching yarn colors at the leg holes or mid-pattern for a trendy contrast. Add a crocheted or braided tie through the waistband for extra style and usability.