Crochet Black Cat Headband Pattern with Posable Tail
Looking for a playful Halloween accessory? This crochet black cat headband has bright yellow eyes, pointed ears, and a 21 cm wire-supported tail you can shape your way.
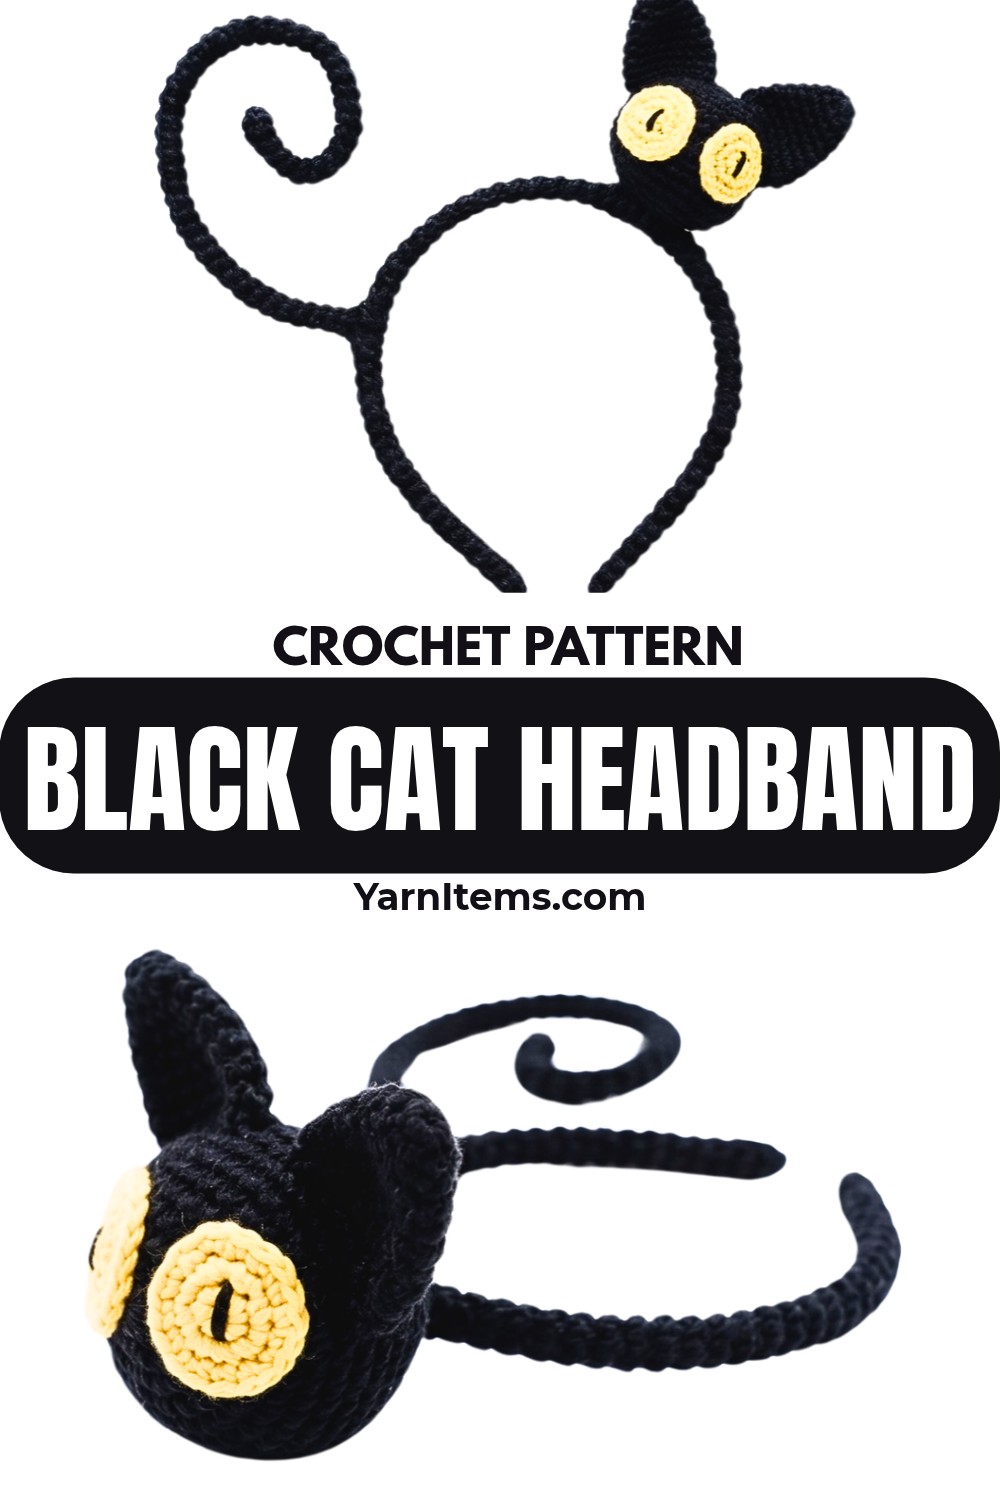
A plain headband gets a completely different personality once it is covered in black crochet and finished with a little cat face. The pointed ears, bright yellow eyes, and long tail create a recognizable black-cat look, while the lightweight crochet design makes it easy to wear as a last-minute Halloween accessory or give to a cat-loving friend.
Made with simple continuous rounds, this crochet pattern takes you through the headband cover and tail first, followed by the stuffed cat head, flat ears, and embroidered eyes. The standard-size design can be adjusted with different eye colors or yarn weights, while the hidden aluminum wire gives the 21 cm tail enough support to bend into an S curve or curl.
Credit Let’s crochet
Materials & Tools Needed
- Yarn: Lace-weight yarn in black and yellow
- Crochet Hook: 2.5 mm
- Headband: Plain metal or plastic headband, 5 mm wide
- Wire: Silver aluminum craft wire for the posable tail
- Stuffing: Fiber fill for the cat head
- Tools: Stitch markers, tapestry needle, pliers, measuring tape, and scissors
Finished Size & Customization
The finished headband fits a standard size, with the tail measuring exactly 21 cm from the base of the headband.
The yellow eyes can be changed to bright green or blue if you want a different cat-eye effect. For a festive Halloween detail, add a tiny crochet bow or ribbon around the base of one cat ear.
You can also use worsted weight yarn with a 4.0 mm hook for a bulkier, fuzzier cat. If you make this change, use a wider headband base so the larger crochet tube fits properly.
Before You Start
The headband cover and tail are made as one continuous 6-stitch tube rather than as two separate pieces. This is the key detail to understand before beginning: the tube first needs enough length to cover the entire headband, then continues for another 21 cm to form the tail.
The cat head, ears, and eyes are made separately and attached afterward. Because the head is stuffed while it is still open, the stuffing step comes before the final decrease and closure. Keeping a stitch marker in the continuous rounds will also make it much easier to know where each new round begins.
Pattern Abbreviations
- R / Rnd: Round
- sc: Single crochet
- inc: Increase – work 2 single crochets in the same stitch
- dec: Decrease – single crochet 2 stitches together
- sl st: Slip stitch
- Not sl: Do not slip stitch to join; continue working in spiral rounds
- (…) x N: Repeat the instructions inside the brackets N times
- (#): Stitch count at the end of the round

Step-by-Step Crochet Pattern
Crochet the Headband Cover and Tail
This first section creates the long black tube that does two jobs. Most of it covers the headband, while the final 21 cm extends beyond the headband to become the tail. Since the tube stays at 6 stitches throughout, the main thing to watch here is length, not stitch count.
R1: Make a magic ring, work 6 sc into the ring. Do not slip stitch to join. (6)
Continuous Rounds: Work 1 sc in every stitch around in a continuous spiral. Place a stitch marker at the beginning of the round and move it up as you go.
Length: Keep repeating the 6 sc rounds until your tube is long enough to fully cover your headband from end to end, PLUS an additional 21 cm for the tail.
Finishing: Fasten off, leaving a yarn tail to sew the ends closed later.
Check Your Tube Before Moving On
Lay the crocheted tube alongside the headband rather than guessing its length. One section should be long enough to cover the entire headband, and the remaining 21 cm must stay beyond the headband for the tail.
That extra length is important. If the tube is stopped at the end of the headband, there will be no 21 cm section available for the posable tail later.
Crochet the Cat Head
The cat head begins small and gradually becomes wider through the increase rounds. The middle rounds hold that 36-stitch width to create the fuller face, and the later decreases bring the opening back down so it can be stuffed and closed.
Continue working in continuous spiral rounds, without joining at the end of each round.
R1: 6 sc in a magic ring. (6)
R2: 2 sc in every sc. (12)
R3: (sc, inc) x 6. (18)
R4: (sc, inc, sc) x 6. (24)
R5: (3 sc, inc) x 6. (30)
R6: (2 sc, inc, 2 sc) x 6. (36)
R7-R11: 1 sc in every stitch around. (36)
R12: (2 sc, dec, 2 sc) x 6. (30)
R13: (3 sc, dec) x 6. (24)
R14: (sc, dec, sc) x 6. (18)
R15: (sc, dec) x 6. (12)
Stuffing: Pause here to stuff the head firmly with fiber fill.
R16: dec x 6. (6)
Finishing: Fasten off, leaving a long tail for sewing. Weave the tail through the front loops of the remaining 6 stitches and pull tight to close the hole.
Shape Check
By Round 11, the head should have reached its fullest width at 36 stitches. The following decrease rounds gradually narrow the opening.
Do not wait until after Round 16 to add the stuffing. Once the final 6 stitches are closed, reaching the inside becomes difficult. Firm stuffing at Round 15 also helps the finished head keep its rounded shape when it is sewn onto the headband.
Crochet the Cat Ears
Make 2 ears in black yarn. These are deliberately left unstuffed so they can be flattened and attached with a pointed cat-ear shape.
Work in continuous spiral rounds.
R1: 6 sc in a magic ring. (6)
R2: (sc, inc) x 3. (9)
R3: 9 sc. (9)
R4: (2 sc, inc) x 3. (12)
R5: 12 sc. (12)
R6: (3 sc, inc) x 3. (15)
R7: 15 sc. (15)
R8: (2 sc, inc, 2 sc) x 3. (18)
R9: 18 sc. (18)
Finishing: Fasten off, leaving a long tail for sewing. Do not stuff the ears; pinch them flat.
Ear Placement Note
Keep both ears flat before sewing them onto the head. Their position at the top corners of the head is what creates the recognizable cat silhouette, so check their spacing from the front before making the stitches permanent.
Crochet the Cat Eyes
Make 2 yellow eyes in continuous rounds. The black embroidered pupils will be added after the crochet pieces are finished.
R1: 6 sc in a magic ring. (6)
R2: 2 sc in every sc. (12)
R3: (sc, inc) x 6. (18)
Finishing: Fasten off, leaving a long tail for sewing.
Pupil: Take a strand of black yarn and your tapestry needle. Embroider a thick, vertical line down the center of each yellow eye to create a classic cat pupil.
Eye Check
Before sewing the eyes down, place both pieces against the black head and check that they sit at a similar height and distance from the center. This small check makes a noticeable difference once the face is assembled.

Assembly
Insert the Headband and Prepare the Tail
Slide the 5 mm headband into the long black crochet tube.
Measure the extra 21 cm of empty tubing hanging off one side of the headband. This is the section that will become the tail.
Cut a piece of silver aluminum craft wire that fits fully inside this 21 cm tail section.
Use pliers to bend the sharp ends of the wire over before inserting it. This prevents the ends from creating a sharp point that could poke through the crochet.
Insert the wire fully into the 21 cm empty portion of the tail.
Using a tapestry needle and the yarn tail, sew the open end of the tail completely shut.
Tail Check
At this stage, the wire should be hidden completely inside the crochet tail. The tail should still be flexible enough to bend by hand, but the wire should give it enough support to hold the shape you create.
Attach the Cat Face
Sew the two yellow eyes onto the front of the black cat head.
Next, sew the two flat ears securely onto the top corners of the head.
Before tightening all the stitches, look at the face from the front. Adjust the eyes or ears if needed so the face looks balanced and both ears point upward.
Secure the Cat Head to the Headband
Position the completed cat head onto the headband off-center, near the side opposite the long tail.
Use the black yarn tail left over from the head to whipstitch securely around the headband tube and attach the head in place.
Keep stitching until the head feels secure and does not wobble when the headband is gently moved.
Final Tail Shape
Once everything is firmly attached, gently shape the wire inside the tail into an S curve or curled hook.
Because the wire is hidden inside the crocheted tube, you can reshape the tail later instead of having to keep one fixed position.

A Few Finishing Checks
Before wearing the headband, check the finished piece from the front and side:
- The cat head should sit securely without wobbling.
- Both yellow eyes should face forward.
- The two ears should remain flat and pointed upward.
- The headband should be fully covered by the black crochet tube.
- The tail should extend 21 cm from the headband base.
- The wire should remain completely enclosed inside the crocheted tail.
Once these details are in place, the simple black crochet pieces come together as a playful cat headband ready for a Halloween costume, seasonal outfit, or gift for a cat lover.