Oversized Crochet Mesh Sweater with Textured Sleeves
Give your wardrobe bold handmade texture with this oversized crochet sweater, built from colorful panels and repeating mesh patterns you can rearrange.
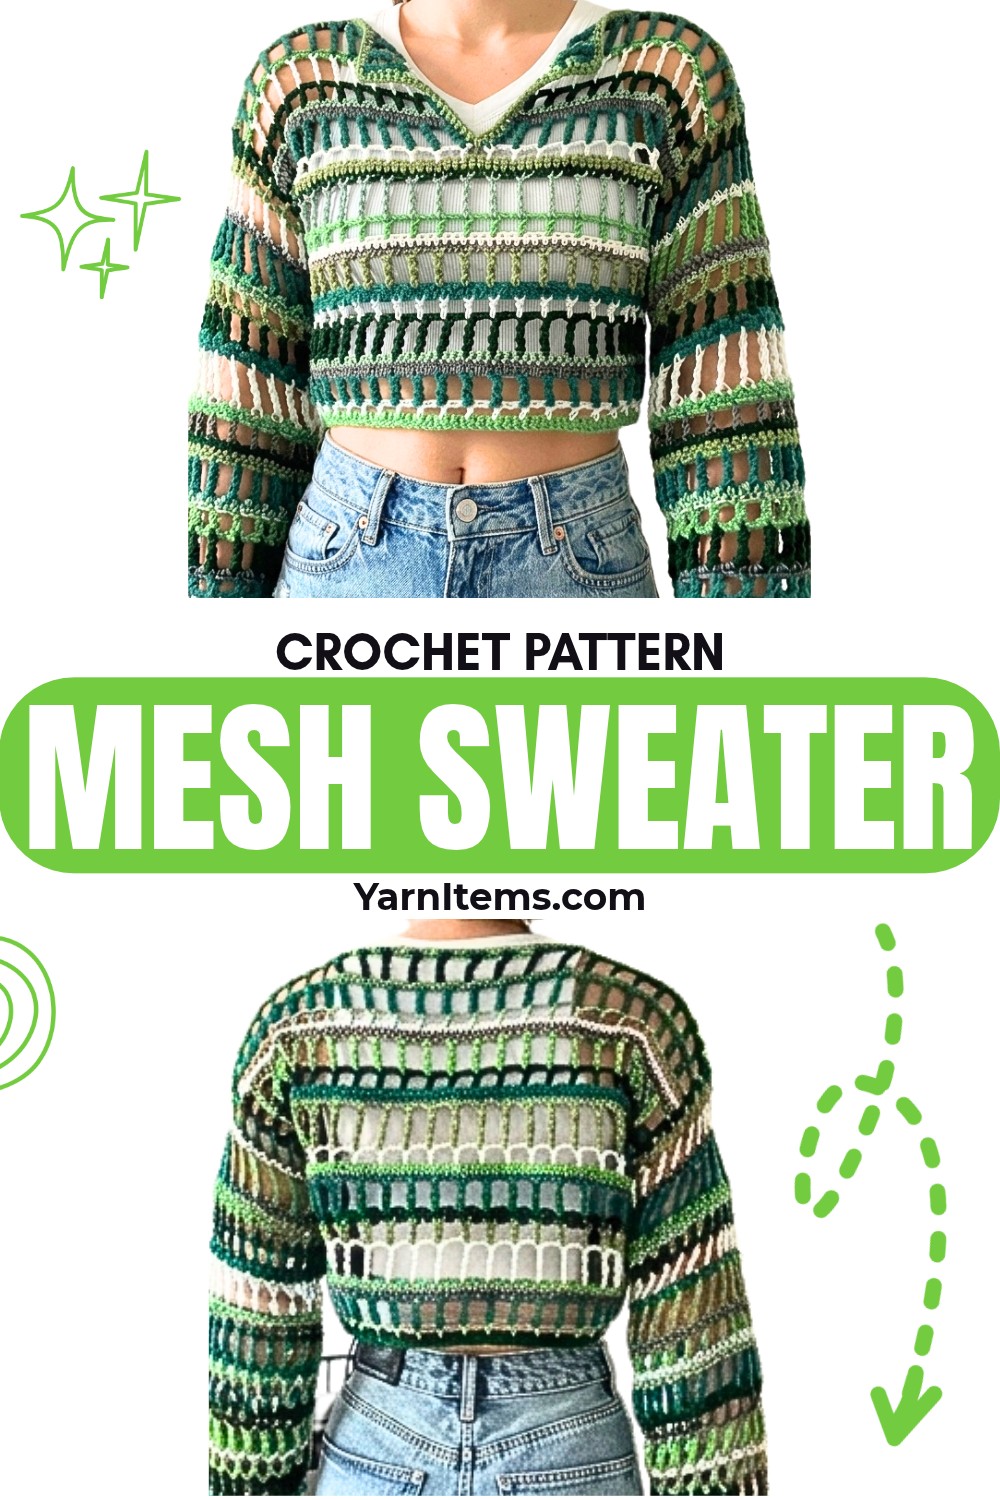
Bright color changes and alternating mesh textures give this crochet sweater its relaxed, oversized character. Five different row crochet patterns create visual movement across each panel, while open sections keep fabric light and flowing.
Made-to-measure width starts with foundation-chain count, while extra rows can extend body length for cropped or full-length styling. Armhole depth also controls sleeve width, so careful side-seam placement becomes important before crochet sweater sleeves are added.
Credit Kenikse Crochet
Materials & Tools Needed
- Yarn: 8 colors in total; any number of colors can be used, or the sweater can be made in one solid shade
- Creator combines 4 acrylic DK yarns, 3 cotton DK yarns, and 1 Merino wool Aran-weight yarn
- Mixing yarn types and textures is encouraged
- Crochet Hook: 4.5 mm
- Scissors
- Yarn or tapestry needle: For weaving in tails and sewing seams
Choose Width and Length
Sweater uses oversized proportions, with foundation chain controlling main-panel width.
Foundation chain must be a multiple of 3 + 2. Measure slightly wider than your shoulders when deciding starting width.
Body length is fully adjustable. Continue adding rows to front and back panels until desired cropped or full length is reached.
Armhole opening also affects sleeve width. Larger side opening creates wider sleeve; smaller opening creates narrower sleeve. Measure this before sewing side seams permanently.
Pattern Abbreviations
- ch: Chain
- st(s): Stitch(es)
- sk: Skip
- sl st: Slip stitch
- sc: Single crochet
- hdc: Half double crochet – yarn over, pull up loop, pull through all 3 loops
- dc: Double crochet – yarn over once
- tr: Treble crochet – yarn over twice, pull through 2 loops three times
- dtr: Double treble crochet – yarn over three times, pull through 2 loops four times

Main Panels
Make 2 panels the same.
Work over yarn tails whenever possible while crocheting. This reduces loose ends that need separate weaving later.
Color Changes
When finishing any row of sc or hdc, do not pull current yarn through final 2 loops of last stitch. Pick up new color and pull it through those 2 loops, then ch 1 to secure; cut old yarn, leaving tail.
This method places color change directly into final stitch, helping next row begin cleanly without bulky knots.
Row 1 – Single Crochet: Make slip knot and ch 74, or any multiple of 3 + 2; skip first ch and work 1 sc into second ch from hook; work sc into every ch across for 73 sc total; on final sc, change to next color.
Row 2 – Double Crochet Mesh: With new color, ch 5, counting as 1 dc plus ch 2, and turn; sk first 3 sts including base st; work 1 dc into 4th st; ch 2, sk 2 sts, 1 dc in next st; repeat across row; change to next color on final dc.
Mesh row creates open spaces that will later line up with taller stitches in following rows. Keep skipped stitches consistent so panel edges stay even.
Row 3 – Treble Crochet Mesh: Ch 6, counting as 1 tr plus ch 2, and turn; sk ch-2 sp and work 1 tr into top of next dc; ch 2, sk ch-2 sp, 1 tr into next dc; repeat across; at row end, ch 2, sk 2 chs from turning chain, and work 1 tr into 3rd chain; change to next color.
Row 4 – Half Double Crochet Solid: Ch 1 and turn; work 1 hdc into first st at top of tr; work 2 hdc into next ch-2 sp; work 1 hdc into next tr, then 2 hdc into next ch-2 sp; repeat across; work final hdc into turning chain and change to next color on final stitch.
Keep exactly 2 hdc in each ch-2 space. Adding extra stitches here would unintentionally widen panel.
Row 5 – Double Treble Mesh: Ch 7, counting as 1 dtr plus ch 2, and turn; sk next 2 sts and work 1 dtr into 3rd st; ch 2, sk 2 sts, 1 dtr into 3rd st; repeat across; change to next color on final stitch.

Continue Panel Pattern
Continue mixing these 5 rows in any preferred order and color combination until panel reaches desired length.
Available row textures are:
- Single crochet solid
- Double crochet mesh
- Treble crochet mesh
- Half double crochet solid
- Double treble crochet mesh
Color placement can change with every row or follow repeating color groups.
Final Row: Make sure the final panel row is single crochet. Leave a long yarn tail for sewing.
Make second panel identically to first, matching width and length.
Before assembly, place both panels together and compare side edges, row count, color order, and final width. Matching panels now will make shoulder and side seams much easier to align.

Join Shoulders
Place front and back panels together with right sides facing inward, leaving wrong sides facing outward for sewing.
Use the long yarn tail left from the panel and yarn needle.
Shoulder Seams: Sew from outside corners inward, joining approximately 18 sc stitches for each shoulder as shown in tutorial; secure yarn and weave in ends.
Keep both shoulder seams equal in length so neckline stays centered.

Close Side Seams
Keep sweater wrong-side-out while sewing side edges.
Side Seams: Begin at bottom hem and sew upward toward armpit; line up matching row types on both panels, keeping dc beside dc and tr beside tr; stop once desired armhole width is reached; creator sews approximately 11 rows upward from bottom; secure yarn and weave in ends.
Armhole size deserves careful checking here because opening directly determines sleeve width. Try sweater on or compare opening against intended fit before completing second side.
Add Sleeves
Turn sweater right-side-out before beginning sleeve rounds.
Sleeves are worked around raw armhole edge. Spacing needs to account for different row heights so sleeve does not flare or bulge.
Sleeve Color Joining
For open mesh rounds, fasten off by chaining 1 and cutting yarn. Reattach next color with slip knot directly into same space.
Round 1 – Single Crochet Base: Attach yarn with sl st directly at armpit where side seams meet; work sc evenly around raw armhole edge; use approximately 5 sc along side of each dtr row, 1 sc along side of each sc row, and 2 sc along side of each hdc row; when reaching beginning, sl st to first sc and switch to next color on final loop pull-through.
Spacing will not be identical along every row type because stitch heights differ. Follow these proportions to create smooth sleeve circumference rather than adding stitches randomly.
Round 2 – Double Crochet Mesh: Ch 5, counting as 1 dc plus ch 2; sk 2 sts and work 1 dc into 3rd st; ch 2, sk 2 sts, 1 dc in next st; repeat around; when reaching beginning, ch 2 and sl st into 3rd ch of starting ch-5, even if slightly more or fewer than 2 sts remain; ch 1, cut yarn, and pull through to fasten off.
Round 3 – Treble Crochet Mesh: Reattach next color in same sl st space; ch 6, counting as 1 tr plus ch 2; work 1 tr above next dc, ch 2; repeat around; sl st into 4th ch of starting ch-6; ch 1, cut yarn, and fasten off.
Round 4 – Half Double Crochet Solid: Attach new color in same sl st space; ch 1; work 1 hdc into same space; work 2 hdc in each ch-2 space and 1 hdc directly into each tr around; on final hdc, change to next color and sl st to first hdc.
Round 5 – Double Treble Mesh: Ch 7, counting as 1 dtr plus ch 2; sk 2 sts and work 1 dtr into 3rd st; ch 2, sk 2 sts, 1 dtr in next st; repeat around; ch 2 and sl st into 5th ch of starting ch-7; ch 1, cut yarn, and fasten off.

Continue Sleeve Length
Repeat and mix sleeve rounds according to preferred look and length.
Possible sequence:
Round 2: Double crochet mesh
Round 3: Treble crochet mesh
Round 4: Half double crochet solid
Round 5: Double treble mesh
Continue until sleeve reaches wrist or desired stopping point.
Because acrylic yarn can stretch slightly with wear, check sleeve length while wearing or holding sweater in intended position before adding final rounds.
Repeat exact sleeve process on opposite side.
Shape Neckline
Neckline can remain wide for off-the-shoulder styling or be tightened for more standard fit.
Optional Neckline Adjustment: Thread a darning needle and sew 10 to 12 stitches together on both sides of top neckline.
Sew gradually and check the opening after each side. This lets you control neckline width instead of closing too much at once.

Final Side and Sleeve Check
Before weaving in every remaining tail, lay the sweater flat and compare both sleeves.
Check:
- Shoulder seams have matching width
- Side seams stop at equal heights
- Both armholes have similar circumference
- Sleeve stitch sequence matches intended color pattern
- Mesh spaces remain open and even
- Neckline sits at preferred width
- Body reaches desired length
Once fit and alignment look right, weave in remaining yarn tails with tapestry needle.
Colorful panels, mixed stitch heights, and open mesh sections give finished sweater its distinctive handmade texture. Since width, length, armhole depth, sleeve length, and neckline can all be adjusted, same stitch sequence can create noticeably different fits and styles.