How to Crochet a Santa Spinner Ornament
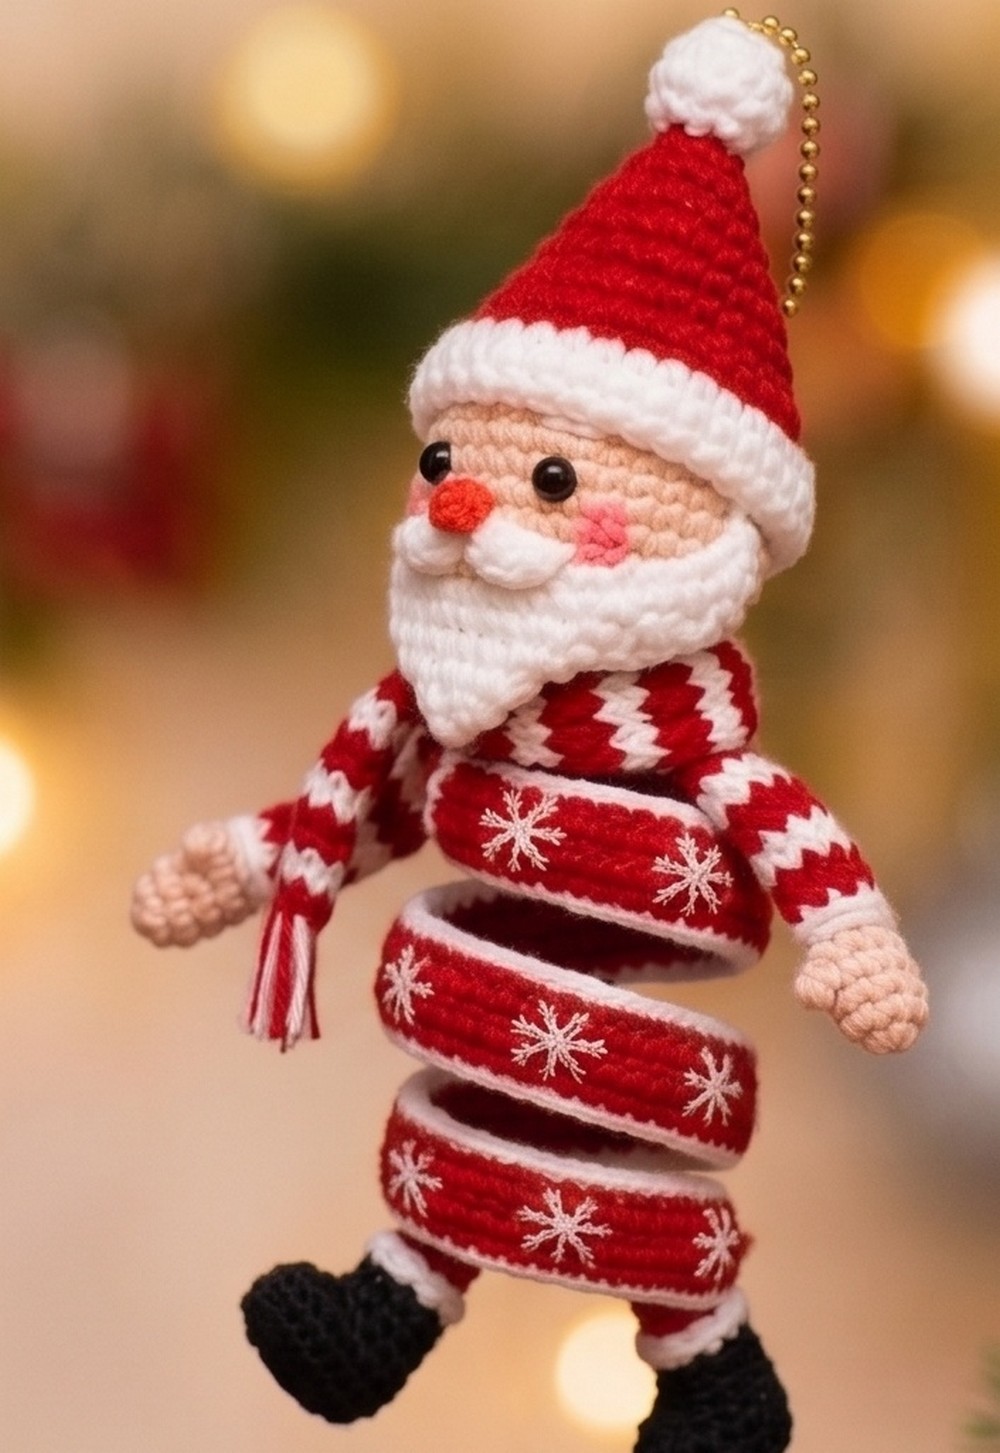
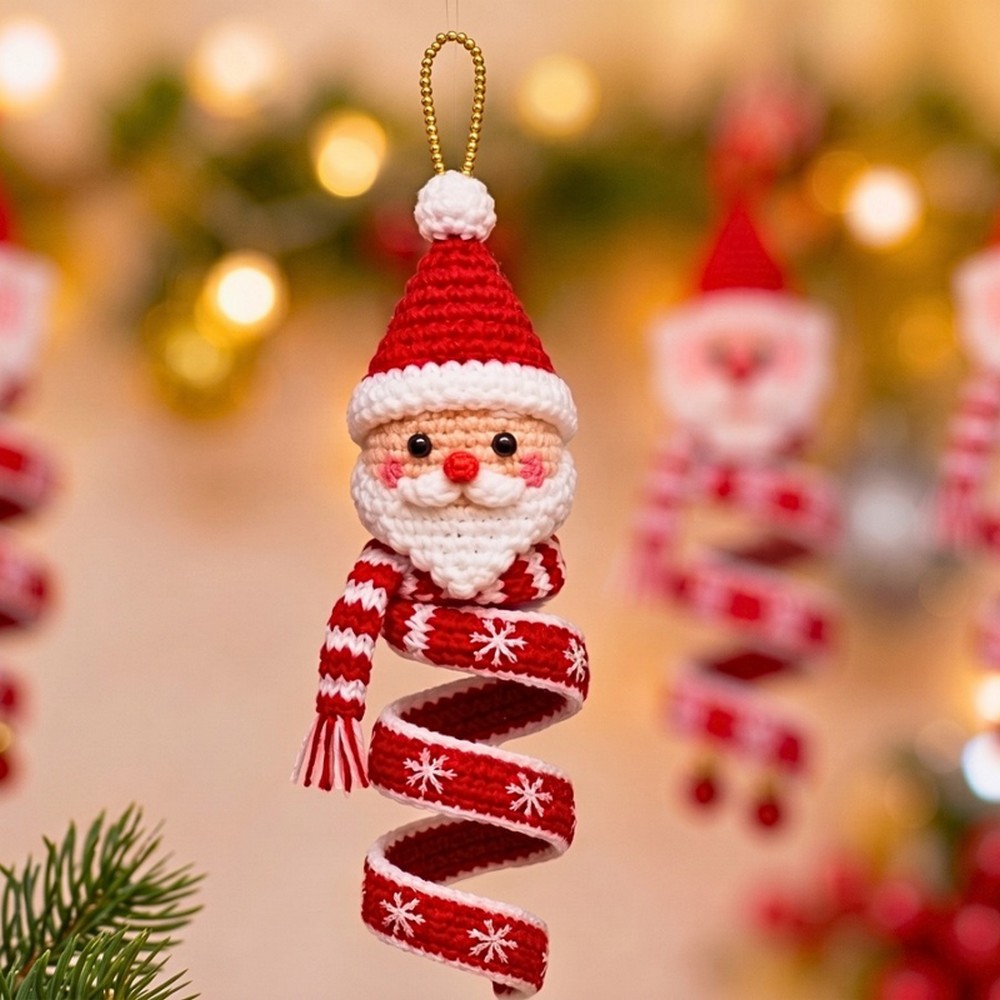
Want a Santa ornament that does more than hang still? This crochet Santa spinner combines a cheerful face with a wire-supported spiral for a fun Christmas decoration.

A little crochet Santa face can become much more playful when it has a springy spiral body underneath. This crochet spinner ornament begins with a simple yellow face, then adds the beard, hat, facial details, and a red-and-white spiral that gives the finished piece its distinctive hanging shape.
The important part is knowing what each section is doing before moving on. The face needs to stay round, the hat gradually narrows toward its peak, and the wire must sit securely inside the spinner strip before you shape it. Taking a moment to check those points as you crochet will make the final assembly much easier and help the Santa hang neatly from the tree.
Credit Crochet Patterns Free
Materials & Tools Needed
- 3-ply yarn in yellow, white, and red
- Crochet hook: 2.7–3.0 mm
- Wire for shaping the spinner and supporting the hat
- Hot glue or adhesive
- Googly eyes
- Small red pom-pom for the nose
- Optional star sequins
- Scissors
- Yarn needle
Before You Start: How the Santa Is Built
This ornament is easiest to understand as a few separate sections that come together at the end:
- The yellow face base creates the round Santa face.
- The white beard is added only along the lower part of the face.
- The red hat fills the open area above the face and narrows toward a point.
- The facial features give Santa his expression.
- The red-and-white wired strip becomes the spring-shaped spinner.
- The scarf and hanging loop finish the ornament.
Keeping these parts separate at first makes placement much easier. You can check the face and hat before attaching the spinner, rather than trying to correct several pieces after everything has been glued together.
How to Face Base
Step 1: Make the Yellow Circle
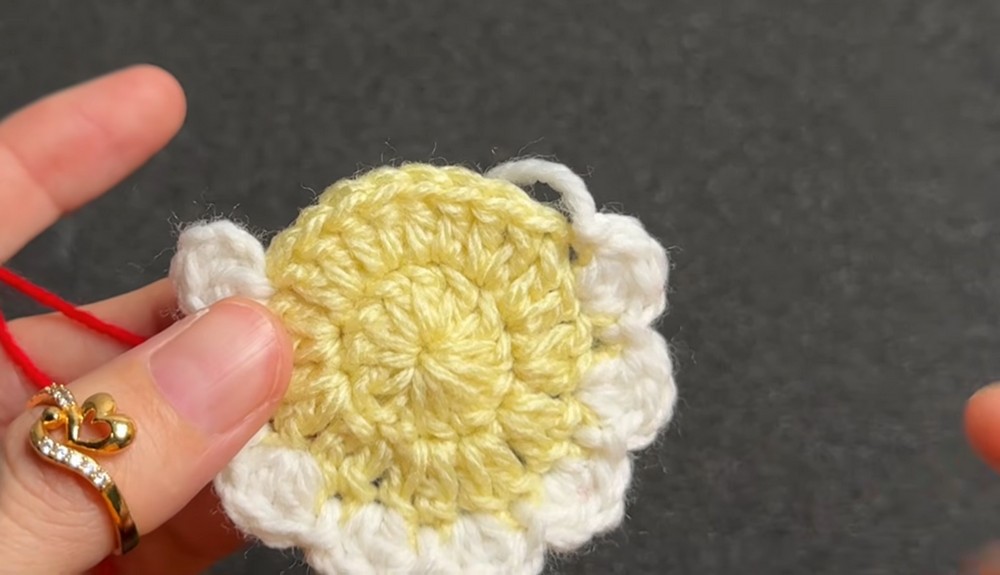
With yellow yarn, make a magic ring. Work 3 chains, then crochet 11 double crochets into the ring. Join with a slip stitch.
For Round 2, chain 3 and work 1 double crochet in the same stitch. Continue with 2 double crochets in each stitch around, then finish with a slip stitch.
Fasten off the yellow yarn.
Why the Second Round Is Larger
The first round creates the center of the face. Working 2 double crochets into each stitch on the next round increases the number of stitches evenly, allowing the piece to spread outward into a wider circle.
If the face begins looking wavy, check that your stitches are being worked into the correct spaces. If it starts cupping upward instead, the increases may not be distributing evenly.
What comes next: once this yellow circle is complete, the beard will cover the lower portion while the upper area remains available for the hat and facial features.

Beard
Step 2: Add the White Beard
Attach white yarn to the lower portion of the yellow face base.
Chain 3, work 2 double crochets into the same stitch, then slip stitch into the next stitch.
Repeat 3 dc in the same stitch, sl st in the next stitch 7 times. Fasten off.
Why the Beard Uses Repeated Groups
The repeated group creates small scalloped sections instead of making the beard a flat strip. The slip stitch between groups keeps the beard attached to the face while giving the lower edge its textured shape.
Keep the beard positioned on the lower part of the circle. If it creeps too far upward, there may not be enough room left for the mustache, eyes, and hat.
What comes next: after the beard is finished, the remaining open stitches at the top of the face become the attachment area for Santa’s red hat.
Santa Hat
Step 3: Work the Red Hat Base
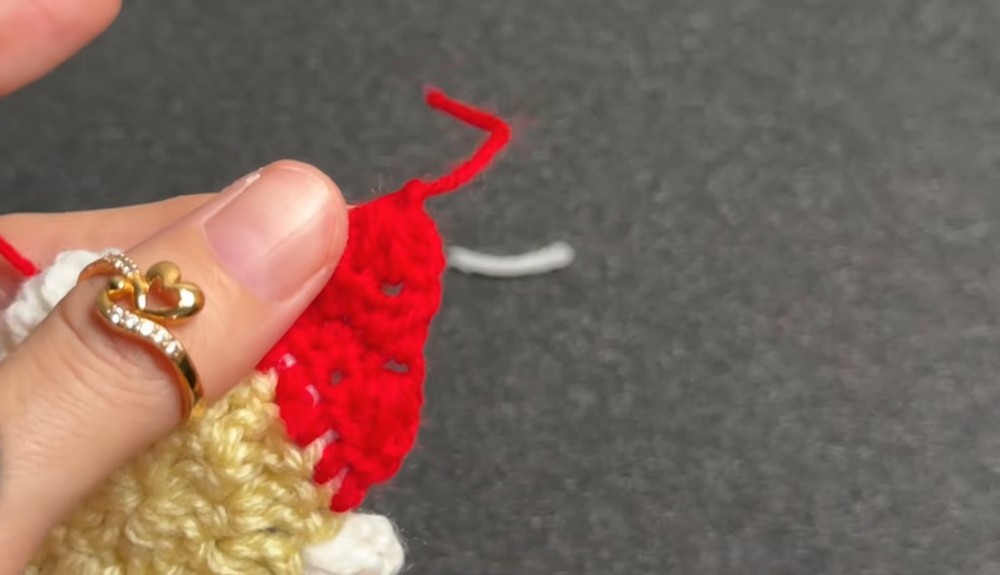
Attach red yarn to the remaining open stitches on top of the head.
Chain 2, then work 8 half double crochets across.
For the next row, chain 2, turn, work 1 hdc decrease, 4 hdc, then 1 hdc decrease.
For the following row, chain 2, turn, work 1 decrease, 1 hdc, then 1 decrease.
For the final shaping row, chain 2, turn, and decrease across all remaining stitches to form the peak. Fasten off.
Why the Hat Gets Narrower
The hat does not stay the same width because the decreases gradually remove stitches from each row. Each decrease brings the sides closer together, so the wide base naturally becomes a pointed Santa hat.
The most important point here is to keep the decreases in the intended places. If one side loses stitches faster than the other, the hat can lean instead of forming a centered peak.
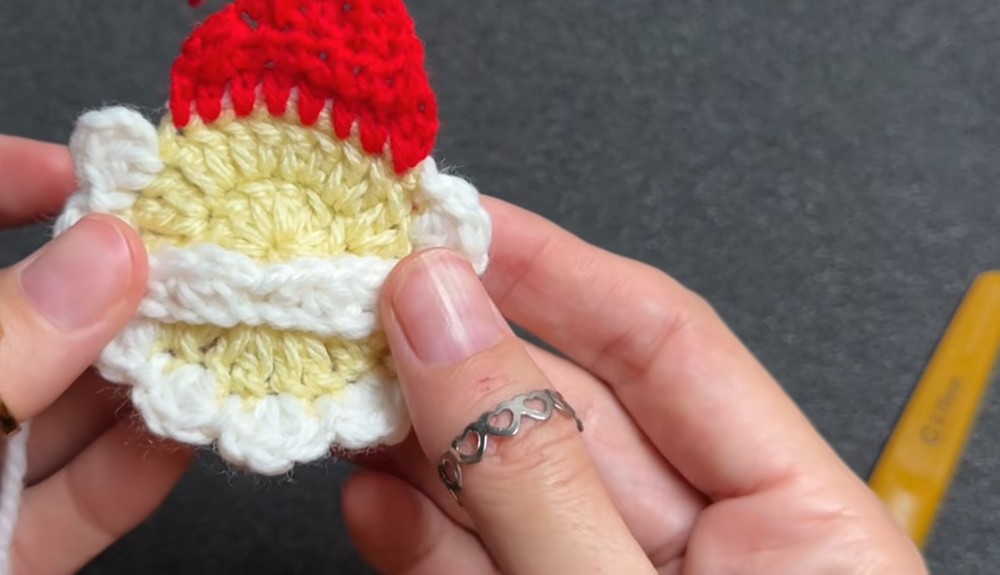
Check before moving on: lay the hat against the face. The lower edge should cover the upper head area while the decreases should lead toward one clear tip.
Step 4: Add the Hat Pom-Pom
Using white yarn, chain 3 and work a puff stitch into the first stitch. Attach it to the tip of the hat.
The pom-pom should sit at the end of the tapered section. If it is attached too far down, the pointed shape of the hat will become less noticeable.
Facial Features & Assembly
Step 5: Add Santa’s Nose
Use a small red puff stitch or a small red pom-pom for the nose.
Glue it to the center of the face.
Step 6: Make the Mustache
Using white yarn, chain 10.
Skip 1 stitch, then work: sl st, sc, hdc, sc, sl st, sc, hdc, sc, sl st along the chain.
Glue the mustache just above the beard and below the nose.
Step 7: Position the Eyes
Glue the googly eyes just beneath the hat line.
Why Placement Matters Here
The facial features are small, so even a slight change in position can alter Santa’s expression. Before gluing anything, place the nose, mustache, and eyes loosely on the face and check the spacing.
The mustache should remain between the nose and beard, while the eyes should sit under the hat rather than too close to the beard.
What comes next: once the face looks balanced, set it aside while you make the long spiral section. The spinner will be attached to the bottom of the Santa face later.
Spring Spinner Body
Step 8: Crochet the Red Strip
Using red yarn, chain 60.
Skip 3 stitches, then work 1 double crochet in each remaining stitch down the chain.
Insert the wire inside the finished row.
Why the Wire Goes Inside Now
The wire gives the long crocheted strip enough support to hold the spiral shape later. It needs to be enclosed before the white edging is added so the two crochet layers can help secure it in place.
Do not shape the spiral yet. First, make sure the wire runs securely through the strip.
Step 9: Secure the Wire With White Yarn
Attach white yarn and work 1 single crochet in each stitch all the way across, securing the wire inside.
Check the edges as you go. The wire should remain enclosed rather than poking out through the crochet.
What comes next: only after the wire is secured should the strip be turned into the spring shape. Trying to form the spiral before finishing both crochet layers can make the strip harder to control.

How to Shape the Spiral
Step 10: Form the Spinner
Take the finished red-and-white strip and wrap it tightly around a cylindrical object such as a marker or pipe.
Continue wrapping to form a spiral spring.
Once released, the strip should hold the curved shape created around the cylinder.
Why a Cylinder Helps
The cylinder gives the strip a consistent curve instead of asking you to form every loop by hand. This makes the spiral more even from top to bottom.
If the loops are uneven, unwrap the strip gently and reshape it around the cylinder rather than forcing individual sections into place.
Optional Star Decoration
If desired, attach small star sequins to the spiral.
Keep decorations light and spaced where they will not interfere with the spring’s movement.

Attach the Spinner to Santa
Attach the top of the spiral spring to the bottom of the Santa face.
Before securing it permanently, hold the ornament upright and check whether the face sits centered above the spiral.
If the Santa tilts strongly to one side, adjust the attachment point before the adhesive sets.
Scarf
Step 11: Make the Scarf
Using white yarn, chain a length that will comfortably wrap around the neck area.
Work 2 rows of single crochet.
Knot the ends and wrap the scarf around the base of Santa’s head.
Why the Scarf Is Added Near the End
The scarf is easier to position after the face and spinner have been assembled. At this point, you can see exactly where the neck area sits and adjust the scarf without interfering with the hat or beard.
Hanging Loop
Step 12: Add the Loop
Create a small loop with white yarn and secure it to the top of the hat.
Keep the loop large enough to fit over the branch or ornament hook you plan to use.
Check that it is attached firmly to the hat rather than only to the loose pom-pom.
Final Assembly Check
Before hanging your Santa spinner on the Christmas tree, check these five points:
- The eyes, nose, and mustache are securely positioned.
- The hat is centered, and its peak is clearly formed.
- The wire is fully enclosed inside the spinner strip.
- The spiral is attached securely beneath the face.
- The hanging loop is firmly attached to the top of the hat.
Hold the ornament by its hanging loop for a moment. The Santa face should sit naturally above the spiral rather than pulling sharply to one side.
If anything shifts, fix that point before placing the ornament on the tree.