How to Crochet a Lifelike Cockatiel with Step-by-Step Instructions
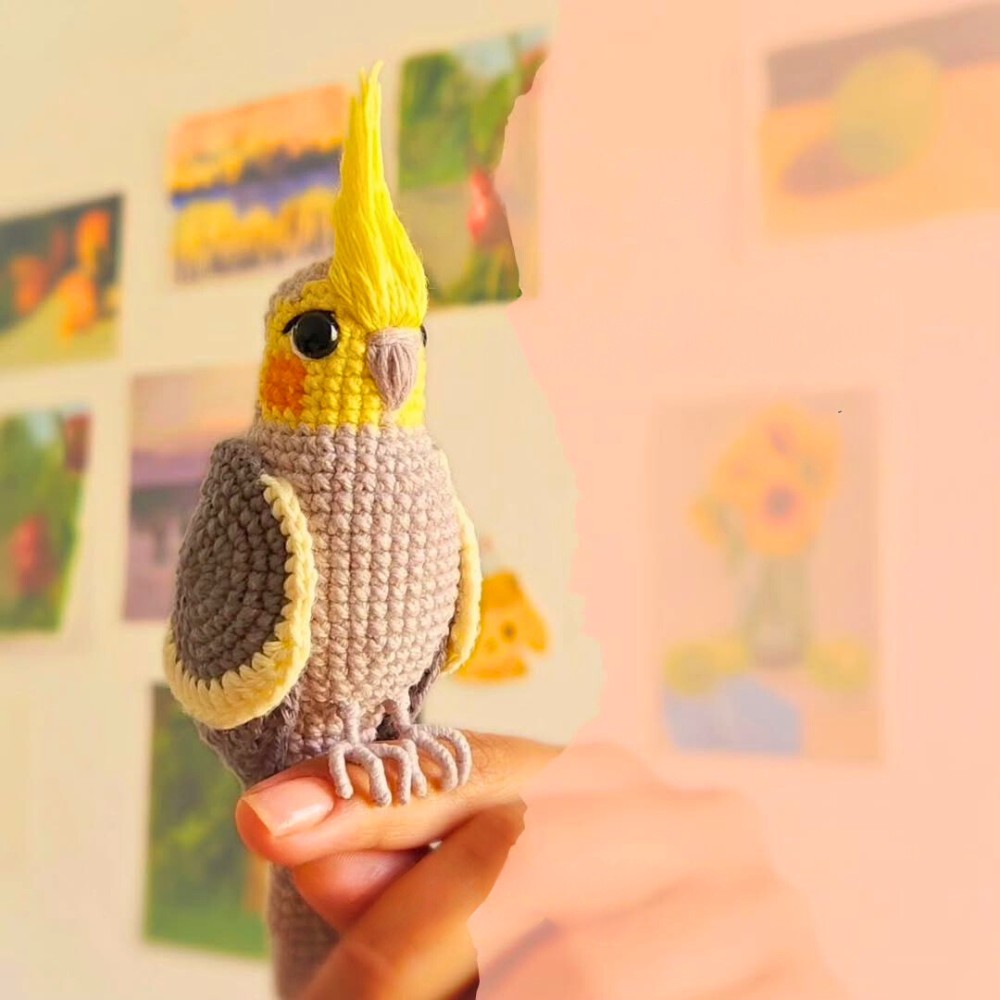
Crochet patterns are a wonderful way to bring creativity to life, and the Crochet Cockatiel Kali is one such project designed to charm both beginners and experienced crocheters alike. With detailed instructions, this crochet pattern helps you craft a lifelike cockatiel complete with its signature yellow crest, orange cheeks, and grey-striped wings. Whether for decor, as a handmade gift, or a toy, this adorable cockatiel makes for a versatile crafting idea.

What Makes the Crochet Cockatiel Pattern Special?
If you’re looking for a crochet project that balances simplicity and artistry, this pattern is perfect. The design captures the natural beauty and playful features of a cockatiel while remaining accessible for beginners. The yellow and orange accents against the grey body make this design visually appealing. Since the instructions are carefully laid out, creating realistic features—from the crest to its detailed wings—is easy and rewarding.
Additionally, the flexibility of this guide lets you customize colors and add personal touches, resulting in a unique amigurumi for your space or gifting needs.
Credit crochet_toys_patterns
Step-by-Step Pattern
Materials:
- Cotton yarn: grey, light grey, yellow, orange cream colour
- Fiberfill
- Crochet hook 2mm
- Stitch marker
- Scissors
- Yarn needle
- Safety eyes of 7mm
- Pins
- Adhesive
- Fine galvanized wire
- All-purpose adhesive
Abbreviations:
- MR: magic ring
- Ch: chain
- Sc: single crochet
- Inc: increase
- Dec: decrease
- R: round
- Dc: double crochet
- Hdc: half double crochet • Slst: slip stitch
- (x): total number of stitches of each round
- (…)*N°: Repeat the section in brackets N° times
- (O): orange colour
- (Y): yellow colour
- (G): grey color
Pattern Instructions
Head
Grey colour
- R1: Mr 6sc (6)
- R2: 6inc (12)
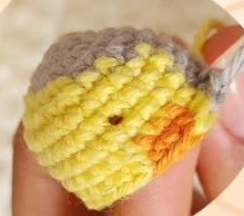
Color changes:
- R3: (G)(Isc, linc)*2, (Y)(Isc, linc)*2, (G) (1sc, linc)*2 (18)
- R4: (G)2sc, linc, 2sc, (Y)(linc, 2sc)*3, (G)linc, 2sc, linc (24)
- R5-R7: (G)4sc, (Y)16sc, (G)4sc (24)
Place eyes between R6 and R7, 9 stitches between them.
- R8-R10: (G)3sc, (Y)lsc, (O)3sc, (Y)9sc, (O)3sc, (Y)lsc, (G)4sc(24)
- R11: (G)5sc, (Y) 7sc, (G)lsc, (Y)7sc, (G)4sc (24)
Grey color
- R12: 24sc (24)
- R13: 5sc, (linc, 2sc)*5, 3sc,linc (30)
- R14: 30sc (30)
- R15: (4sc, Linc)*6 (36)
Body
- R16-R24: 36sc (36)
- R25: 11sc, Idec, 10sc, Idec, 11sc (34)
- R26: 14sc, Idec, 2sc, Idec, 14sc (32)
- R27: 9sc, Idec, 10sc, Idec, 9sc (30)
- R28: 12sc, Idec, 2sc, Idec, 12sc (28) (9)
- R29: 7sc, Idec, 10sc, Idec, 7sc (26)
- R30: 10sc, Idec, 2sc, Idec, 10sc (24)
- R31: 9sc, Idec, 2sc, Idec, 9sc (22)
- R32: 6sc, Idec, 6sc, Idec, 6sc (20)
- R33: 20sc (20)
- R34: (1dec, 3sc)*4 (16)
- R35-R37: 16sc (16)
- R38: 2sc, Idec, (1sc, Idec)*3, 3sc (12)
- R39-R44: 12sc (12)
- R45: 2sc, (Idec, 1sc)*2, Idec, 2sc(9)
- R46-R49: 9sc
- R50: (1sc, Idec)*3
It is not necessary to stuff the tail.
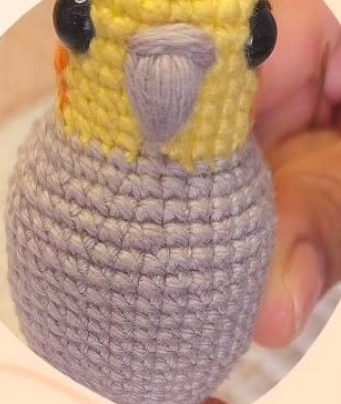
Wings (inner) x2
- R1: MR 6sc (6)
- R2: 6 inc (12)
- R3: (1sc, Linc)*6 (18)
- R4: (2sc, Linc)*6 (24)
- R5: (3sc, Linc)*6 (30)
- R6: 2sc, (linc, 4pb)*5, Linc, 2sc (36)
Join the two sides and crochet together in rows (4dc, Linc)*3, 2dc, Ich in the air, continue crocheting over the previous row 12sc, 2hdc, inc hdc, 5dc, 2 chains, slip stitch, fasten off and leave a long tail for sewing.
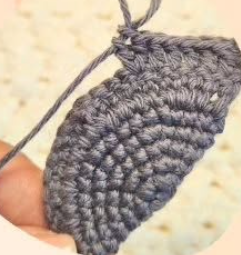
Wings (outer) x2
- R1: MR 6sc (6)
- R2: 6 inc (12)
- R3: (1sc, Linc)*6 (18)
- R4: (2sc, Linc)*6 (24)
- R5: (3sc, Linc)*6 (30)
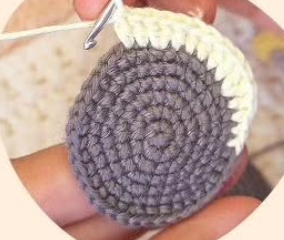
- R6: 2sc, (linc, 4pb)*5, Linc, 2sc (36) Cream color
- R7: 2sc, linc, 5sc, linc, 3sc, lhdc, LDC, linc dc, 5dc, linc dc, 2dc, 1hdc, 2sc, lin, 5sc, linc, 3sc (42)
Fasten off and leave a long tail for sewing.
Legs x2
Use a piece of cardboard as a guide, with 1 centimetre on one side. Wrap the fine wire around the cardboard leaving the ends longer. Cut and remove the wire. Join both ends of the wire (this will go inside the amigurumi, so it must be firm), apply glue to the wire, and wrap it with grey yarn. Let it dry and attach it to the body.
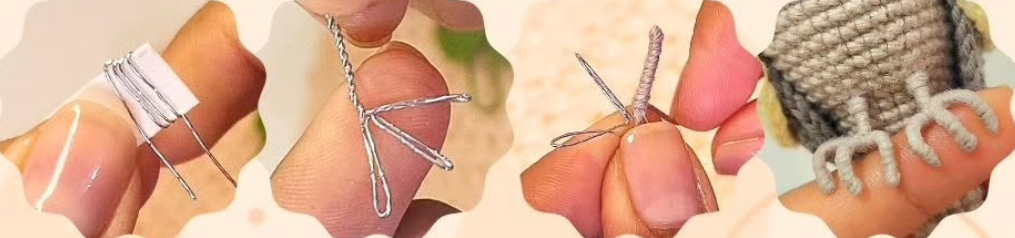
- Place the legs between R28-R29, leaving 4 stitches between them.
- Secure the legs with glue and let them dry so they can be articulated later.
Assembly
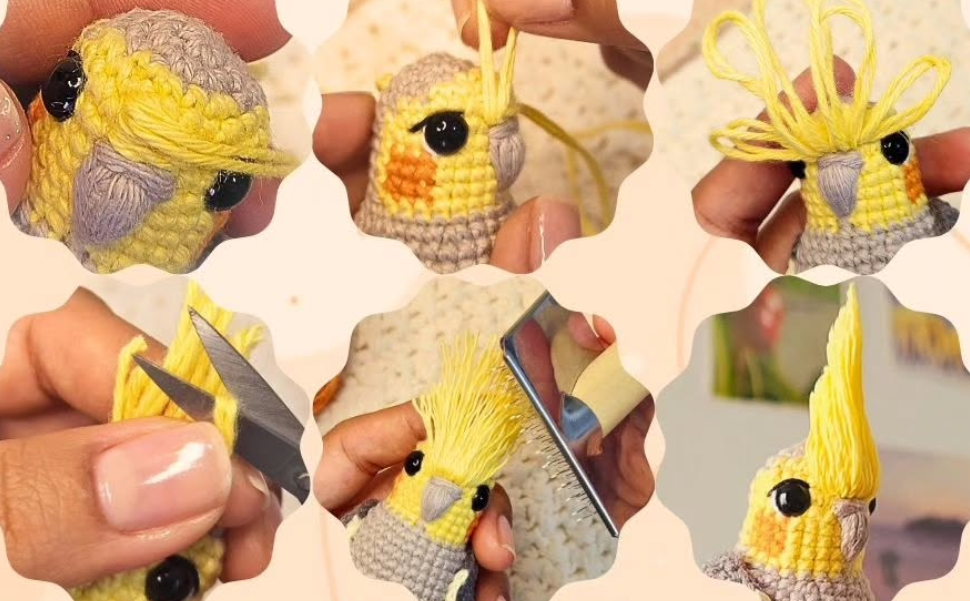
- Embroider the beak with grey yarn between R6 and R10, leaving 2 stitches of distance between each eye.
- For the crest, use yellow yarn, and make several stitches horizontally. We will use it as a base to glue the crest on top.
- Make more stitches, leaving the yarn exposed, and then cut, brush, and glue on the base.
Assembly
- Position the inner wings under R17, and sew along the upper edge of the wings.
- Place the outer wings under R13, secure them with glue in the centre, and then gently sew the edges so that the stitches are not visible.

Conclusion
The Crochet Cockatiel Kali Pattern is perfect for anyone looking to combine artistic detail with fun crafting. The beginner-friendly instructions, coupled with the adorable design, empower crafters of any experience level to create a heartfelt handmade piece. Let your creativity flourish with this detailed guide and enjoy crafting this charming cockatiel design.