Crochet Black Panther Amigurumi Pattern – Iconic Handmade Doll
Craft the sleek Black Panther amigurumi using fine crochet techniques to capture the superhero’s defining features, including his mask and textured suit. The pattern incorporates color changes and embroidered accents for added detail. Utilizing recommended materials like YarnArt Jeans ensures a sturdy yet soft result, while customization allows for experimenting with size, yarn types, or personalized embroidery.
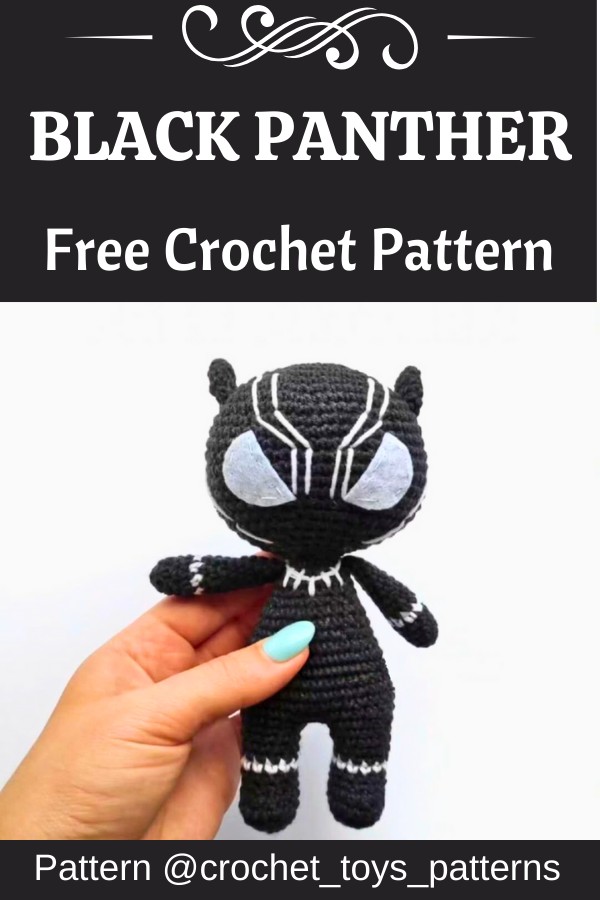
Beyond its standard design, the amigurumi can be tailored creatively by altering yarn combinations or incorporating metallic threads for unique effects. White felt eyes and delicate stitches on the face are key to achieving its striking appearance. Ideal for gifts or themed collections, this project balances simplicity with intricate craftsmanship, making it engaging for beginners and experienced crafters alike.
Credit crochet_toys_patterns
Step-by-Step Pattern
Materials:
- – 2.00 mm crochet hook.
- – YarnArt Jeans (55% cotton, 45% acryl, 50g/160m), next colours: white, dark grey.
- – White felt.
- – Toys filler.
- – Scissors.
- – Tapestry needle.
- – Pins.
- – Stitch marker.
Size:
Approx. 15 cm (about 5.9 inches) tall using the materials stated in the pattern. Size may vary if you use another weight of yarn, hook size, or stitch method. Pattern by TanyaaSmile.
Abbreviations:
- MR – magic ring sc – single crochet
- ch – chain stitch
- sl st – slip stitch
- inc – increase
- dec – invisible decrease
- (…)x n – repeat instructions in brackets n times
Pattern Instructions
Leg 1:
- Start working with dark gray yarn.
- 1. 6 sc in MR (6)
- 2. 6 inc (12)
- 3. (1 sc, inc)x6 (18)
- 4. 18 sc (18)
- 5. 6 sc, 4 dec, 4 sc (14)
- 6. 6 sc, 2 dec, 4 sc (12)
- 7. 12 sc (12)
Continue on with white.
- 8. 12 sc (12)
Continue on with dark gray.
- 9.-10. 12 sc (12)
- 11. Crochet 11 sc. Fasten off, leave a tail to close the gap between the legs later.
Leg 2 + body:
- 1.-10. Repeat Leg 1.
- 11. Crochet 12 sc (12) Crochet another 5 sc. Move the marker to the last loop. Stuff the legs. Now we will start with the body.
- 12. ch 3, join Leg 2 to Leg 1 with 1 sc, continue with 11 sc, 3 sc in the chain, 12 sc on Leg 2 (30). The beginning of your rounds should be on the back of the toy.
- 13. 9 sc, inc, 14 sc, inc, 5 sc (32)
- 14.-18. 32 sc (32)
- 19. 9 sc, dec, 14 sc, dec, 5 sc (30)
- 20. 30 sc (30)
- 21. (3 sc, dec)x6 (24)
- 22.-23. 24 sc (24) Start to stuff the body.
- 24. (2 sc, dec)x6 (18)
- 25.-26.18 sc (18)
- 27. (7 sc, dec)x2 (16)
- 28. 16 sc (16) Cut the yarn. Stuff the body firmly.

Arm x2:
Crochet with dark gray.
- 1. 6 sc in MR (6)
- 2. (2 sc, inc)x2 (8)
- 3.-5.8 sc (8)
Continue with white.
- 6. 8 sc (8)
Continue with dark grey.
- 7. – 14. 8 sc (8) Do not stuff the arms. Press the opening with your fingers, align 4 stitches side by side and work 1 sc through both sides (4 sc). Fasten off. Leave a long yarn to sew.
Ear x2:
- Using dark grey.
- 1. 4 sc in MR (4)
2. (1 sc, inc)x2 (6) - 3. (1 sc, inc)x3 (9)
- 4.9 sc (9)
- 5. (2 sc, inc)x3, sl st (12) Press the opening with your fingers, aligning 6 stitches side by side. Fasten off. Leave a long yarn to sew.
Head:
Using dark gray.
- 1. 6 sc in MR (6)
- 2. 6 inc (12)
- 3. (1 sc, inc)x6 (18)
- 4. (2 sc, inc)x6 (24)
- 5. (3 sc, inc)x6 (30)
- 6. (4 sc, inc)x6 (36)
- 7. (5 sc, inc)x6 (42)
- 8. (6 sc, inc)x6 (48)
- 9. (15 sc, inc)x3 (51)
- 10.-16. 51 sc (51)
- 17. (15 sc, dec)x3 (48)
- 18. (6 sc, dec)x6 (42)
- 19. (5 sc, dec)x6 (36)
- 20. (4 sc, dec)x6 (30)
- 21. (3 sc, dec)x6 (24)
Start to stuff the head.
- 22. (2 sc, dec)x6 (18)
- 23. (7 sc, dec)x2 (16) Fasten off. Leave a long yarn to sew.
Finishing:
- -Sew the head to the body.
- – We embroider the necklace with our yarn needle and a long strand of white yarn. -Sew the arms to the sides of the body.
- – Cut out two eyes from white felt. Sew with thin white sewing yarn.
- – With our yarn needle and a long strand of white yarn we embroider the details of the face. Make sure that the drawing and eyes are symmetrical to the head and body of your toy. Don’t forget that we have different materials used, the density of crocheting and filling, etc. So this pattern is recommendatory, not mandatory.
- – Sew the ears to the sides of the head.