This Crochet Pumpkin Bag Charm combines festive fall vibes with functionality, crafted to resemble a plump pumpkin complete with drawstrings, leafy embellishments, and a whimsical curly twig!
Crochet Pumpkin Bag Charm Pattern

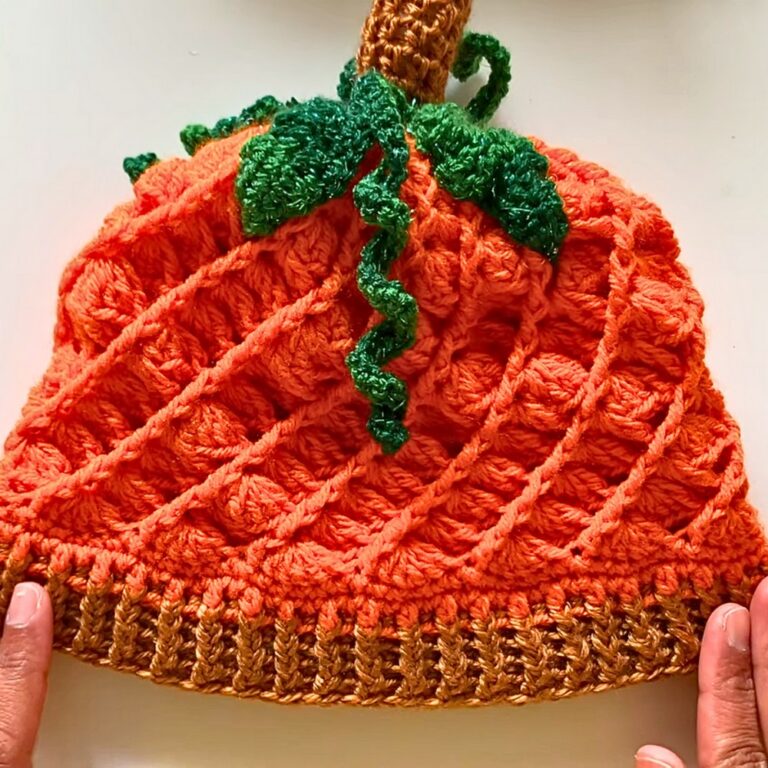
This pumpkin bag charm is a cute and creative way to brighten your spooky season. Shaped like a pumpkin, it is decorated with leaves and a curly twig for an extra festive touch. It’s spacious and features a drawstring closure, making it a great treat pouch for gifts or candies. Kids, friends, and loved ones will adore it.
Want to try making one? Crochet Pumpkin Bag is simpler than you think. With basic crochet techniques, you can create a round pumpkin shape and secure a strap. You’ll also learn fun tips like adding colorful details and a shiny twist to bring it to life. It’s perfect for showing creativity while making something useful that can hold small treasures.
Credit Kukkacrochet By Putri
Key Pattern Features
- Materials: 5-ply milk cotton yarn, 3.5mm hook, scissors, tapestry needle.
- Major Techniques: Working in the round, double crochet increases, single crochet edging, unique shaping for texture.
- Construction: Starts with a pumpkin base, shaped with creative double crochet placement to form curves.
- Embellishments: Includes crocheted leaves and a curly twig for decoration.
- Final Details: Drawstring strap woven through the top for functionality and charm.
The Pumpkin Bag Charm begins with the pumpkin base, crocheted in a circular shape using the magic ring or slipknot technique. The pattern progresses with rounds of double crochet, incorporating increases in each round to form a plump, spherical shape reminiscent of a real pumpkin. Clever placement of stitches—such as working some double crochets between stitches—creates dynamic ridges that mimic the natural texture of pumpkin grooves.

Once the pumpkin shape is complete, a single crochet edging is added to sharpen the design and stabilize the structure. A new yarn color is introduced for a series of alternating half-double crochet stitches with chain spaces. This creates a decorative band and drafted loops to guide the drawstring strap through. The strap itself is made by chaining 60 stitches and weaving it through the top to create a practical closing mechanism.

The pattern comes to life with embellishments that truly embody autumn charm. Two detailed pumpkin leaves are crafted using chains, double crochets, and slip stitches to add dimension. A delightful curly twig, formed by increasing single crochets along a chain, adds playful whimsy to the design. These decorative elements are attached securely, completing the bag charm.

This small project is ideal for gifting, especially for Halloween or fall-themed treats. With its functional drawstring design and warm seasonal appeal, it’s bound to be a hit with kids and adults alike!
How To Crochet Pumpkin Bag Charm
Materials & Tools Needed
- Yarn: 5-ply milk cotton yarn (multiple colors – orange for the pumpkin, green for the leaves, and optional brown for the twig).
- Crochet Hook: 3.5 mm hook.
- Other Tools:
- Scissors
- Tapestry needle
Finished Size & Customization Ideas
- Finished Size: A small, spacious bag charm with a drawstring (customizable in size by adjusting yarn weight and hook size or modifying the number of starting rounds).
- Customization Ideas:
- Add more leaves or adjust the curly twig size.
- Use glittery or variegated yarn for a fun, festive look.
- Attach beads, buttons, or charms for personalization.
- Use for Halloween treats or as an everyday accessory.
Pattern Abbreviations & Terminology
(US Terminology)
- ch = Chain
- sl st = Slip Stitch
- sc = Single Crochet
- dc = Double Crochet
- hdc = Half Double Crochet
- inc = Increase (2 stitches in 1 stitch)
- st(s) = Stitch(es)

Step-by-Step Detailed Instructions
The pattern is divided into three main sections: Pumpkin Body, Strap, and Decoration (Leaves & Curly Twig).
1. Pumpkin Body
Round 1:
- Start with a slip knot or magic ring.
- Ch 3. (This counts as the first dc.)
- Make 11 dc into the first chain (or magic ring). (Total: 12 dc.)
- Sl st into the top of the initial ch-3 to close the round.
Round 2:
- Ch 2 (counts as the first dc).
- Make 1 dc in the same st.
- Work 1 dc inc in each st around. (Total: 24 dc.)
- Sl st into the top of the initial ch-2 to close the round.
Round 3:
- Ch 1. Sc in the same st.
- Ch 1, work 3 dc into the same st.
- Repeat the sequence: Ch 1, Sc, Ch 1, 3 dc in each section around (6 sections total).
- Sl st into the first sc to close.
Round 4:
- Ch 1, sc in the same st, ch 1.
- Make 4 dc in the following method:
- 1st dc: Normal (on top of stitch).
- 2nd & 3rd dc: Work in between stitches.
- 4th dc: Normal (on top of stitch).
- Repeat: Ch 1, Sc, Ch 1, 4 dc around.
- Sl st into the first sc to close.
Round 5:
- Ch 1, sc in the same st, ch 1.
- Make 5 dc in the following method:
- 1st & 5th dc: Normal.
- 2nd, 3rd, and 4th dc: Work in between stitches.
- Repeat: Ch 1, Sc, Ch 1, 5 dc around.
- Sl st into the first sc to close.
Round 6:
- Ch 1, sc in the same st, ch 1.
- Make 6 dc in the following method:
- 1st & 6th dc: Normal.
- 2nd–5th dc: Work in between stitches.
- Repeat: Ch 1, Sc, Ch 1, 6 dc around.
- Sl st into the first sc to close.
Round 7 (Start Decreasing):
- Ch 1, sc in the same st, ch 1.
- Make 5 dc in the following method:
- Skip 1 st, work between stitches for 1st–4th dc.
- 5th dc: Normal.
- Repeat: Ch 1, Sc, Ch 1, 5 dc around.
- Sl st into the first sc to close.
Round 8:
- Ch 1, sc in the same st, ch 1.
- Make 4 dc in the following method:
- Skip 1 st, work between stitches for 1st–3rd dc.
- 4th dc: Normal.
- Repeat: Ch 1, Sc, Ch 1, 4 dc around.
- Sl st into the first sc to close.
Round 9:
- Ch 1, sc in the same st, ch 1.
- Make 3 dc in the following method:
- Work between stitches for the 1st and 2nd dc.
- 3rd dc: Normal.
- Repeat: Ch 1, Sc, Ch 1, 3 dc around.
- Sl st into the first sc to close.
Round 10 (Add Color and Drawstring Loops):
- Attach the new yarn color.
- Work sc around (only in the top of stitches, NOT the chains from previous rounds). (Total: 24 sc.)
- Sl st into the first sc to close.
Round 11:
- Ch 3, skip 1 st.
- Work hdc, ch 1, skip 1 st, repeat the sequence around.
- Sl st into the 2nd ch of initial ch-3 to close.
- Fasten off and weave in ends.
2. Strap
- Make a slip knot.
- Ch 60 (or to your desired length).
- Attach the strap by weaving it into the loops created in Round 11.
3. Decoration (Leaves & Curly Twig)
Leaf:
- Attach green yarn to any stitch.
- Ch 3.
- Work: 1 dc, ch 2, sl st into the same ch.
- Work: 2 dc, ch 2, sl st into the same ch.
- Work: 2 dc, ch 3, sl st into the same ch.
- Repeat to finish the shape of the leaf: 2 dc, ch 2, sl st into the same ch, then 1 dc, ch 3, sl st into the center to complete.
- Complete 2–3 leaves as desired.
Curly Twig:
- Attach brown or green yarn to the pumpkin.
- Ch 20 (or to desired length).
- Starting in the 2nd ch from the hook, make 2 sc in each chain down the length of the chain (Result: 38 sc).
- Sl st into the base stitch, fasten off, and weave in the ends.
Finishing Steps
- Close the bottom of the pumpkin pouch using a tapestry needle.
- Attach decorative elements (leaves and curly twig) securely.
- Add optional additional embellishments if desired.

Troubleshooting and Suggestions
Common Issues:
- Stitch Consistency: Ensure your tension remains even during the round increases to avoid an uneven shape.
- Handling Color Changes: Take care when adding the new yarn color by securing loose ends tightly to prevent unraveling.
- Curly Twig Troubles: If the twig isn’t curling well, double-check the number of single-crochet increases—it’s essential for creating the spiral effect.
Creative Modifications:
- Experiment with different yarn colors to create pumpkins in shades like green, white, or even sparkly yarn for a magical effect.
- Add beads or embroidery to the pumpkin for extra embellishment.
- Expand the design into a larger bag for storage or outdoor Halloween festivities.
- Skip the strap and use the pumpkin as a standalone decorative plush for seasonal decor.