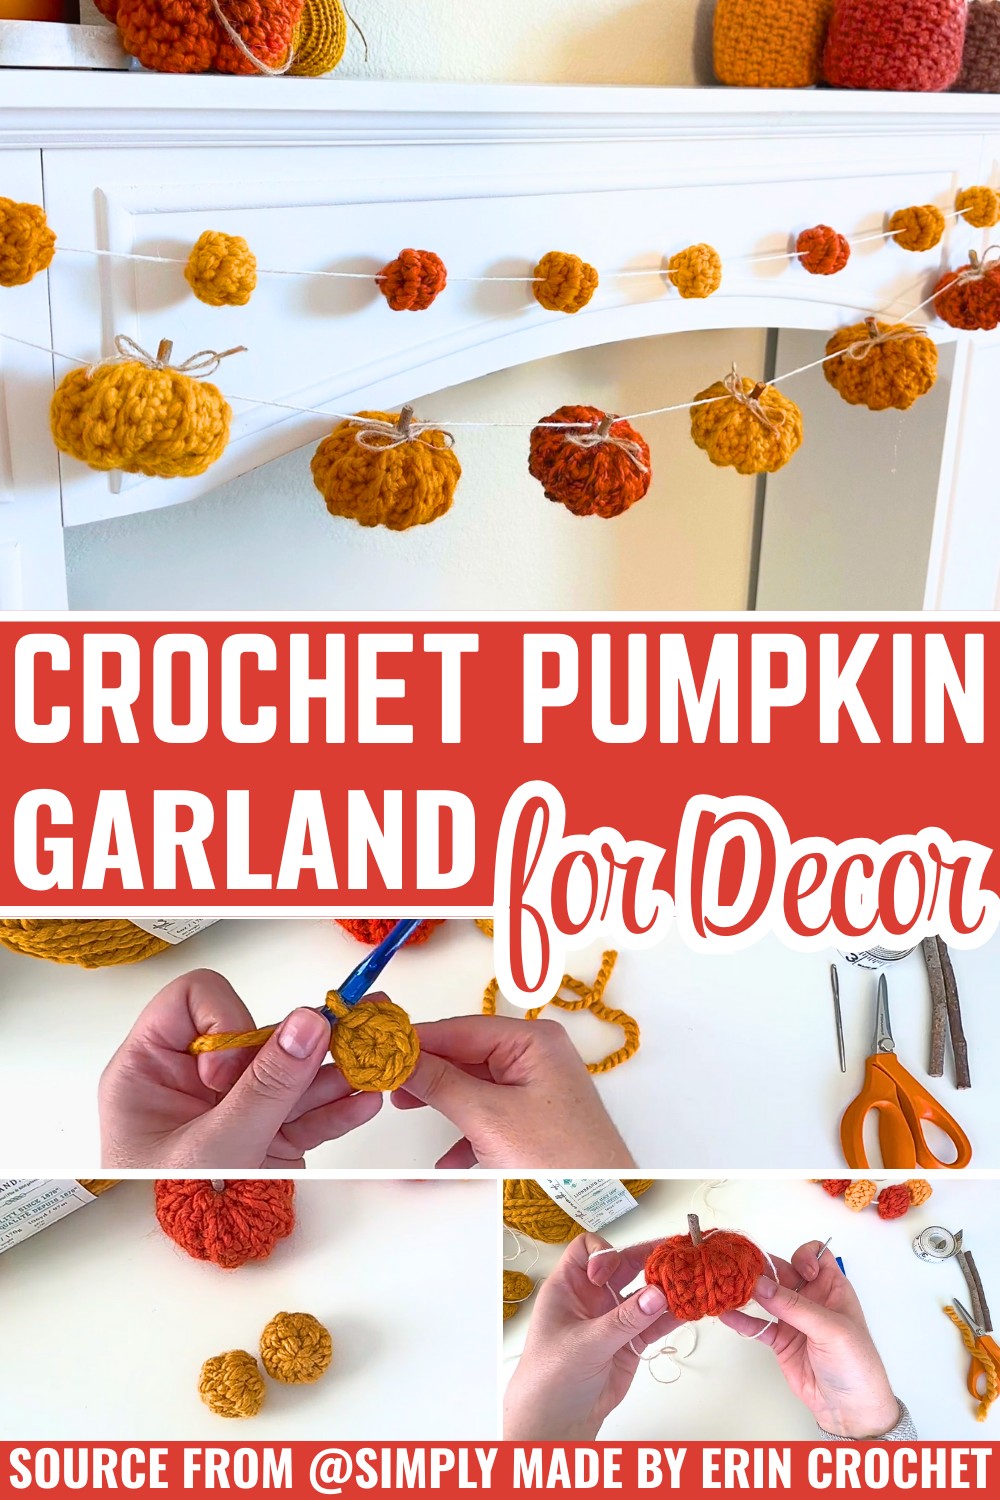
This pumpkin-and-balls garland is the perfect handmade touch for fall décor, whether hung on a fireplace mantle or draped over a mirror.

This crochet pumpkin garland is the ultimate cozy decoration for the fall season. Crocheted pumpkins paired with little balls make the perfect decoration for a fireplace mantel, mirror, wall, or even use them as table decor! It’s a wonderful way to invite those cozy fall vibes into any room.
Crochet Pumpkin Garland – Fall-Ready Festive Charm
The charm of this crochet pumpkin garland is in its simplicity, making it perfect for beginners. The crochet pumpkin shapes, combined with round crochet balls, are strung together using twine for a clean and sturdy finish. The crocheted pumpkins and balls are small, soft, and cute, and they look great with twine for a natural appearance. You can mix and match colors to fit your space or season, and the pattern is easy to adjust for any length you need.
Credit Simply Made by Erin Crochet
Key Features and Construction Highlights:
- Based on a mini rib pumpkin pattern, scaled down slightly for garland-sized pumpkins.
- Utilizes super bulky yarn (Lion Brand Wool-Ease Thick & Quick or roving yarn) and an 8mm crochet hook for quick construction.
- Features small crocheted balls made using a magic circle and invisible single crochet decreases. No polyfill required—just tuck in the yarn tails for stuffing!
- The pumpkins are embellished with stems (wooden sticks or crochet stems) and attached to twine along with the crocheted balls for a spaced or clustered garland design.
- Requires simple techniques like working in the round, single crochet, and slip stitch joins.
Overview of Construction
This festive garland begins with scaled-down pumpkins inspired by an existing mini rib pattern. By chaining seven instead of nine and working 19 rows instead of 21, you create petite pumpkins that are perfectly suited for garland assembly. After crocheting these tightly-stitched mini pumpkins, they’re stuffed with polyfill and finished with charming stems, which can be made from wooden sticks, outdoor finds, or even crochet. Elegant and rustic, these pumpkins become the centerpiece of the garland.

The adorable balls are made next, using a magic circle to start and working several rounds with single crochet increases and invisible decreases. The clever trick here is that the balls don’t require polyfill stuffing—simply tuck the leftover yarn tail inside to ensure the balls maintain their shape. Each ball is spaced among the pumpkins on twine, allowing for custom arrangements to suit various décor styles.

Crocheting the garland involves threading the pumpkins and balls onto long twine. The pumpkins are carefully attached behind the stem by slipping the twine under a stitch for stability, while the balls are strung straight through their centers using a tapestry needle. The result is a versatile garland with a polished yet handmade appearance that’s ready to hang anywhere from mantles to mirrors, bringing cozy fall vibes to your space.

Unique Features and Decorative Touches
The pattern creates a rustic aesthetic with the use of super bulky yarn in rich autumn hues like “Mustard,” “Fall Leaves,” and “Butterscotch.” For a more felted effect, working with roving yarns such as Fluff of the Andes adds an extra dimension to the design. However, when using roving yarn, care must be taken as it can break easily during shaping and weaving. This fragility is worth overcoming to achieve the textured, whimsical look of soft, woolly garland pieces.
To elevate the overall presentation, the pattern suggests tying bows with twine or experimenting with different spacing and combinations of pumpkins and balls. Color choices are limitless, ranging from classic orange and yellow hues to more modern palettes like cream and sage green, ensuring this garland easily adapts to every interior.

Video Tutorial
Materials
Here’s what you’ll need to get started:
- Yarn:
- Lion Brand Wool-Ease Thick & Quick (Size 6 Super Bulky Yarn) in colors like mustard, fall leaves, butterscotch, or any combination of your preference.
- Optional: Knit Picks Fluff of the Andes roving yarn in bright mustard yellow (color: “Caution”) and orange (color: “Solar Flare Heather”). Note: Roving yarn requires gentle handling as it breaks easily.
- Crochet Hook: Size L/8mm.
- Accessories:
- Tapestry needle (for weaving ends and assembling pieces).
- Flexible measuring tape (for checking gauge).
- Scissors.
- Polyfill stuffing for pumpkins (balls don’t need stuffing).
- Stems or sticks for pumpkin tops (Amazon or collected sticks).
- Twine (approximately 80 inches per strand; natural or white).
- Hot glue (optional, for securing stems).

Stitch Guide
You’ll need these basic stitches and techniques:
- Magic Ring: Wrap yarn around your fingers and create a small circle to begin working stitches.
- Single Crochet (sc): Insert hook, yarn over, pull through, yarn over again, pull through two loops.
- Slip Stitch (sl st): Insert hook into a stitch, yarn over, pull loop directly through both stitches.
- Invisible Single Crochet Decrease: Work into the front loop of two consecutive stitches, yarn over, pull up a loop, yarn over, pull through both loops.
Notes
- Customizing Pumpkin Size: This mini pumpkin pattern is a scaled-down version of the creator’s ribbed pumpkin pattern. Chain seven instead of nine and crochet 19 rows instead of 21 to achieve a smaller pumpkin.
- Gauge Tips: Ensure stitches are tight enough to avoid gaps, especially for the balls (to prevent polyfill from showing through).
- Stems: You can crochet stems or use natural sticks for an added rustic touch.
Pattern Instructions
Step 1: Crochet Decorative Balls
- Create a Magic Ring: Wrap yarn around your finger twice. Insert your hook underneath both loops, yarn over, pull up a loop, and chain 1 to secure.
- Round 1: Work 6 single crochet into the magic ring. Pull the tail tightly to close the circle. Join with a slip stitch into the first single crochet.
- Round 2 (Increase Round): Chain 1 (does not count as a stitch). Work 2 single crochet into each stitch around (12 total stitches). Join with a slip stitch.
- Check Gauge: After Round 2, the ball should measure approximately 2 inches across.
- Round 3 (Decrease Round): Using the invisible single crochet decrease technique, work 6 decreases around (front loops only). Slip stitch into the first decrease stitch and cut a small tail.
- Secure Tail: Turn the ball inside out, then weave the tail into the base of the magic ring to secure. Flip it back right side out.
- Finish Ball: Take the long tail and stuff it inside the ball before cinching the top with your tapestry needle. Thread through the front loops of the final round, pull tight, and weave the yarn ends to secure.
Repeat this process to create as many balls as desired.
Step 2: Crochet Mini Pumpkins
- Start by following the creator’s ribbed mini pumpkin pattern with the adjustments:
- Chain 7 instead of 9.
- Crochet 19 rows instead of 21.
- Assemble your pumpkin by shaping it into a circle, stuffing it with polyfill, and sewing closed with a tapestry needle.
- Add a stem: Use hot glue to attach a stick or crochet a small stem to glue in place.
Step 3: Assemble the Garland
- String the Decorative Balls: Cut a long piece of twine (approx. 80 inches). Thread twine onto your tapestry needle and string each ball by inserting the needle through the center (starting from the magic circle and exiting through the closing hole). Space the balls evenly along the twine.
- Attach Pumpkins: For pumpkins, thread the twine through the yarn loops near each pumpkin’s stem to secure them in place. Space evenly between the balls.
- Add Decorative Twine Bows (Optional): Tie small bows around the twine at the back of the pumpkins for a polished look.
Step 4: Display Your Garland
- Use Command hooks to hang your garland on a mirror, fireplace mantel, or anywhere you’d like to add a touch of fall charm. Create knots at the ends of the twine to secure in place.
Troubleshooting and Suggestions
- Avoid holes or gaps in your stitches: Use an accurate gauge to ensure the pumpkins and balls don’t show any stuffing or lose their shape. Tight stitching helps maintain a cohesive look.
- Careful handling of roving yarn: Roving yarn can break easily when pulling stitches tight or weaving ends; use a light hand when cinching the yarn. Crochet balls densely to minimize strain on the yarn.
- Spacing adjustments: Experiment with spacing pumpkins and balls for varied effects. If you prefer a solid ball garland, make more balls and string them close together to create a continuous design.
- Color flexibility: Use traditional autumn shades or branch out into unusual combinations (e.g., pastel pumpkins for a shabby-chic aesthetic or monochrome balls for a minimalistic vibe).
- Alternate embellishments: Swap wooden stems for crocheted stems, twine bows for ribbons, or even add embroidered accents to pumpkins for added flair.