
These charming turkey-shaped coasters combine versatility and autumnal charm, making them the perfect addition to your seasonal décor.

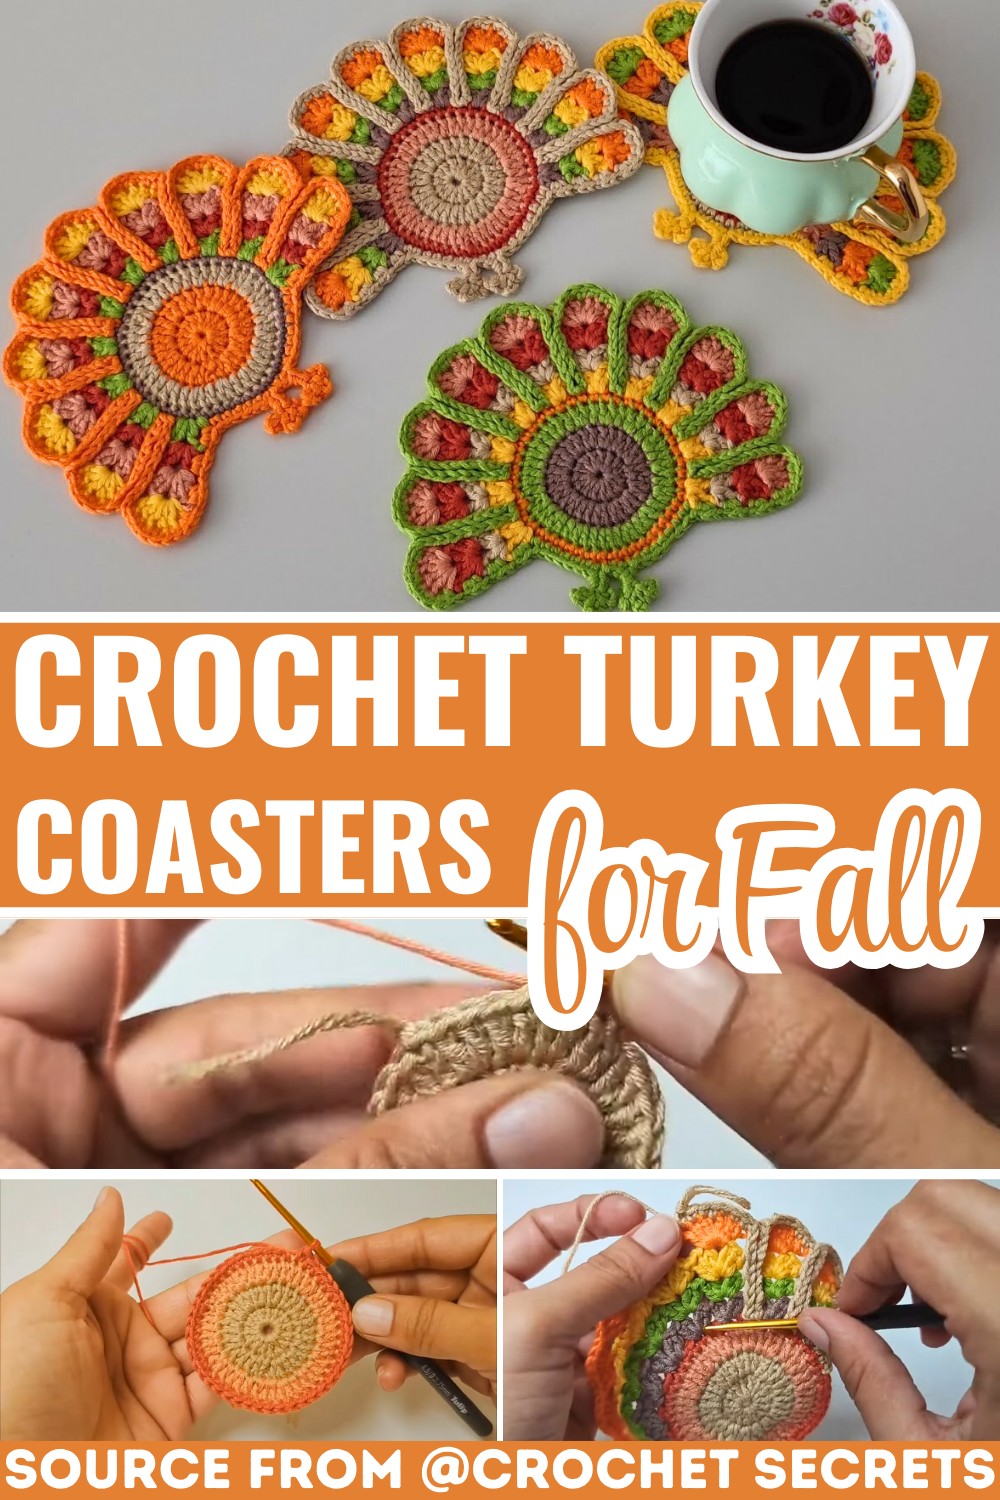
Add a festive touch to your fall decor with these charming Crochet Turkey Coasters. Designed with a circular base and fan-like tail feathers, they bring a playful seasonal vibe to your table setting. The layered color rounds and multicolor feather arrangement make each coaster a delightful pop of autumn-inspired hues. Their thoughtful, coaster-friendly construction promises both style and utility.
Crochet Turkey Coasters for Fall
These adorable coasters are perfect for Thanksgiving gatherings or cozy autumn evenings at home. Crocheted to highlight the warm colors of the season and inspire festive cheer, they’re functional table accessories that also double as fun decor.
Handmade items like these carry a personal and unique charm. The balance of simplicity and detail here ensures they’ll blend in beautifully with your fall theme while protecting your surfaces. These coasters are the perfect mix of whimsy and practicality, making them a wonderful addition to any home or a thoughtful holiday gift.
Key Features and Construction Highlights:
- Start with a sturdy body: Worked in increasing rounds to form the base of the turkey.
- Colorful, layered feathers: Achieved with fun group stitch techniques and vibrant color changes.
- Simple embellishments: Includes the turkey’s head, feet, and decorative wattle for added personality.
- Skill-building opportunities: Practice techniques like magic rings, cluster stitches, and color changes.
- Customizable designs: Create unique turkeys with different yarn colors and decorative details.
The turkey coaster begins with the body, a solid circular base made by working in increasing double crochet rounds. Starting with a magic ring ensures a nice, tight center, providing a polished start to your turkey-shaped creation. As you build the body, alternating stitch increases create a smooth, evenly expanding circle, perfect for functional coasters.

Next comes the burst of feathers, where creativity truly shines. Using vibrant contrasting colors, these decorative clusters are stitched in layers, giving depth and personality to your turkey. The feathers are formed by repeating groups of 2 double crochets, a chain, and more double crochets in skip spaces or chain loops, creating a scalloped design. The final feather row finishes with larger, more dramatic stitches, making the turkey’s tail the standout feature.

Once the body and feathers take shape, it’s time to crochet the head and feet to bring your turkey to life! A simple series of single crochet stitches creates the turkey’s head detail, while dainty clusters and chains are used for the feet—a fun, playful addition at the bottom of the coaster. Attach these securely with single crochets for durability.

Finally, embellishments like the wattle and decorative details are crocheted separately and added with care. This step is where you can really let your creativity flow—experiment with unique shapes or use embroidery to give your turkey extra flair.

Step-by-Step Pattern
Materials
To make your Turkey Coasters, you’ll need the following:
- Yarn: Himalaya Himagurumi cotton yarns (or any soft cotton yarn in multiple colors)
- Suggested colors: Brown (body), yellow (beak/feet), red, orange, and green for decorative feathers
- Crochet Hook: 2.75 mm
- Optional Tools:
- Scissors
- Stitch markers (for keeping track of rounds)
- Yarn needle (for weaving in ends)

Pattern Instructions
Step 1: Start the Turkey Body
- Begin with a magic ring.
- Row 1: Chain 3 (counts as first dc). Make 15 double crochets into the ring (16 total including chain). Close the round with a slip stitch into the top of the first chain.
- Row 2: Chain 3. Make 2 double crochets into each stitch from the previous row. (Total: 30 stitches). Close the round with a slip stitch.
Step 2: Continue Building the Body
- Row 3 (Increasing Row):
- Chain 3, double crochet into the same space.
- Alternate stitches: 1 double crochet into the next stitch, 2 double crochets into the next. (Repeat: 1v, x dc)
- Finish the row with a slip stitch.
Step 3: Change Colors for Contrast
- Attach a new yarn color.
- Row 4: Chain 1 and work single crochets (sc) into each stitch around. Use a slip stitch to close the round.
Step 4: Form Decorative Feather Groups
- Change to another contrasting color.
- Row 5: Chain 3. In the first stitch, make:
- 2 double crochets, 1 chain, 2 double crochets into the same space.
- Skip 2 spaces, then repeat (make 10 groups of feathers total by skipping spaces).
- End the row with a slip stitch.
Step 5: Add Layers to the Feathers
- Change colors again.
- Row 6: Repeat the process for the feather groups, but continue in the chain spaces of the previous feather row. (2 dc, 1 ch, 2 dc in each space).
- Row 7: Switch colors and make larger feather clusters. Do this by making:
- 3 double crochets, 1 chain, 3 double crochets into each chain space.
Step 6: Create Head and Face
- Use brown yarn to add the turkey’s head detail by crocheting smaller clusters and single crochets at the top edge of the body.
Step 7: Crochet the Feet
- Use yellow yarn to create the feet:
- Chain 6, slip stitch into the 5th chain to form a toe.
- Make 4 chains, slip stitch into the same space (repeat for 2 more toes).
- Attach the feet securely to the bottom of the body with single crochets.
Step 8: Add Final Decorations
- Use red or orange yarn to crochet a wattle or any decorative touches.
Pattern Question
Question: How can I adjust the size of the coasters?
Answer: You can increase the size by adding extra rows of double crochets or modifying the number of groups in the circular rows. This allows you to create larger coasters while maintaining the design’s balance.
Troubleshooting and Suggestions:
Common Issues:
- Keeping edges clean: Be mindful of slip-stitch joins when closing rounds; overly tight stitches may cause warping.
- Color changes: To avoid gaps or visible joins, carry your yarn neatly and practice seamless transitions at the start of new rounds.
- Consistent feather shaping: Keep track of stitch counts and chain loops in the feather rows to maintain a uniform look.
Creative Modifications:
- Experiment with colors: Use bold hues for feathers or subtle tones for a modern fall aesthetic.
- Extra embellishments: Add googly eyes, a felt beak, or embroidered features for a whimsical design.
- Turn it into a decoration: Rather than coasters, turn one into wall art or garlands for festive décor.


