
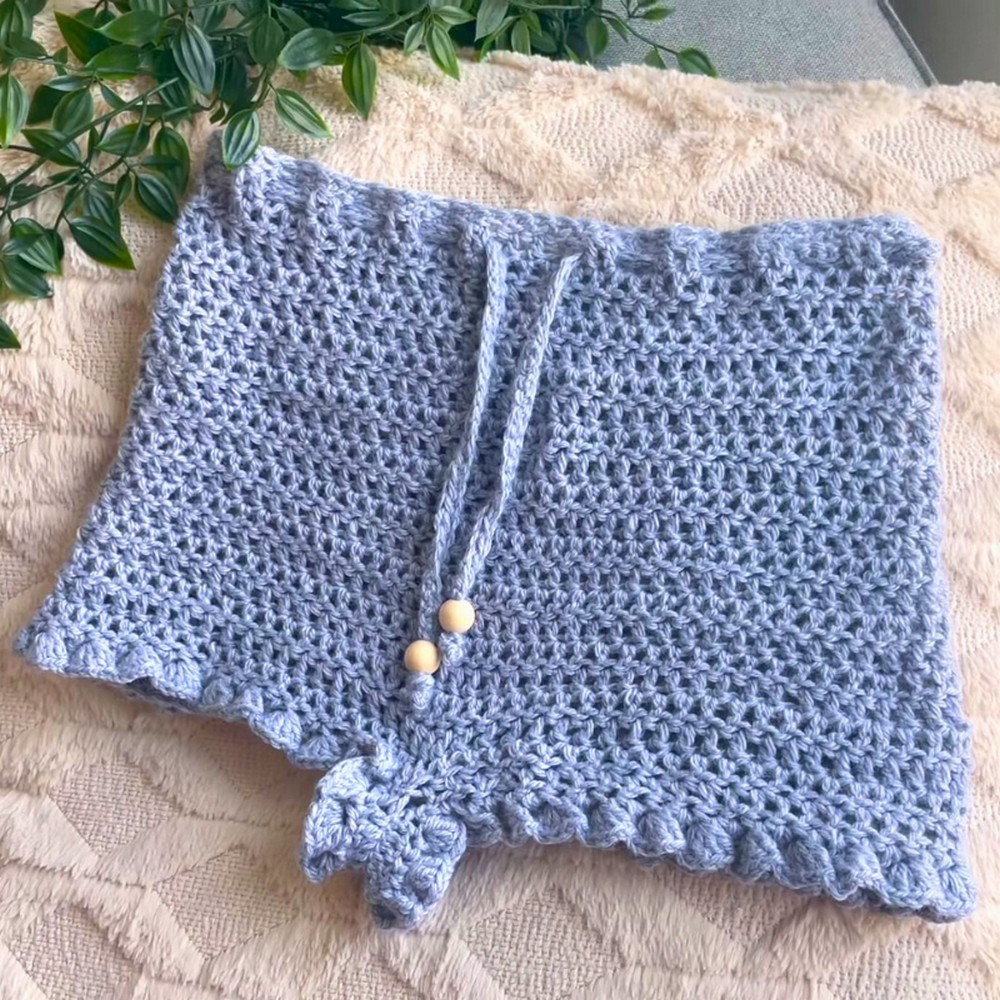
Crochet Ruffle shorts are a fun and stylish addition to your wardrobe, perfect for sunny days. These shorts stand out with their playful ruffles and snug, custom fit. Whether you’re heading to the beach, relaxing by the pool, or lounging at home, they’re designed to keep you comfortable while adding a touch of charm to your look.
Crochet Ruffle Shorts Tutorial
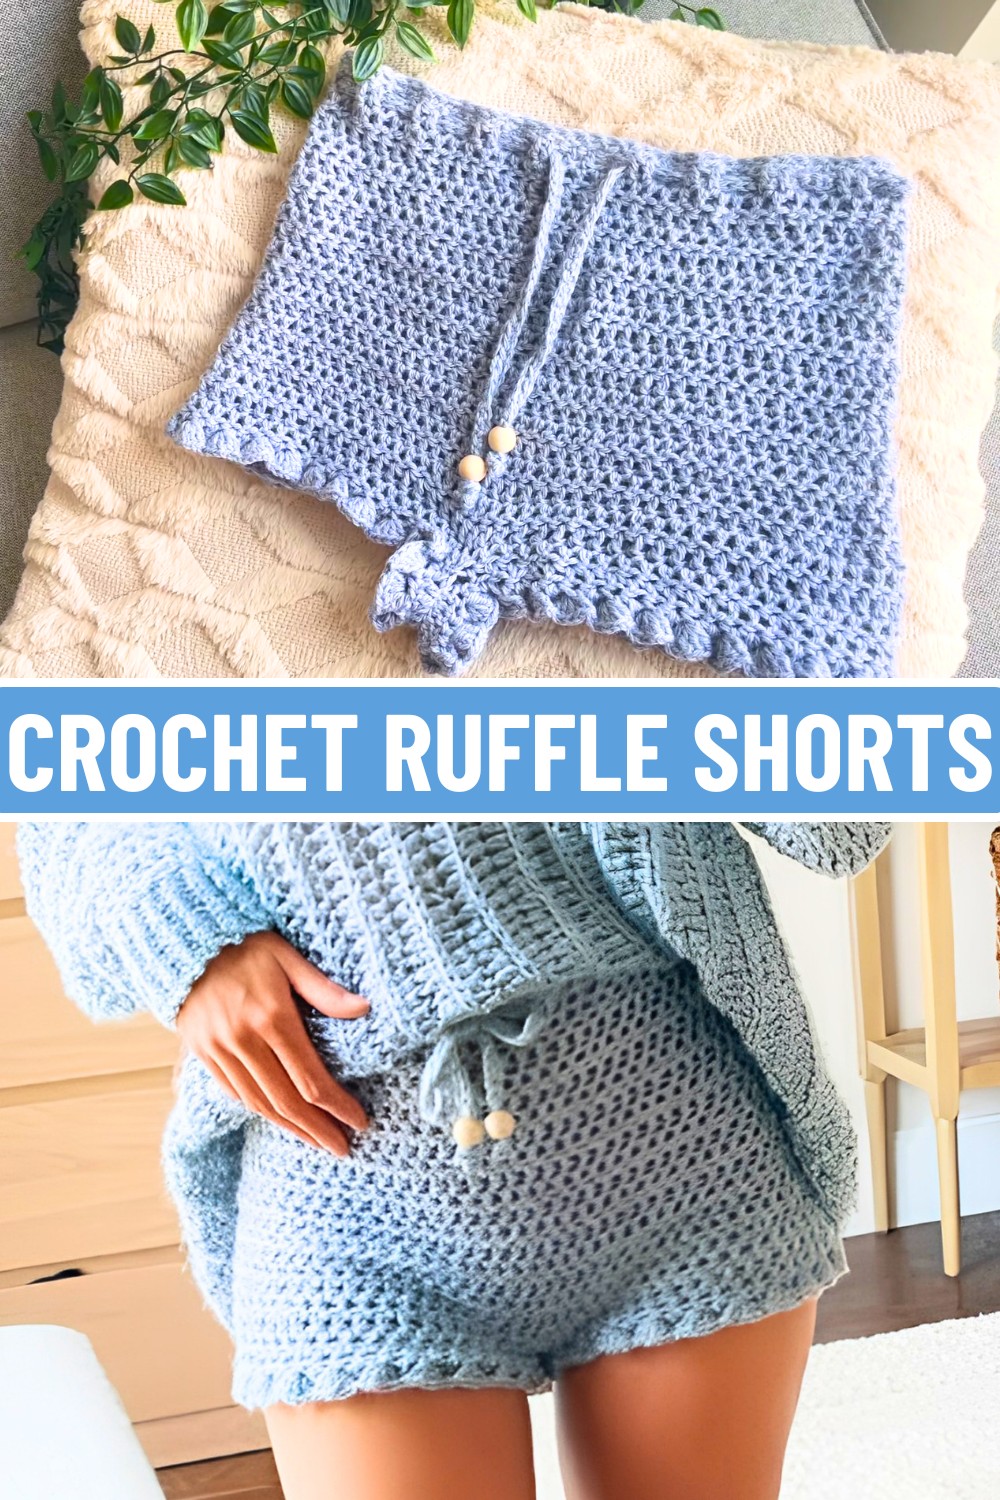
Making these crochet shorts is easier than you might think. They’re beginner-friendly and can be customized to fit your exact measurements. You can pick your favorite yarn and hook size to match your style and preference. Simple stitches shape the waistband and legs, while the ruffles add texture and flair. You can even add a tie at the waist for extra flair, complete with beads for a cute finish.
Credit petpetcrochets
Materials & Tools Needed
- Yarn: DK weight (Size #3) yarn.
- Hook Sizes:
- Main Body: 6.5mm crochet hook.
- Crotch and Ruffles: 4.0mm crochet hook.
- Optional: Beads for tie ends.
- Other Supplies:
- Tape measure for measurements.
- Stitch markers.
- Darning needle for weaving in ends.
- Scissors.
Finished Size & Customization Ideas
- Finished Shorts Size:
- The shorts are tailored to the crocheter’s own measurements. The measurements used by the creator were:
- Waist: 25 inches.
- High Hip: 28 inches.
- Full Hip: 35 inches.
- These shorts were created to be high-waisted.
- The shorts are tailored to the crocheter’s own measurements. The measurements used by the creator were:
- Customization Ideas:
- Use different yarn weights for different textures.
- Adjust the waistband and hip increases for a tighter or looser fit.
- Change the ruffle spacing (e.g., skip fewer or no posts for tighter ruffles).
- Add rows for longer shorts or stop earlier for short shorts.
Pattern Abbreviations & Terminology
- ch: Chain.
- dc: Double Crochet.
- sl st: Slip Stitch.
- fsc: Foundation Double Crochet.
- YO: Yarn Over.
- st(s): Stitch(es).
- terminology: US terms are used throughout this pattern.
Step-by-Step Instructions
1. Waistband
- Measure your waist circumference. For this pattern, the example size is 25 inches.
- With the 6.5mm hook, create a Foundation Double Crochet (fsc) chain long enough to measure your waist circumference when slightly stretched.
- Example: This was 25 inches for the creator.
- If you prefer, you can start with a regular chain and work a row of DC, but the fsc method is recommended for flexibility.
- Join the ends to form a round:
- Insert your hook into the top of the first fsc, sl st to join. Ensure the loop is not twisted.
2. Waistband Section
- Row 1 (DC row):
- Ch 2.
- Work 1 dc into each st around.
- At the end of the round, sl st into the top of the starting ch-2 to join.
- Rows 2-3:
- Repeat Row 1 until your waistband is the desired thickness.
- Example: The creator worked 2-3 rows to make a waistband about 2 inches thick.
3. Hip Increases
- Place a stitch marker at both side seams for evenly spaced increases.
- Increase Row:
- Ch 2.
- Work 1 dc into each st until you reach the first stitch marker. At the stitch marker, place 2 dc in the same st (increase).
- Continue with dc stitches until you reach the second stitch marker. Place 2 dc into the same st.
- Continue dc to the starting ch-2, then sl st to join.
- Alternate Increase Rows and No-Increase Rows:
- For No-Increase Rows: Work 1 dc per stitch all the way around.
- Repeat the alternating rows until you reach your hip circumference measurement.
- Example: The creator alternated rows until the circumference measured about 35 inches (17.5 inches folded in half).
- End this section when you are ready to start working on the crotch.
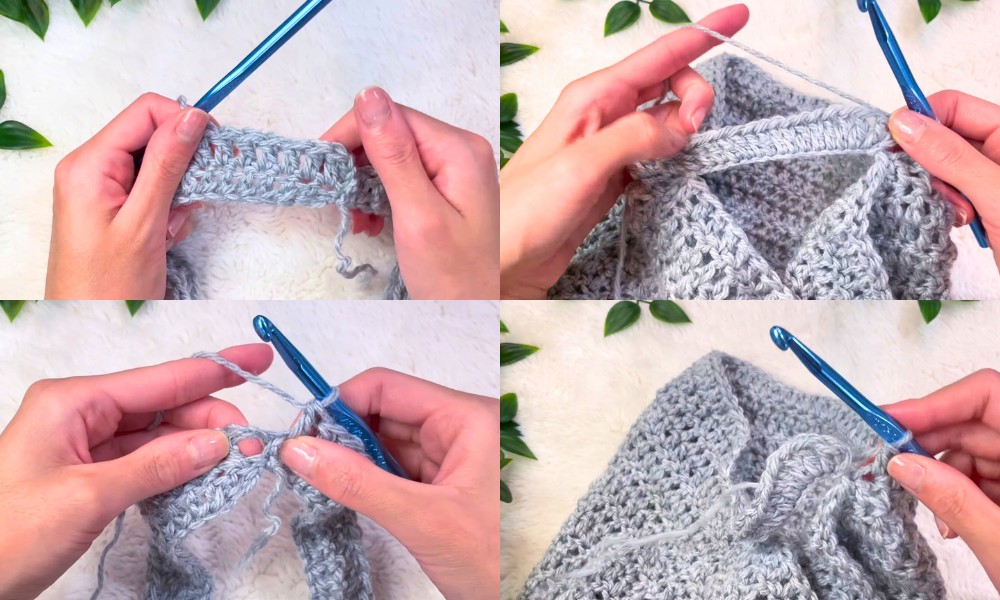
4. Leg Separation (Crotch Area)
- Mark the crotch area:
- Fold the shorts in half and align the side seams. Use stitch markers to mark the center front and center back of the shorts.
- Use a smaller (4.0mm hook) for tighter stitches in the crotch region.
- Chain for Crotch:
- Attach yarn to the front center stitch marker.
- Ch enough to span about 2-2.5 inches across.
- Example: The creator made a 2.5-inch chain.
- Join the chain to the back center stitch marker with a sl st. This forms a loop for the crotch.
5. Pant Legs
- Leg Opening:
- Switch back to the 6.5mm hook.
- Work dc stitches into the top loops of the crotch chain and into each st around the leg opening.
- Sl st to join at the end of the round.
- Leg Rounds:
- Ch 2 at the start of each round. Work dc stitches all the way around. Sl st to join at the end of each round.
- Example: The creator worked 2 rounds per leg for short shorts.
- Ch 2 at the start of each round. Work dc stitches all the way around. Sl st to join at the end of each round.
- Secure:
- After completing the rounds, fasten off by chaining 1, cutting the yarn, and pulling through the loop.
- Repeat for the Second Leg: Follow the same steps.
6. Ruffles
- Use the 4.0mm hook for the ruffles.
- Attach yarn to any post stitch in the leg round.
- Ruffle Row:
- Work 5 dc around each post. Skip 1 post, then repeat 5 dc around the next post.
- Adjust spacing (e.g., skip no posts for denser ruffles).
- Join and Fasten Off:
- After completing the round, sl st to join, ch 1, cut yarn, and pull through.
- Repeat for the second leg.
7. Waist Tie
- With a 4.0mm hook, make a long chain (length depends on personal preference).
- Work 1 sc into each ch st across. Fasten off.
- Weave the tie through the waistband.
- Optional: Add beads or secure knots at the tie ends.
8. Finishing Touches
- Use the darning needle to weave in any loose ends.
- Block or steam the shorts lightly for finishing if desired.
Additional Notes
- The length and width of these shorts are completely customizable based on personal measurements.
- For looser shorts, adjust the increases and add rows to the pant legs.


