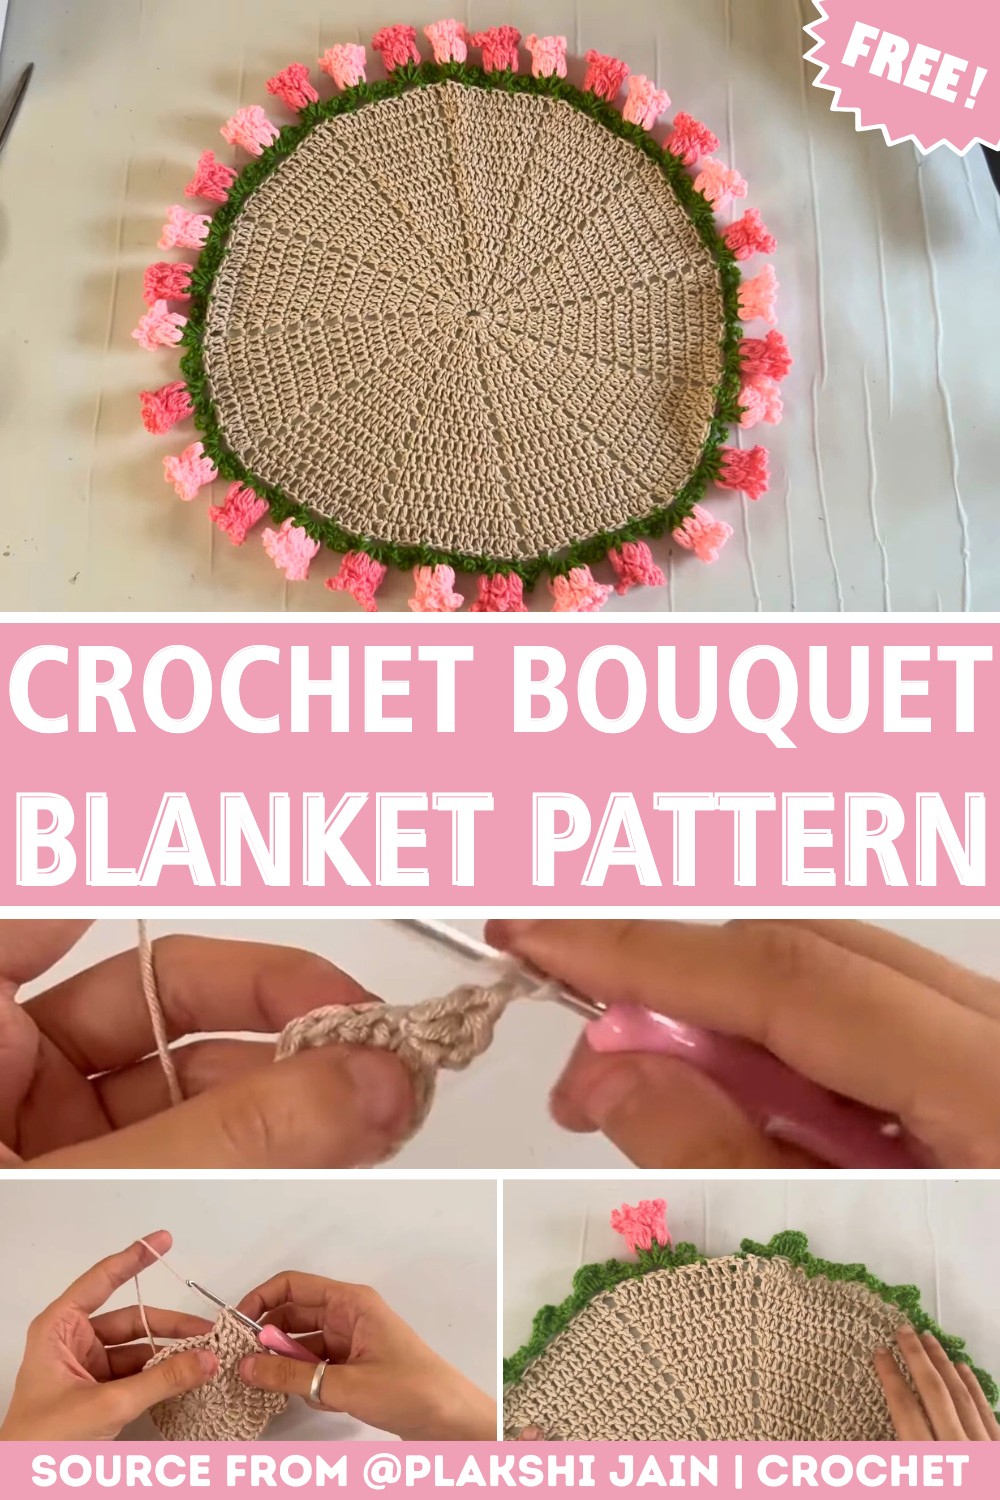
This delightful crochet blanket combines elegant floral motifs with textured stitches to create a charming, bouquet-inspired design perfect for adding a touch of beauty to any space.

The Crochet Bouquet Blanket is a delightful way to bring the beauty of flowers into your space. This blanket pattern is unique because it transforms simple yarn into charming flower motifs that look like delicate blossoms spread across a garden. If you want to add warmth to your bed, brighten up your couch, or give someone a thoughtful handmade gift, this crochet blanket is perfect for home decor and cozy comfort.
Crochet Bouquet Blanket Tutorial
Making this crochet blanket is simpler than it looks. Using just a variety of colorful yarns, you create intricate flower shapes and leaves that come together seamlessly. While working on it, you’ll use basic stitches to shape the petals, leaves, and lace-like borders. Even beginners can enjoy the learning process and see their skills bloom.
Credit Plakshi Jain | Crochet
Pattern Highlights
- Beginner-Friendly Construction: This tutorial starts with simple techniques like magic rings and basic double crochets, gradually introducing shaping for floral embellishments.
- Worked in Rounds: The blanket builds outward in concentric rounds, increasing stitches to achieve desired size.
- Elegant Flower Embellishments: Elaborate floral and leaf patterns are added using creative stitch combinations, such as chains, double crochets, and slip stitches.
- Versatile Yarn Choices: Use polyester, cotton, acrylic, or any yarn of your choice to suit your preferred texture.
- Customizable Dimensions: The pattern repeats easily, allowing you to tailor the blanket’s size and colors to your liking.
The blanket begins with the foundational magic ring, which serves as the centerpiece of the design. After securing the ring with chains, the first round is filled with double crochets, setting the circular structure. This round-by-round expansion integrates increases at regular intervals to maintain a smooth, symmetrical shape, making the base effortless to grow for beginners.

As the rounds progress, the stitch pattern evolves by introducing chain spaces and groups of double crochets. These create a lush, textured appearance reminiscent of blooming petals. Each round builds upon the last, adding depth and structure while staying consistent with familiar crochet techniques.
Once the base is completed, the tutorial transitions into the decorative phase. Using a secondary yarn color, scalloped edges form using chains and single crochets, resulting in a beautiful, curved finish. These chain spaces prepare for the placement of detailed motifs, where flowers and leaves are cleverly crocheted directly into the gaps for an integrated bouquet effect.

Adding the floral embellishments brings life to the design. Flowers are created using unfinished double crochets, which are then gathered into delicate petals bound by slip stitches. Leaf patterns are shaped with chains and slip stitches to complement the flowers, creating a stunning contrast. Together, they form a harmonious bouquet along the edges of the blanket.
With the floral and leaf details complete, the blanket is ready to be finished. The tutorial emphasizes neat slip stitches and trimming excess yarn for a polished, professional look. The end result is a vibrant, textured blanket filled with dimensional blooms that mimic a field of flowers.

Video Tutorial
Step-by-Step Pattern
Materials
To create your Crochet Bouquet Blanket, gather the following materials:
- Yarn: Polyester yarn is used in the tutorial, but you can substitute with cotton or acrylic based on your preference.
- Hook Size: 3 mm or 3.5 mm crochet hook (depending on your desired flexibility and gauge).
- Optional Tools:
- Scissors (for cutting yarn ends).
- Tapestry needle (for weaving in ends).

Pattern Instructions
Foundation Circle
- Start with a magic ring. Follow the tutorial’s guide for forming the loop (creating two parallel lines and crossing them).
- Chain 1 to secure the ring and make one additional chain.
- Work 12 double crochets (DC) into the magic ring. Keep count, and adjust if needed.
- Pull on the tail end of the magic ring to tighten and close the circle.
Round 2
- Slip stitch (SL ST) into the first stitch to begin the second round.
- Chain 2.
- In the first stitch, make 2 double crochets (DC).
- Chain 1.
- Repeat the following sequence:
- 2 double crochets in the next stitch.
- Chain 1.
- Continue this pattern around the circle.
- Slip stitch into the first stitch to finish Round 2.
Round 3
- Start with Chain 2.
- For every set of stitches created in the previous round:
- Make 1 double crochet in the first stitch.
- Make 2 double crochets in the following stitch.
- Chain 1 and skip the chain spaces from the previous row.
- Repeat the sequence above until the round is complete.
- Slip stitch into the first stitch to close the round.
Subsequent Rounds
- For each new round, repeat the following process:
- Add 1 more single double crochet (DC) to the start of each cluster (e.g., in Round 4: make 1 DC into the first 3 stitches and 2 DC into the 4th stitch).
- Chain 1 and skip the chain spaces created in the previous row.
- Continue this repetitive process until the blanket reaches your desired size.
Leaf and Flower Decoration
Creating Leaves:
- Switch to green yarn. Secure it with a slip stitch into any stitch on the blanket.
- Chain 4. Skip 2 stitches and make a single crochet (SC) into the third stitch.
- Repeat: Chain 4, skip 2 stitches, and single crochet into the next stitch.
- Work this sequence around the entire blanket edge.
Creating Flowers:
- Into each space created by the green chains, begin the flower design.
- For each flower:
- Make a single crochet (SC).
- Chain 3.
- Work 4 unfinished double crochets into the same space and pull through all loops at once. Chain 1.
- Repeat this 4 more times to form the flower’s 5 petals.
- Secure the flower with a slip stitch at the base.
Adding Details to the Flower Petals:
- In each petal hole, work the following pattern:
- Double crochet.
- Chain 3.
- Turn back and slip stitch into the base of the petal.
- Double crochet again, chain 3, and slip stitch.
- Repeat for all petals to add dimension to the flower design.
Finishing Touches
- Weave in all ends using the tapestry needle. Trim excess yarn.
- Block your blanket to ensure the shape and flowers remain intact.
Pattern Question
Q: Can I adjust the size of the blanket?
A: Yes! The blanket size can be customized by adding or reducing the number of repeating rounds in the base design. Simply follow the same increase pattern for each round.
Troubleshooting and Suggestions
Common Issues
- Magic Ring Difficulties: For beginners, mastering the magic ring can be tricky. If your ring doesn’t tighten properly, try restarting and securing it with a tighter knot.
- Stitch Count: Losing count in rounds can disrupt symmetry. Use stitch markers or count aloud when working double crochets.
- Petal Shapes: Ensure your unfinished double crochets are tall enough to create well-defined petals. Pull through all loops carefully to avoid unraveling the flower.
Creative Modifications
- Color Variations: Experiment with gradient yarns for the blanket background or use different colors for each flower to create a vibrant garden effect.
- Alternative Embellishments: Replace flowers with motifs like stars or popcorn stitches for a personalized design.
- Adaptable Uses: Use the pattern to create small throw blankets, table runners, or pillow covers by altering the size and number of motifs.
- Edge Customization: Add a border of simple shells or picots to frame the finished blanket.