Quick Crochet Tea/Coffee Coaster Pattern
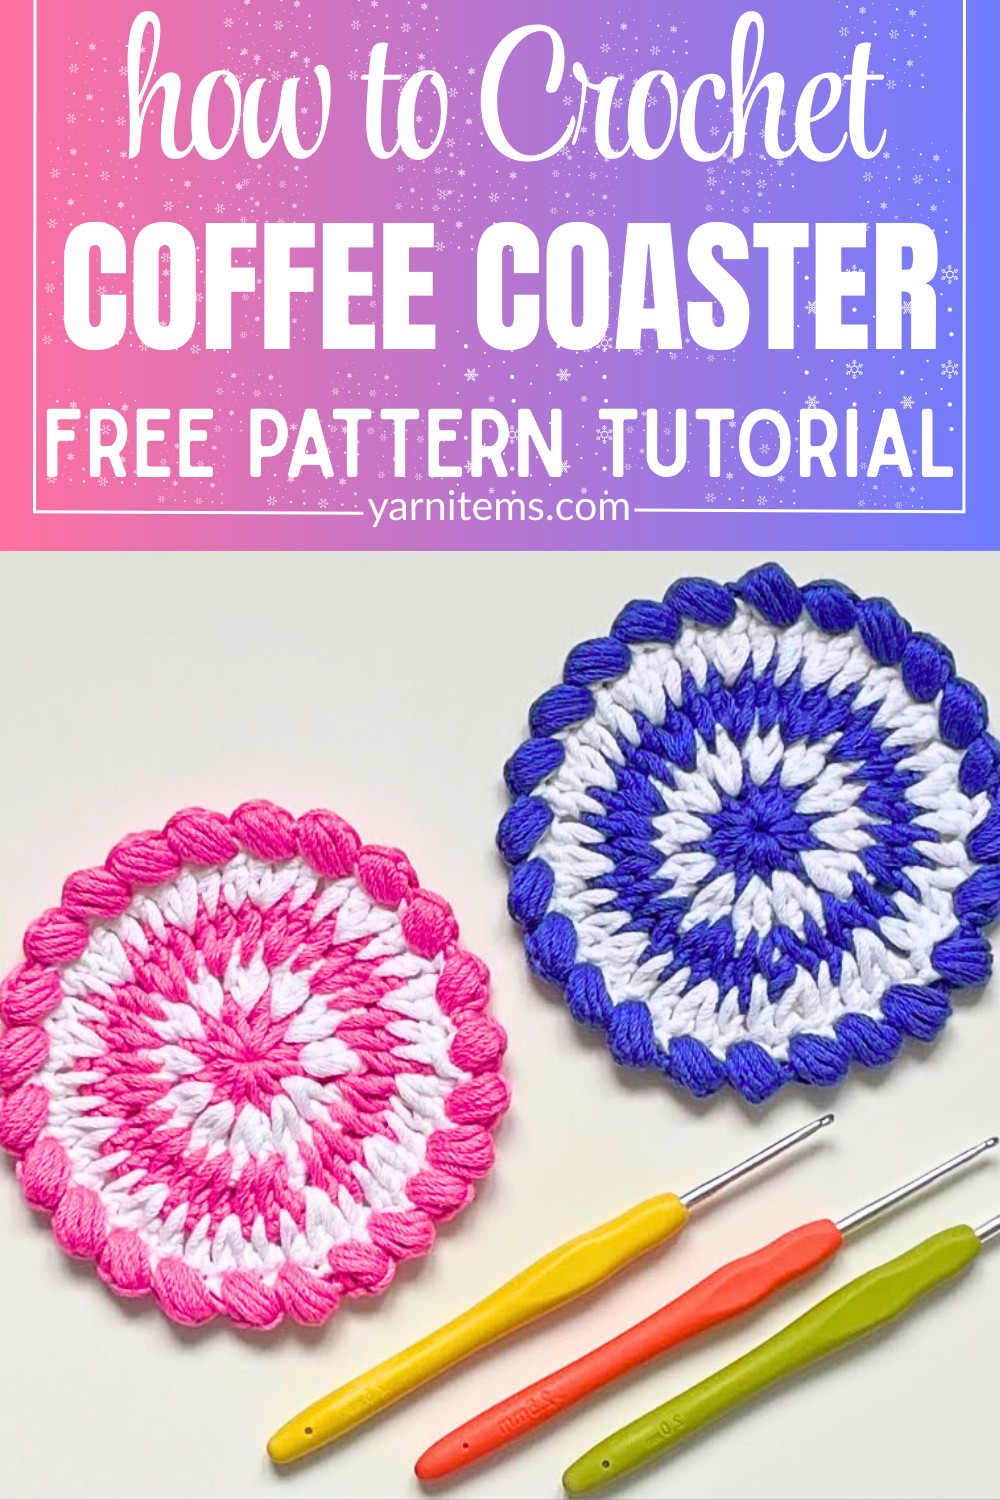
A handmade coaster can instantly make a simple tea or coffee break feel a little more inviting. This crochet design pairs a neat center with a textured border, creating a piece. That looks attractive, while helping protect your table from everyday cup marks.
It works beautifully with any color palette, making it easy to create a set that suits your home or to stitch thoughtful crochet handmade gifts in very little time.

If you’re looking for a piece that comes together quickly without sacrificing detail, this pattern is a great place to start. The instructions guide you through each step of making the crochet coaster.
Easy to recreate whether you’re making one or a full matching crochet set. Keep scrolling to see how this simple design transforms a few basic stitches into a practical piece you’ll reach for every day.
Credit Anutha – The Crochet World
Materials & Tools Needed
- Yarn: 100% Cotton Yarn in two contrasting colors (Color A and Color B).
- Crochet Hook: 3.0 mm (Size US 11/C-2 or D-3 depending on brand).
- Other Essentials:
- Scissors
- Tapestry needle (to weave in ends).
Finished Size & Customization Ideas
- Standard Size: Approximately 4 to 4.5 inches (10–11 cm) in diameter — perfect for standard mugs and teacups.
- Customization Options:
- Striped/Spiral Effect: Yarn carries up the back for seamless alternate color rounds.
- (You can choose to cut and tie off at every color change for a clean-edge look).
- Monochrome: Use a single color to emphasize stitch texture and the thick border.
Pattern Abbreviations & Terminology (US Terms)
- MR: Magic Ring (Magic Circle)
- ch: Chain
- sc: Single Crochet
- dc: Double Crochet
- st(s): Stitch(es)
- sl st: Slip Stitch
- sp: Space (worked between stitches, not in top loops)
- Puff st: Pull up a loop, [yarn over, insert hook into same stitch, pull up a loop] 4 times (8 loops on hook). Yarn over, pull through all 8 loops, ch 2.

Step-by-Step Crochet Instructions
Note on Hook Placement: For Rounds 2, 3, and 4, insert your hook into the spaces between posts of the stitches—not the top loops.
Round 1: Color A (12 Double Crochets)
- Create a Magic Ring using Color A.
- ch 1 to secure the ring (does not count as a stitch).
- Make 1 sc into the ring, then ch 1 (counts as your first dc).
- Work 11 dc into the magic ring.
- Pull the tail of the ring tight to close the center hole.
- Join: Skip the first sc + ch-1 start.
- Insert hook into the top of the second dc, then sl st to join.
- Do not cut Color A yet — pull the loop up slightly and drop it behind your work.
Stitch Count: 12 dc

Round 2: Color B (Increase to 24 Double Crochets)
- Take Color B. Insert your hook into any space between posts from Round 1.
- Pull up a loop, ch 1 to secure.
- Work 1 sc + ch 1 (counts as 1 dc), then work 1 dc in the same space.
- Pattern Repeat: Skip each stitch and work 2 dc in the spaces between stitches all the way around.
- Join: Sl st into the top of the second dc, leaving Color B live.
Stitch Count: 24 dc (12 sets of 2-dc clusters)

Round 3: Color A (Increase to 36 Double Crochets)
- Pick up Color A’s loop. Slip stitch or pull it through to the top of the current stitch.
- Insert hook into the space between the next two stitches.
- Work 1 sc + ch 1 (first dc), then 1 dc in the same space.
- Pattern Repeat: Alternate [2 dc in next space, 1 dc in following space] around the round.
- Join: Sl st in top of second dc.
- Drop Color A loop.
Stitch Count: 36 dc
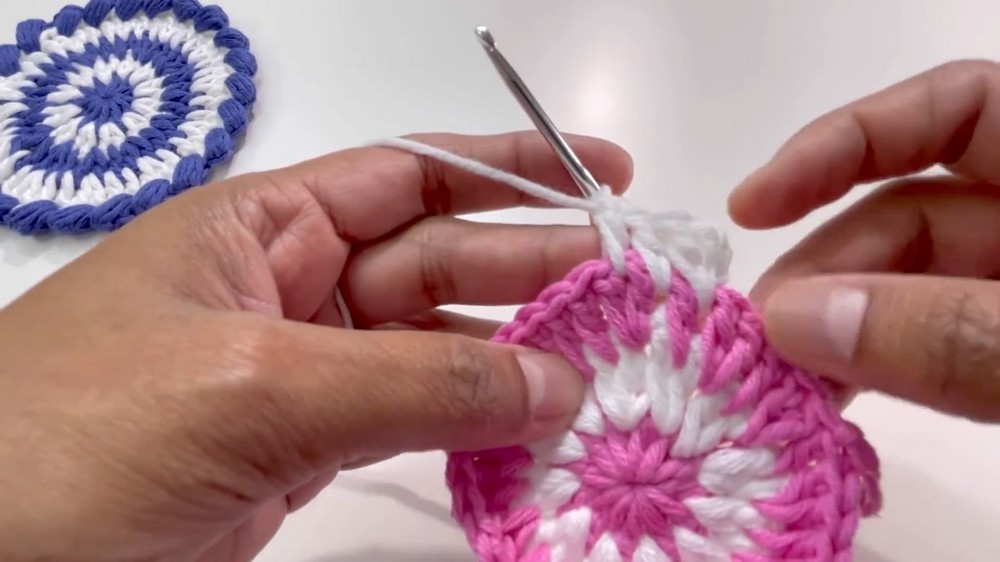
Round 4: Color B (Increase to 48 Double Crochets)
- Pick up Color B’s loop and pull through to reattach.
- Insert hook into the next space. Work 1 sc + ch 1 (first dc), then 1 dc in the same space.
- Work 1 dc in each of the next two spaces.
- Pattern Repeat: Alternate [2 dc in next space, 1 dc in next space, 1 dc in next space] around the round.
- Join: Sl st in top of second dc, then cut Color B and pull through to secure.
Stitch Count: 48 dc
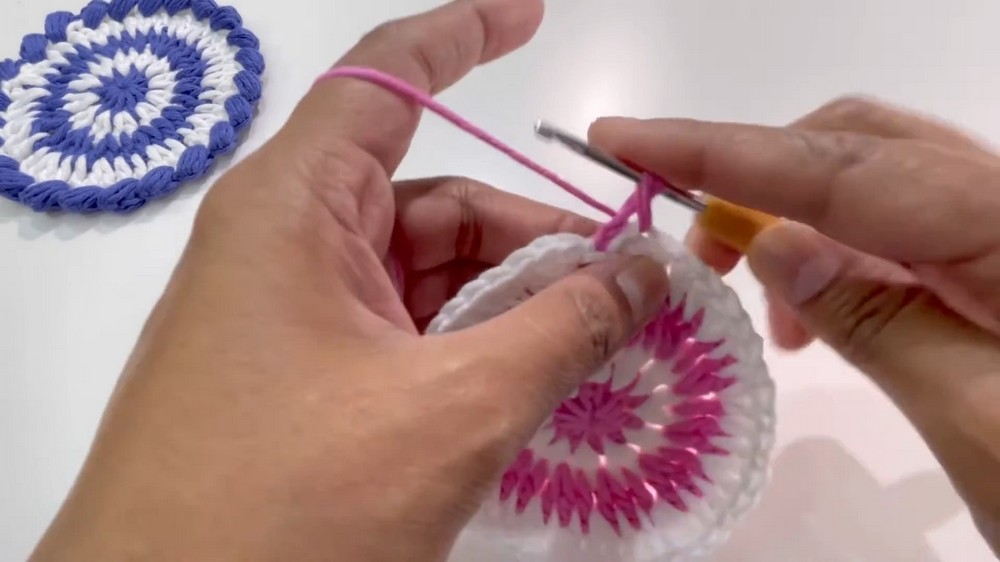
Round 5: Color A (Textured Reverse Puff Border)
Special Technique: Crochet backward (clockwise/in reverse). Work into the top loops this round.
- Pick up Color A again.
- Skip the first stitch to the right behind the hook.
- Insert hook into second stitch to the right and pull up a loop.
- Reverse Puff: Yarn over, insert hook into same stitch, pull up loop.
- Repeat 4 times (8 loops on hook). Yarn over, pull through all 8 loops, ch 2.
- Pattern Repeat: Skip 1 st to the right, work 1 Reverse Puff, ch 2 all the way around.
- Finishing Border: After last ch 2, insert hook into the base of the first Puff Stitch, sl st to join.
- Cut yarn and pull through to secure.
Stitch Count: 24 Puff stitches (each separated by ch-2 spaces).

Finishing Touches
- Turn coaster over to its wrong side.
- Using a tapestry needle, weave in all yarn ends. Be sure to secure the center ring tightly.
- Clip excess yarn.