Crochet Carrot Pattern – Easy Amigurumi Carrot Tutorial
Here’s a tiny crochet carrot with simple shaping, leafy greens, and embroidered texture, making it easy to follow for a palm-sized seasonal decoration or playful accessory.

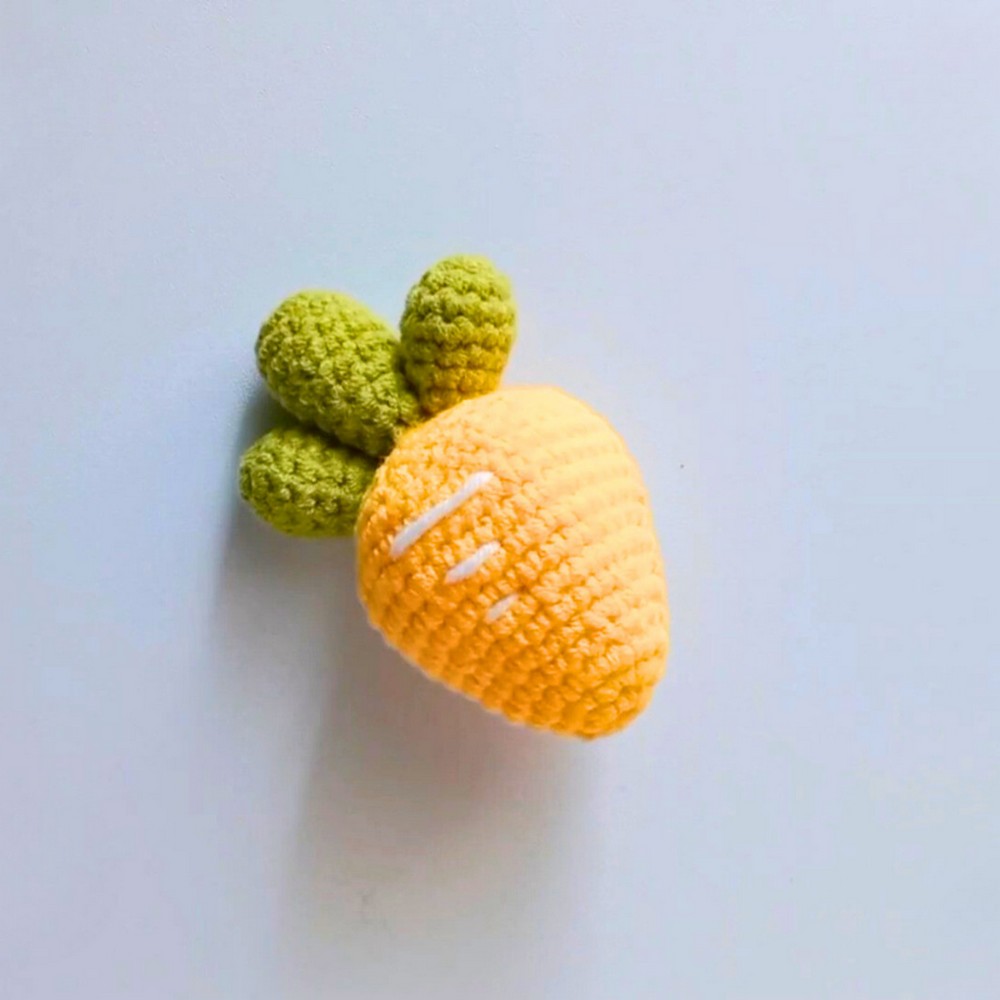
Bright orange yarn, simple rounded shaping, and a leafy green top come together in this crochet carrot for a small handmade piece that is easy to personalize. The compact size also makes it useful as seasonal decor, play food, or a cute keychain.
This crochet pattern takes you through the carrot body from its magic ring and increases to final decreases and stuffing, followed by two sizes of leaves and simple surface embroidery. You’ll also learn how to join each part neatly so finished crochet carrot keeps its recognizable shape.
Credit Cahaya Crochet
Materials & Tools
- Yarn: 5-ply milk cotton yarn in Orange, Green, and White.
- Crochet Hook: Size 5/0.
- Yarn Needle: For finishing and attaching leaves.
- Scissors: For cutting and finishing yarn.
- Polyfill/Dacron: For stuffing carrot and lightly filling leaf bases.
Finished Size & Customization
Finished carrot is approximately palm-sized, making it suitable for a small keychain, play food toy, or seasonal decoration.
For a different scale, use thinner or thicker yarn with a hook appropriate for your chosen yarn weight. You can also experiment with different shades of orange or yellow to create a softer or more unusual carrot colorway.
Pattern Abbreviations & Terminology
- R: Round
- MR: Magic Ring
- ch: Chain stitch
- sc: Single crochet
- inc: Increase – work 2 single crochets in the same stitch
- dec: Decrease – work 2 single crochets together
- sl st: Slip stitch
- st(s): Stitch(es)
- (…): Repeat instructions enclosed in parentheses for the specified number of times
Step-by-Step Crochet Pattern
Step 1: Begin the Carrot Base
Work the carrot body with Orange or Yellow Yarn, starting from the pointed base and gradually widening it through increases.
R1: Make a Magic Ring, ch 1, and work 6 sc into the ring – 6 sts
R2: (inc) x 6 – 12 sc
R3: (1 sc, inc) x 6 – 18 sc
The first three rounds establish the small starting point and begin widening the carrot.
Teaching tip: Keep the center of your Magic Ring pulled snugly so there is no large hole at the carrot’s pointed end.
Step 2: Add the First Straight Round
For R4, work 1 sc in each stitch around.
R4: 1 sc around – 18 sc
This round holds the width created by R3 before the next increase.
Keeping straight rounds between increases helps the carrot develop length rather than becoming too wide too quickly.
Step 3: Continue Widening the Carrot
Move into the next increase rounds:
R5: (1 sc, inc) x 6 – 24 sc
R6: 1 sc in each stitch around – 24 sc
R7: (3 sc, inc) x 6 – 30 sc
R8: 1 sc in each stitch around – 30 sc
R9: (2 sc, inc, 2 sc) x 6 – 36 sc
These rounds create the fuller middle section of the carrot.
Result check: The piece should now look noticeably wider than its starting point while still maintaining a rounded, carrot-like form.
Step 4: Hold the Fullest Width
Work R10-R13 with 1 sc in every stitch around.
R10-R13: 1 sc in each stitch – 36 sc per round
These even rounds maintain the carrot’s widest section before the shaping begins to narrow it again.
Work each round consistently so the sides remain smooth and the body does not become uneven.
Step 5: Start Narrowing the Carrot
Begin bringing the body inward with controlled decreases.
R14: (2 sc, dec, 2 sc) x 6 – 30 sc
R15: (3 sc, dec) x 6 – 24 sc
R16: (1 sc, dec, 1 sc) x 6 – 18 sc
Each decrease round reduces the circumference and starts forming the upper narrowing of the carrot body.
Helpful check: After R16, the opening should be noticeably smaller while the stuffed body still has enough room for the filling.
Step 6: Stuff Before the Opening Becomes Too Small
Work:
R17: (1 sc, dec) x 6 – 12 sc
At this point, firmly stuff the carrot body with polyfill or Dacron.
Add the stuffing gradually and distribute it throughout the body so the carrot remains evenly rounded.
Important: Avoid leaving the center hollow, but do not overstuff to the point where the stitches stretch and gaps appear.
Step 7: Close the Carrot Body
Complete the final decrease:
R18: (dec) x 6 – 6 sc
Fasten off, leaving a yarn tail.
Thread the tail through the front loops of the remaining 6 stitches with a yarn needle. Pull the yarn firmly to close the opening completely.
Secure the tail and hide it inside the finished carrot.
Finish check: The top opening should be closed securely, with no stuffing visible and no loose tail showing on the outside.
Step 8: Make the Two Large Leaves
Use Green Yarn to make 2 large leaves.
Start each leaf with:
R1: MR, ch 1, 6 sc – 6 sts
R2: (inc) x 6 – 12 sc
R3–R6: 1 sc in each stitch around – 12 sc per round
R7: (2 sc, dec) x 3 – 9 sc
R8: 1 sc in each stitch around – 9 sc
R9: (1 sc, dec) x 3 – 6 sc
Finish with a slip stitch, fasten off, and leave a long tail for sewing.
Lightly stuff the base of each leaf.
Teaching point: Only lightly fill the leaf base. Too much stuffing can make the leafy top look bulky when several leaves are grouped together.
Step 9: Shape the Two Small Leaves
Make 2 smaller leaves with Green Yarn.
R1: MR, ch 1, 6 sc – 6 sts
R2: (inc) x 6 – 12 sc
R3–R4: 1 sc in each stitch around – 12 sc per round
R5: (2 sc, dec) x 3 – 9 sc
R6: 1 sc in each stitch around – 9 sc
R7: (1 sc, dec) x 3, then sl st – 6 sc
Fasten off and leave a long tail for assembly.
Lightly stuff each leaf before setting it aside.
Result check: You should now have four green pieces: two longer leaves and two shorter ones. Keeping their sizes distinct will give the carrot top more natural variation.
Step 10: Arrange the Leafy Top
Bring the four green pieces together at the top center of the carrot body.
Arrange the two large leaves and two small leaves tightly together so their bases form one compact leafy crown.
Before sewing, check the arrangement from the front and adjust the leaves if needed. The larger leaves should provide the main height while the smaller leaves fill the center.
Step 11: Secure the Leaves to the Carrot
Use the long green yarn tails and a yarn needle to attach the leafy group.
Whipstitch the bases securely to the top perimeter of the carrot body.
Work through the bases rather than pulling the yarn through the visible leafy sections. This keeps the stitches discreet and helps the leaves stay upright.
Once the attachment feels secure, weave in and hide the remaining yarn ends.
Step 12: Add Carrot Texture with Embroidery
For the final surface detail, thread the yarn needle with White Yarn.
Work staggered horizontal dashed lines across the front of the orange carrot body.
These short lines imitate the natural surface markings found on a real carrot.
Helpful tip: Keep the dashes slightly staggered instead of placing them in perfectly straight rows. This gives the surface a more natural appearance while keeping the embroidery simple.
Secure the white yarn and neatly weave the remaining end inside the amigurumi.
Step 13: Check the Finished Carrot
Give the completed piece a final check before using it.
The carrot body should remain firmly stuffed and smoothly closed, four green leaves should be securely attached at the top, and white embroidered dashes should remain visible across the front without loose ends.

The finished crochet carrot is ready to use as a palm-sized decoration, play food piece, or small keychain accessory.