
Crochet Bunny Easter Egg Bag Tutorial for Beginners
Here you’ll find a beginner-friendly crochet bunny bag with an Easter-ready shape, textured ruffle, bunny hat, floppy ears, red bow, and simple finishing details.
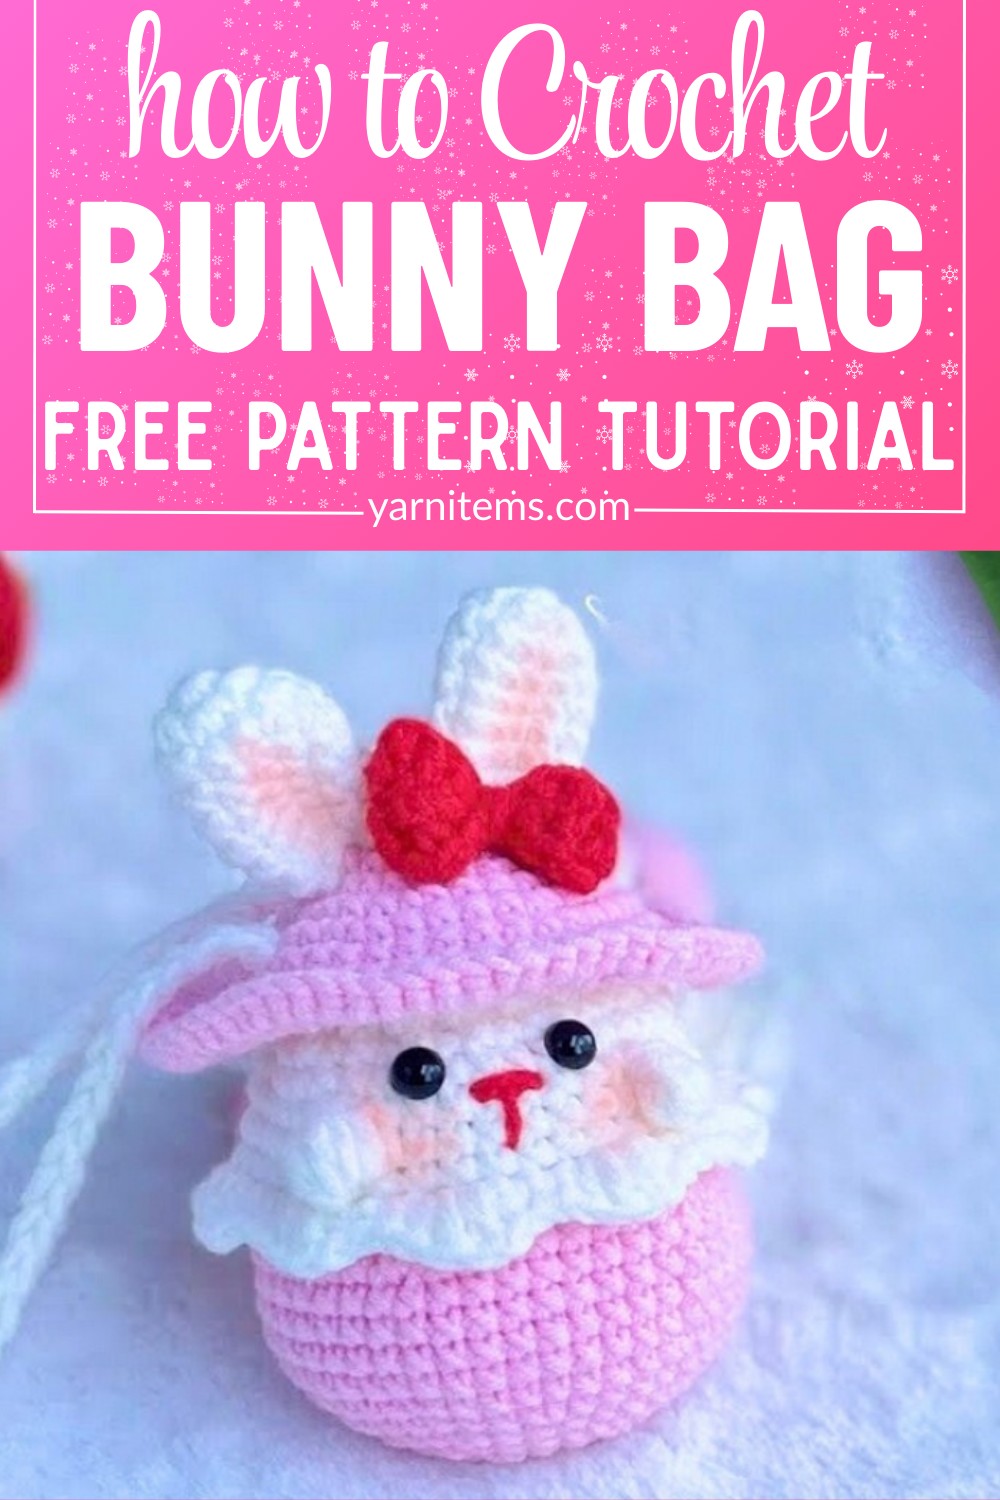
Easter treats need something more special than plain packaging, and this crochet bunny bag turns small eggs and trinkets into part of the decoration. Its compact shape and simple color changes make crochet approachable while giving beginners useful shaping practice.
This crochet tutorial walks through bag construction, white textured detailing, ruffle work, bunny hat shaping, ears, red bow, handle, and facial features. Each stage explains what to make and what to check before moving forward. Let’s get started.
Credit Crochet Anywhere
Materials & Tools
- Yarn: 4-ply baby yarn in pink, white, and red
- Crochet Hook: 2.5 mm
- Tapestry Needle: For sewing and weaving in ends
- Scissors
- Glue Gun or Fabric Glue
- Safety Eyes or Small Black Beads
- Pink Blush or Fabric Paint: For cheeks
- Stitch Markers: Optional
Finished Size & Customization
Finished bag is compact and lightweight, making it suitable for Easter eggs, small treats, or little trinkets.
For color variation, replace pink with pastel blue, mint green, or yellow. Adjusting starting chain length changes shoulder strap length, which can make bag more suitable for different child heights.
For very young children, embroidered facial features can replace beads or safety eyes.
Pattern Abbreviations
- ch: Chain
- sc: Single crochet
- inc: Increase – 2 sc in same stitch
- dec: Decrease – 2 sc worked together
- hdc: Half double crochet
- dc: Double crochet
- sl st: Slip stitch
- BLO: Back Loop Only
- FLO: Front Loop Only
- [ ]: Stitch count at end of round or row

Step-by-Step Crochet Instructions
Step 1: Build the Pink Bag Base
Using pink yarn, begin with Magic Ring.
- Round 1: Ch 1, work 6 sc into ring. Join with sl st. [6 sts]
- Round 2: Ch 1, work 1 inc in each stitch around. Join with sl st. [12 sts]
- Round 3: Ch 1, work (1 sc, 1 inc) 6 times. Join with sl st. [18 sts]
- Round 4: Ch 1, work (1 sc, 1 inc, 1 sc) 6 times. Join with sl st. [24 sts]
- Round 5: Ch 1, work (3 sc, 1 inc) 6 times. Join with sl st. [30 sts]
These increases gradually widen bag base. Keep each increase positioned correctly so finished base develops evenly rather than becoming lopsided.
Step 2: Continue Expanding Bag Shape
Continue pink section with:
- Round 6: Ch 1, work (5 sc, 1 inc) 5 times. Join with sl st. [35 sts]
- Round 7: Ch 1, work (3 sc, 1 inc, 3 sc) 5 times. Join with sl st. [40 sts]
- Round 8: Ch 1, work (7 sc, 1 inc) 5 times. Join with sl st. [45 sts]
At this point, increasing section has created wider base needed for small Easter bag.
Check your work: Count should reach 45 stitches after Round 8. Correct stitch count now makes following straight rounds easier to maintain.
Step 3: Raise Bag Walls
For Rounds 9-12, ch 1 and work 1 sc in every stitch around. Join with sl st after each round.
Keep 45 sts in every round.
Unlike earlier rounds, no increases are added here. These straight rounds build height while preserving bag width.
Step 4: Shape Upper Pink Section
For Round 13, ch 1 and work: 6 sc, 1 dec, (7 sc, 1 dec) × 4, 1 sc.
Join with sl st. [40 sts]
Then work Round 14 with 1 sc in every stitch around. Join with sl st. [40 sts]
Decrease round brings upper edge inward slightly, preparing body for white decorative section.
Step 5: Change to White Yarn
Change to white yarn for Round 15.
Ch 1 and work 1 sc in every stitch around. Join with sl st. [40 sts]
Keep tension even around color-change point so white section begins cleanly without pulling pink portion out of shape.
Step 6: Create Front Loops for Ruffle
For Round 16, work 40 sc in BLO.
Join with sl st. [40 sts]
Working through back loops leaves front loops visible on surface. These unused loops will later become attachment points for ruffled trim.
Important check: Do not accidentally work through both loops during this round. Exposed front loops are needed for next decorative stage.
Step 7: Form Textured White Bobble Section
For Round 17, ch 1 and work: 15 sc, (ch 1, Front Loop Bobble Stitch) × 6, 8 sc, (ch 1, Front Loop Bobble Stitch) × 6, 15 sc.
Join with sl st. [40 sts]
For Round 18, ch 1 and work 1 sc in every stitch around to anchor textured bobble ruffles. Join with sl st. [40 sts]
The bobble sections create raised texture across upper bag rather than leaving white portion visually flat.
Step 8: Finish Upper Bag Edge
Work Rounds 19–20 with 1 sc in every stitch around. Join with sl st after each round. [40 sts per round]
For Round 21, ch 2 and alternate: (FPDC, BPDC) × 20 around bag.
Ch 1, fasten off, and weave in ends. [40 sts]
Post stitches add structured ribbing along upper edge and give finished rim more definition.
Step 9: Add Ruffled Rim
Return to unused front loops from Round 16 using white yarn.
Attach yarn to one exposed front loop and ch 1.
Work: [1 sc, (1 hdc, 1 dc), (1 dc, 1 hdc), 1 sc] into same loop.
Repeat this pattern 10 times around bag rim.
Join with sl st, fasten off, and weave in ends.
Result check: Ruffle should form visible layered waves around rim. If frill looks uneven, check whether each repeated group has been worked into its intended front loop.
Step 10: Shape Pink Bunny Hat
Using pink yarn, create Magic Ring.
Work same basic circle increase sequence through Rounds 1-5:
- R1: 6 sc [6 sts]
- R2: 6 inc [12 sts]
- R3: (1 sc, 1 inc) × 6 [18 sts]
- R4: (1 sc, 1 inc, 1 sc) × 6 [24 sts]
- R5: (3 sc, 1 inc) × 6 [30 sts]
For Round 6, ch 1 and work (2 sc, 1 inc, 2 sc) × 6. Join with sl st. [36 sts]
These increases expand hat beyond initial dome size and prepare it for wider brim.
Step 11: Complete Hat Dome
For Rounds 7-9, ch 1 and work 1 sc in every stitch around. Join with sl st after each round.
Maintain 36 sts per round.
Straight rounds stabilize dome shape before brim expansion.
Step 12: Flare Bunny Hat Brim
For Round 10, ch 1 and work 1 inc in every stitch around. Join with sl st. [72 sts]
For Round 11, ch 1 and work 1 sc in every stitch around. Ch 1 and fasten off. [72 sts]
The increase creates wide brim that can sit over upper bag body.
Step 13: Make Bunny Ears
Make 2 ears using white yarn.
For each ear:
- Round 1: Magic Ring, ch 1, 6 sc, join with sl st. [6 sts]
- Round 2: Ch 1, 1 inc in every stitch around, join with sl st. [12 sts]
- Rounds 3-8: Ch 1, 1 sc in every stitch around, joining after each round. [12 sts per round]
Fasten off after Round 8, leaving long tail for sewing.
Keep ears slightly flattened so they sit naturally against hat crown during assembly.
Step 14: Shape Red Bow
Using red yarn, chain 15 and turn.
Skip first chain, then work: 1 sc, 2 hdc, 2 dc, 1 hdc, 2 sl st, 1 hdc, 2 dc, 2 hdc, 2 sc into final end stitch.
Continue along opposite side of foundation chain: 2 hdc, 2 dc, 1 hdc, 2 sl st, 1 hdc, 2 dc, 2 hdc, 1 sc, 1 sl st to close.
Fasten off, leaving tail.
Wrap remaining yarn around bow center several times and pull gently to cinch middle into traditional bow shape.
Step 15: Make Shoulder Strap
Attach white yarn securely to inner top edge of bag.
Chain 150 chains for shoulder strap.
Adjust starting chain length if shorter or longer strap is preferred.
Anchor opposite end firmly to other side of bag rim. Fasten off and weave in ends.
Check the attachment: Both strap ends should be secured firmly at matching positions so bag hangs evenly.
Step 16: Attach Ears and Hat
Use tapestry needle and long yarn tails to sew two white ears securely onto top center of pink hat.
Position ears so they sit evenly across crown.
Next, place completed hat over upper portion of bag body.
The hat should sit neatly over bag opening without forcing body or rim out of shape.
Step 17: Add Red Bow
Position red bow at center base between bunny ears.
Sew it securely with yarn tail or use fabric glue/glue gun where appropriate.
Allow adhesive to set fully before handling finished decoration.
Step 18: Embroider Bunny Face
Using red embroidery thread, stitch small nose and mouth onto front white section of bag.
Keep facial details centered beneath eye placement.
Attach safety eyes or small black beads just above snout, using secure backing or suitable adhesive.
For toddler or infant use, embroidered eyes are preferable to loose small components.
Step 19: Add Cheek Details and Finish
Apply small amount of pink blush or fabric paint beneath each eye using small brush or cotton swab.
Keep both cheeks balanced and allow fabric paint to dry completely if used.

Finally, inspect entire bag:
- Tuck away loose yarn ends.
- Check strap attachment.
- Confirm ears are secure.
- Check bow placement.
- Make sure facial details are firmly attached.
- Confirm ruffle sits evenly around rim.
Your Bunny Easter Egg Bag is ready for Easter eggs, small treats, or seasonal decoration, with its textured white trim, bunny hat, floppy ears, red bow, and child-friendly customization options.


One Comment