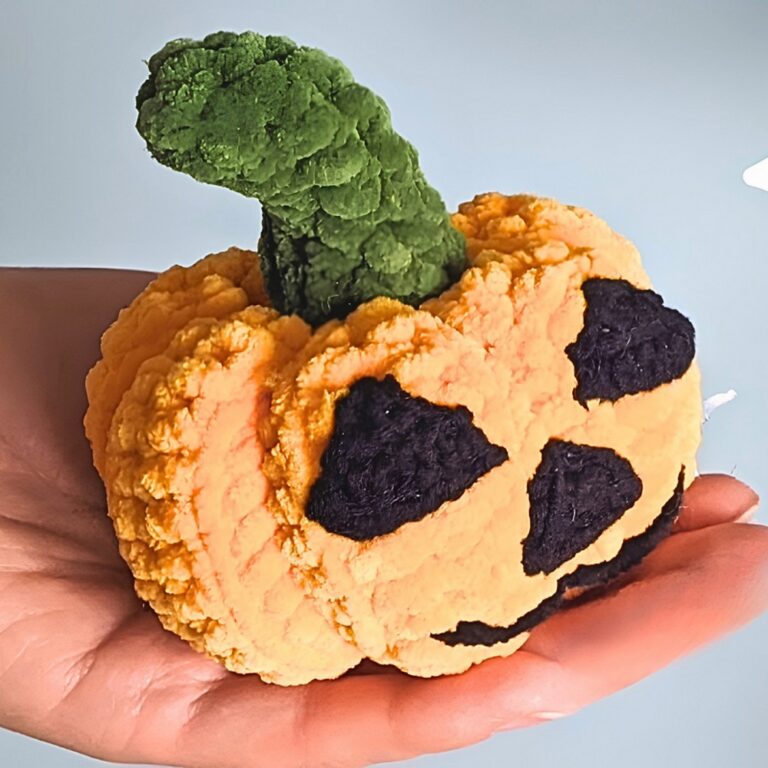
A crochet velvet pumpkin is a soft, handmade decoration perfect for fall. It’s cozy, beautiful, and fun to make. You can display it during Halloween, use it as table decor for Thanksgiving, or even make a smaller version for a keychain or gift tag. Its squishy texture and bright colors make it a wonderful way to add warmth to your space.
Crochet a Velvet Pumpkin

This pumpkin is simple to create using velvet yarn, filling, and a crochet hook. You’ll stitch it up piece by piece, gently shaping it as you go, no complicated skills needed. With just some basic single crochet and sewing, you’ll put together a unique piece that matches your style. Add a little brown stem at the top, and you’ll have a finished velvet pumpkin in no time.
Credit Diving Ducks Crochet
Materials & Tools Needed:
- Velvet Yarn: Honey Bunny from Hubie (or similar super bulky weight yarn, #6).
- Main color: Orange (or any color of your choice), approximately one skein.
- Stem color: Brown yarn, small amount.
- Crochet Hook: 6mm.
- Tapestry Needle
- Scissors
- Polyfill/Fiberfill: For stuffing the pumpkin.
Finished Size & Customization Ideas:
- Finished Size: The example pumpkin is approximately 8 cm tall.
- Customization: To make the pumpkin bigger or smaller:
- Adjust the number of chains at the start.
- Ensure the completed rectangle (before shaping) measures three times the height of the finished pumpkin.
Pattern Abbreviations & Terminology:
- ch: Chain
- sc: Single Crochet
- BLO: Back Loop Only
- sl st: Slip Stitch
- st(s): Stitch(es)
Terminology:
This pattern uses US crochet terminology.

Step-by-Step Detailed Instructions
Section 1: Base Rectangle
1. Starting the Base
- Begin with a slip knot.
- Form a loop with your yarn. Take the long end of the yarn behind the loop, wrap it around the hook, and pull through.
- Chain (ch) 16.
- Yarn over hook, pull through, repeat until you have 16 chains.
2. Row 1 (Foundation Row)
- Skip the first chain.
- Insert your hook into the second chain.
- Work 1 sc in each ch across the row.
- At the end of Row 1, you will have 15 sc.
- Chain 1 and turn your work.
3. Row 2 (BLO Single Crochet Row)
- Skip the turning chain and begin working into the back loop of the first stitch.
- Insert your hook into the back loop, yarn over, pull through, yarn over, pull through two loops on hook.
- Continue working BLO sc across the row.
- At the end of the row, ch 1 and turn your work.
4. Repeat Row 2
- Work consecutive rows of BLO sc, turning at the end of each row, until the completed rectangle measures three times the height of your finished pumpkin.
- Example: If your pumpkin is 12 cm tall, you need a rectangle that is 36 cm long.
- For the tutorial demo, this is 38 rows.

Section 2: Seaming the Rectangle
1. Whip-Stitch to Join Ends
- Cut the yarn, leaving a long tail for sewing.
- Using the tapestry needle, sew the short ends of the rectangle together with a whip stitch.
- Ensure each stitch is secured evenly.
- Weave in any loose ends.
2. Close the Top
- Turn the seamed rectangle inside out (so the seam faces inward).
- Use the remaining yarn tail to sew evenly around the top edge.
- Gently pull to gather the seam, closing the top of the pumpkin.
- Secure tightly to prevent gaps.

Section 3: Filling the Pumpkin
1. Fill the Pumpkin
- Stuff the pumpkin securely with polyfill until it is firm but not overfilled.
2. Close the Bottom
- Use the same technique as the top:
- Sew evenly around the bottom edge, pull tightly, and close the gap.
- Add more filling if necessary before completing the closure.

Section 4: Making & Attaching the Stem
1. Crochet an I-Cord
- For the stem, create a 6–7 cm long I-Cord using brown yarn.
- Double the yarn when creating the cord for extra thickness.
- If unfamiliar with an I-Cord, refer to the tutorial’s linked instruction.
2. Attach the Stem
- Place the stem in the center of the pumpkin’s top.
- Stitch the stem securely in place using a tapestry needle and orange yarn.
- Once satisfied with the placement, weave in and trim all ends.
Finishing Touches
- Inspect the pumpkin for any loose ends, and secure them.
- Adjust the filling if needed to achieve the desired shape.
Congratulations! Your Velvet Pumpkin is ready!