Free Crochet Ghost Pattern For Easy & Functional Decor
A crochet ghost is a simple way to turn a few basic stitches into a tiny handmade figure with a recognizable shape and playful details.
This pattern guides you through creating a soft ghost with a rounded body, flowing edges, and a neat finish that works beautifully for seasonal décor, small gifts, or fun everyday displays. Keep reading to see how this little crochet ghost is built step by step and how simple stitches create its final look.
Crochet Adorable Ghost Pattern

This crochet ghost pattern uses an easy construction method that allows each section to come together smoothly. From shaping the body to adding the small features that bring the ghost to life, the tutorial explains every stage in a clear way without complicated techniques. Follow along to create your own adorable ghost and enjoy watching a simple yarn piece transform into a unique handmade crochet piece.
Credit Nhi Art Handmade – Lem’n Do
Materials & Tools Needed
- Yarn: Cotton milk yarn (125 g thickness weight) in:
- White (for the ghost body, hands, and eye backings)
- Bright green (for the alien hat, antenna, and ears)
- Crochet Hook: Size 3/0 (2.20 mm)
- Eyes:
- 5 mm black safety eyes or beads:
- 2 for the ghost body
- 3 for the alien hat
- 5 mm black safety eyes or beads:
- Other Tools:
- Stitch markers
- Embroidery/tapestry needles
- Black embroidery thread (for mouth)
- Red embroidery thread (optional alien mouth detail)
- Fiberfill stuffing
- Blush or makeup (optional, for cheeks)
Finished Size & Customization Ideas
- Finished Size: Approximately 2.5–3 inches tall (depends on personal tension and exact yarn).
- Customization Ideas:
- Change the hat color (e.g., orange for pumpkin, purple for wizard).
- Add a keychain loop or small chain at the top of the hat to make it a:
- Bag charm
- Keychain
- Zipper pull
- Embroider different expressions (happy, sleepy, surprised).
Pattern Abbreviations & Terminology
- MR – Magic Ring
- ch – Chain
- sc – Single Crochet
- inc – Increase (2 sc in the same stitch)
- T – Half Double Crochet (HDC)
- F – Double Crochet (DC)
- TR – Treble (Triple) Crochet
- sl st – Slip Stitch
All rounds are worked in the round, unless otherwise noted.

Step-by-Step Detailed Crochet Instructions
1. Ghost Body (White Yarn)
Round 1:
MR, work 6 sc into the ring.
Tighten the ring.
• Stitch count: [6]
Round 2:
Work 1 inc in each stitch around (2 sc in each st).
• 6 inc → [12]
Round 3:
(1 sc, 1 inc) Repeat 6 times.
• (1 + 2) × 6 = [18]
Round 4:
(2 sc, 1 inc) Repeat 6 times.
• (2 + 2) × 6 = [24]

Rounds 5–9:
sc in each stitch around.
• Each round: [24]
Face Placement & Stuffing:
- Insert two 5 mm safety eyes between Rounds 7 and 8, spaced about 3–4 stitches apart.
- With black embroidery thread, embroider a small mouth between the eyes.
- Begin stuffing with fiberfill; add more as you go so the body is firm but not overstuffed.
Round 10:
(3 sc, 1 inc) Repeat 6 times.
• (3 + 2) × 6 = [30]
Round 11:
(4 sc, 1 inc) Repeat 6 times.
• (4 + 2) × 6 = [36]
Round 12:
(5 sc, 1 inc) repeat 6 times.
• (5 + 2) × 6 = [42]
Be sure the body is fully stuffed before working the wavy edge.
Round 13 – Wavy Bottom Edge:
Repeat the following sequence 7 times around:
- In one stitch, work:
- 1 sc
- 1 T (HDC)
- 1 F (DC)
- 1 T (HDC)
- 1 sc
(All 5 stitches go into the same base stitch to make a “wave”.)
- Then in the next stitch, work 1 sl st.
- ch 1.
After completing this combination 7 times:
- Join with a sl st to the first sc of the round (or to the first wave group).
- Tie off the yarn.
- Weave in all loose ends with a tapestry needle.

2. Alien Hat (Green Yarn)
Round 1:
MR, work 8 sc into the ring.
Tighten the ring.
• Stitch count: [8]
Round 2:
Work 1 inc in each stitch around.
• 8 inc → [16]
Round 3:
(1 sc, 1 inc) Repeat 8 times → [23]
(Note: The count is intentionally 23 stitches to match the tutorial exactly.)
Rounds 4–5:
sc in each stitch around.
• Each round: [23]
Round 6 – Ruffle Rim:
Work the following sequence around the hat:
- 4 sc
- 1 T
- 1 F
- 2 TR
- 1 F
- 1 T
- 4 sc
- 1 T
- 1 F
- 2 TR
- 1 F
- 1 T
- 4 sc
(This creates a wavy/ruffled brim around the hat.)
- Fasten off.
- Leave a long tail for sewing the hat to the ghost’s head.

3. Hat Antenna (Green Yarn)
- ch 5.
- Turn; skip the first chain from the hook.
- In the 2nd ch from the hook: 1 sc.
- In the remaining 3 chains: 3 sl st (one in each chain).
- Fasten off, leaving a tail for sewing.
Assembly for Antenna:
- Sew the antenna to the top center of the green hat using the yarn tail.
- Weave in any excess ends on the inside of the hat.

4. Hat Ears (Green Yarn – Make 2)
For each ear:
- Make an MR.
- In the magic ring, work:
- 2 sc
- 1 T (HDC)
- ch 2
- 1 T (HDC)
- 2 sc
- 1 sl st
- Pull the MR tight to form a small pointed ear.
Fasten off, leaving a tail for sewing.
Assembly for Ears:
- Position each ear on the sides of the alien hat (slightly above the midpoint of the hat).
- Sew securely with the yarn tail.
- Weave in any ends on the inside.

5. Ghost Hands (White Yarn – Make 2)
Round 1:
MR, work 5 sc into the ring.
Tighten the ring.
• Stitch count: [5]
Round 2:
(1 sc, 1 inc) Repeat 2 times, then 1 more sc.
- (1 sc, 1 inc) × 2 = 4 + 2 = 6
- Plus 1 sc = [7]
Round 3:
sc in each stitch around.
• Stitch count: [7]
- sl st to finish.
- Fasten off, leaving a tail for sewing.

Assembly for Hands:
- Lightly stuff if desired (optional; they can be left flat).
- Sew the arms to the sides of the ghost body, around the midsection, or slightly below the eyes.
- Secure well and weave in ends.
6. White Eye Backings for the Hat (White Yarn – Make 3)
For each eye backing:
- MR.
- Work 4 sc into the ring → [4].
- Tighten the ring.
- sl st to the first sc to close the round.
- Fasten off, leaving a short tail for sewing (or a longer one if you prefer sewing with the same yarn).
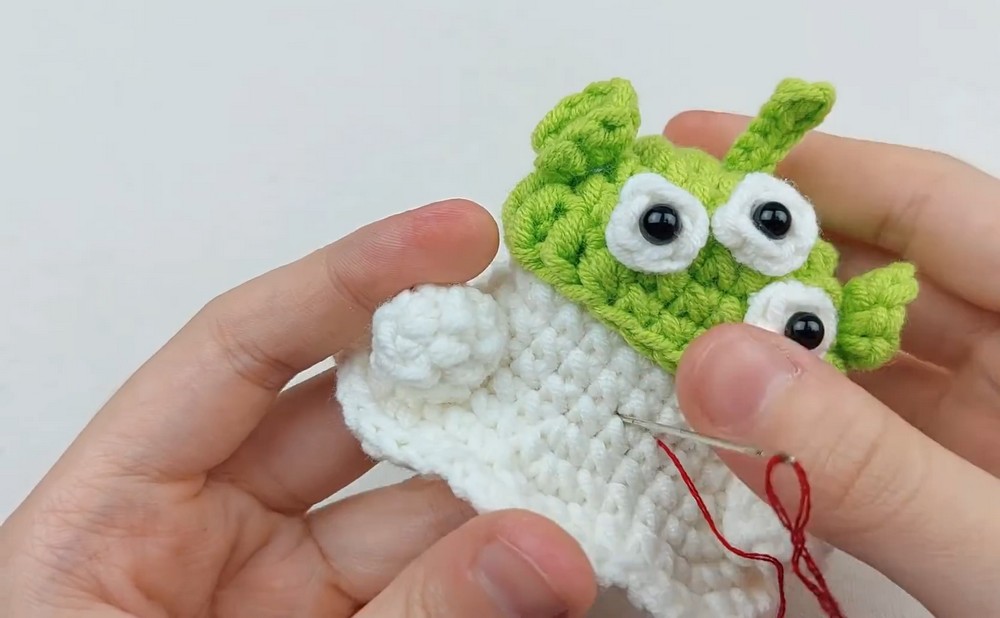
Assembly for Alien Hat Eyes:
- Insert a 5 mm black safety eye or bead through the center of each white backing.
- Arrange all three eyes at the front of the green hat in a line or triangle formation (whichever matches the look you want).
- Sew the white circles onto the hat.
- Secure and weave in ends on the inside.
Assembly & Finishing
- Attach the Hat:
- Place the finished green alien hat on the ghost’s head.
- Position it slightly tilted back so the ghost’s own eyes are fully visible.
- Sew around the edge of the hat using the green yarn tail.
- Secure firmly so it doesn’t wobble.
- Alien Face Details (Optional):
- With red embroidery thread, add a tiny diagonal or curved stitch under the middle eye on the hat to create a simple smile or alien expression.
- You can also use black thread for additional lines if desired.
- Cheeks (Optional):
- Apply a small dab of blush or makeup under the ghost’s eyes using a cotton swab or fingertip.
- Blend lightly for a soft, rosy cheek effect.
- Keychain Option (Optional):
- Before fully closing the hat or after assembly, sew in a small metal keychain ring or add a chain loop at the top of the antenna.
- Reinforce with extra stitches.